Total Rebuild Help

Woodonglass

Supreme Mariner
Joined
Dec 29, 2009
Messages
25,926
Re: Total Rebuild Help

Not sure I qualify as an Expert but I'll give it a shot at answering your questions...

1. The transom did warp about 1/2 inch despite my efforts to keep it from doing so. Is this ok or will it cause problems?

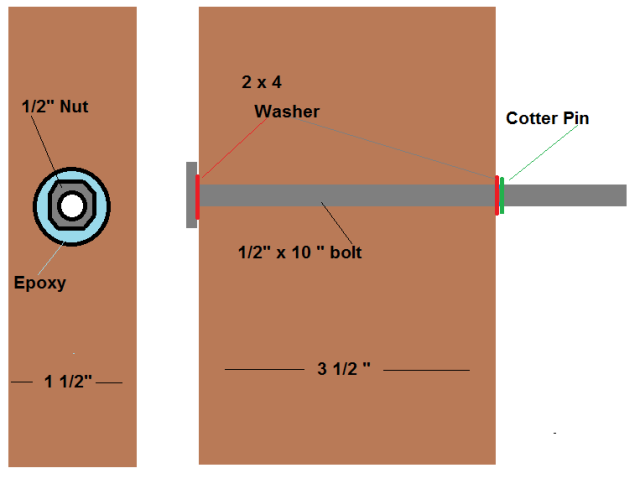
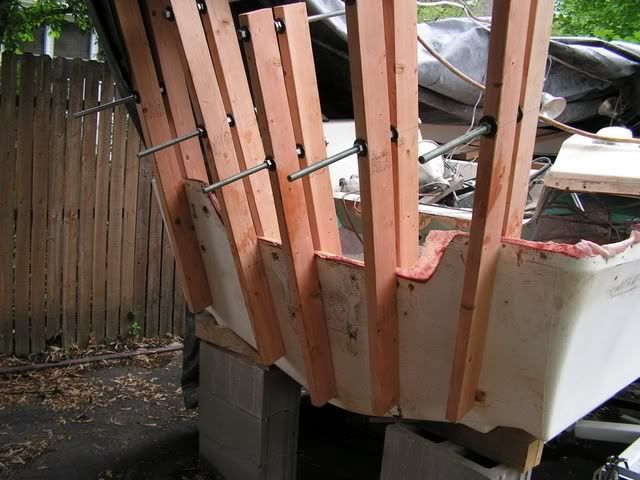
Warpage is not good but 1/2" is prolly not a show stopper. R U going to be using clamps like I have illustrated on my site?

2. I plan on removing the screws and filling the holes with PB before covering in CSM. Is this the right course of action?
Either fill em or drill em out to 1" holes and let the PB ooze thru when you clamp it home on install. This gives it more of a Mechanical bond to the hull. See the first link in my signature below.

3. It will be about 67 degrees tomorrow. How long will I need to let the first layer of CSM I apply on the transom sit before I can flip it over and do the other side? If you use 1.5% MEKP you'll have about 20 mins before it starts to set up. I wait another 20 mins and then flip it.

4. After installing the transom, how long should I wait between layups when glassing it to the hull with CSM tabs and full sheets of 1708? Same as above. Don't forget to fillet the edges and bottom with PB
 

jbcurt00

Moderator
Staff member
Joined
Oct 25, 2011
Messages
24,996
Re: Total Rebuild Help

You can run 3 drywall screws thru a scrap of plywood, making 3 screw point prongs to support the still slightly tacky transom for CSM & resin application to the 2nd side. Just be sure to have the points spread out enough to support the weight & span of the transom plywood, to make it less tippy while you're working on it flipped. Helps when you're pulling & tugging the CSM down over the edges to have it lifted off the work surface......
 

SSOWDERS

Seaman
Joined
Sep 21, 2012
Messages
52
Re: Total Rebuild Help

Thanks once again for the advice!

I do plan on using 5 of the clamps once I figure out exactly how to make and use them. Have to get the supply list together for making them. It has warmed up nicely this morning and I am heading out to fill the screw holes in the new transom with PB. Then a little sanding and final fit just to be sure I have it right. Hopefully I will get it covered with a layer of CSM as well.
 

SSOWDERS

Seaman
Joined
Sep 21, 2012
Messages
52
Re: Total Rebuild Help

Ok. A little update here.
Sanding and "final fit" took much longer than expected. A special note....when clamping plywood together with Titebond III make sure you clean up all excess really well. Sanding off the excess takes forever especially when you forget to check the bottom side after clamping. Lesson learned.

So, everything is all cleaned up and edges of transom are rounded off. I am now to the point where I will fill the screw holes with PB. How long would you suggest I let the PB set before coating the transom with 2 coats of resin on each side and the edges? I would presume it would still be the same 20 minutes or so. However, I will probably have to sand the PB filling down flush before laying the glass, so should I wait longer? I then plan on waiting 20 minutes between resin coats and another 20 for the resin to tack up before laying a layer of CSM on each side. Does this ound ok?

Also, on the top edge of the transom where it is flush with the top of the hull it will be covered in a layer of CSM. Is this sufficient? I know it will be under the cap overlap when the cap is put back on and sealed with 5200. Just trying to cover all bases

Thanks again!
 

Woodonglass

Supreme Mariner
Joined
Dec 29, 2009
Messages
25,926
Re: Total Rebuild Help

You can start immediately. Fill em, then coat it with resin. Let it sit till it starts to tack then lay the 1st layer of CSM. I'd put a couple layers of CSM on the top edge of the transom.
 

SSOWDERS

Seaman
Joined
Sep 21, 2012
Messages
52
Re: Total Rebuild Help

Thanks again.

So how thick is 2 layers of CSM? I want to make sure it doesn't add too much across the top of the transom when I install. May have to trim it down a little bit once again.
 

SSOWDERS

Seaman
Joined
Sep 21, 2012
Messages
52
Re: Total Rebuild Help

Could someone please give me the order for building the woodonglass clamps. I'm having trouble picturing it. Is it bolt, washer, thru 2x4, washer, nut, nut, washer, thru 2x4, washer, nut? I have never used this type of clamp before. I have looked at the link and still confused. Forgive my "noviceness." Don't think that's a word. Anyway. I would guess that you set the bottom bolt to the thickness of the transom and skin. Then opening the top bolt applies the pressure. Any tips would help!
 

jbcurt00

Moderator
Staff member
Joined
Oct 25, 2011
Messages
24,996
Re: Total Rebuild Help

^^^ sounds about right.

Unless you have a drill press to thru drill for a cotter pin, as shown in WOG's graphic, you'll need to use nuts:
Untitled.png

transomClamps.jpg


The double nuts & washers in between the 2X's.

Tighten the bolt closest to the top of the transom until just snug, then LOOSEN the upper nuts to force the 2X's.

Until you make 1 and practice adjusting all the nuts & trying to use them as clamps, it sounds complicated. Once you start using them, it'll be more apparent when, which & how to loosen/tighten the nuts along the length of the bolt.

The nut closest to the bolt head is never loosened once tightened to just snug. It keeps that 2X & bolt fixed as 1 side of the clamp. You'll only be loosening & tightening the nuts on either side of the other 2X only. This moves the jaws open & closed.

PM WOG or another active member posting to your thread if you have any problems.

Try to thru drill the 2X's as straight, true & centered as possible.

Good luck
 

GT1000000

Rear Admiral
Joined
Jul 13, 2011
Messages
4,916
Re: Total Rebuild Help

They work like these...
819460.jpg


Prior to installing the transom, you do a couple of "rehearsals" or "practice runs" to get the hang of everything involved in doing the job...includes, but not limited to; Pre-setting the clamps to be close to their final tightened position, getting all the necessary materials pre-cut, pre-set and pre-measured...
Hopefully you will do this with an assistant who can rehearse with you...

The WoG clamps look like this in use...

I made mine with nuts/washers between the clamps, instead of the cotter pins...the cotter pin design is easier and faster to use, my version is just faster to make the actual clamps, no waiting for the epoxy to dry, etc...
Hope this helps...
 

SSOWDERS

Seaman
Joined
Sep 21, 2012
Messages
52
Re: Total Rebuild Help

Well, tried my hand at some glass today. PB for filling in screw holes went fine. First layer of CSM over transom - not so smooth. I let a coat of resin tack up and then applied the CSM. Laid resin and rolled it out. My problem came with the edges. I planned on letting the resin set up and do the edges later. Some of the resin went over the edges on the CSM. The edges didn't have a coat of resin and weren't tacky so I couldn't try to roll it over the edge and have it stick. . So, I am just letting it dry. I figure I will have to try and sand the edges tomorrow to get rid of the hardened glass that will be hanging over the edge of the transom. What is the correct way to glass the edges? Should I apply a coat of resin to the face of the transom and the edges. Let it tack. Then lay CSM over the face and the edges at the same time? Just looking for some experienced guidance. Thanks
 

SSOWDERS

Seaman
Joined
Sep 21, 2012
Messages
52
Re: Total Rebuild Help

Ok. I have the transom completelt covered in CSM. Don't think it turned out too badly considering it was my first shot at this type of thing. Still have a couple small bubbles in some spots, but I think it looks pretty good. I will post some pics soon.

I plan on over drilling the holes that the motor mount bolts go into and fill them with PB prior to installing the transom. Two areas of concern on this.

1) How much should I over drill the holes?

2) I am a little worried about ensuring that the holes line up just right with the existing bolt holes in the hull skin when I install the transom. Maybe over drilling the holes by a half inch or an inch would give some room for error. any thoughts on this?
 

Woodonglass

Supreme Mariner
Joined
Dec 29, 2009
Messages
25,926
Re: Total Rebuild Help

Don't pre-drill em. Tape over the outer skin holes with Packing tape. When you install the transom the PB will fill the existing holes in the skin and the tape will make it smooth. Once it's set up, you can then re drilll the holes oversized and fill with PB and ensure Perfect alignment. 1/2" should be sufficient.
 

SSOWDERS

Seaman
Joined
Sep 21, 2012
Messages
52
Re: Total Rebuild Help

Sounds good. I was just worried about the hull skin. If the PB will take care of it after over drilling then that's what I will do.
 
Top