Steam Launch parts acquired

seikeinlemming

Petty Officer 2nd Class" & 2020 Splash of the Year
Joined
May 23, 2011
Messages
140
Home stretch here we come!

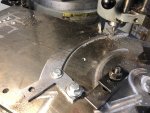
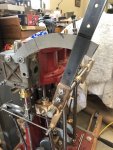
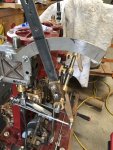
This is the final piece we needed to make for the engine. The first picture you can see it in the milling machine making the last cut. The other photos are of it mounted on the engine. We will cut 2 notches into the top where you see the sharpie marks. This handle controls forward and reverse and the sharpie lines mark the stopping location for each direction. Once these notches are in place, a spring-loaded pin will stick down into it to hold the engine in gear. Weather permitting, we are planning to fire up the boiler and run on both cylinders on Sunday. Hopefully I'll be posting a video Sunday evening of the engine running!

There are still some small things like lubrication reservoirs to be built, but they don't matter for the short running periods we are doing to test everything.
 

Attachments

  • photo331141.jpg
    photo331141.jpg
    303 KB · Views: 5
  • photo331142.jpg
    photo331142.jpg
    405.9 KB · Views: 5
  • photo331143.jpg
    photo331143.jpg
    448.9 KB · Views: 5

seikeinlemming

Petty Officer 2nd Class" & 2020 Splash of the Year
Joined
May 23, 2011
Messages
140
Moment of truth! Success with a capital 'S'. Below is a link to the video of it running on both cylinders. We couldn't have asked for a better first run, everything turned over and ran flawlessly. We were able to get a very good idea of a few more of the specifics:

- Filling the boiler almost full of water and not replenishing anything, we were able to run for 1 hour until the water dropped to 1/4 of the gauge. We could have kept running longer, but that was the point we decided to shut everything down. In the end this will be a closed loop where the cooled steam will find its way back to the boiler to be reused. For now it just exhausts into the air.

- Once the boiler got up to pressure and we were keeping the fire going, about every 15 minutes we put a log in it approx 15" by 3" thick. This allowed us to keep enough pressure up to run the engine continuously. This is important because if you overheat your water and generate too much steam, you lose steam out of the closed loop through the safety valve.

- We were able to run the engine continuously on as low as 60psi. This is pretty nice. You will see that the engine runs very smoothly at very low speed. Once there is the weight of a propellor as well as the resistance of water, we will likely need to run the engine faster to move the boat, but we'll only know how much once everything is in the water.

- How fast does it go? I can't tell you - we didn't max it out because we didn't want to push the engine too far.

Here you go!

https://youtu.be/KZH9x_2zXdw
 

sphelps

Supreme Mariner
Joined
Nov 16, 2011
Messages
11,462
Awesome ! Can’t wait to see it chugging down the river !
Are you going to have to fabricate any parts that would normally wear out And have to replace after a certain time of use ?
 

seikeinlemming

Petty Officer 2nd Class" & 2020 Splash of the Year
Joined
May 23, 2011
Messages
140
Sphelps- as with any moving thing, wear is inevitable. We have built shims in at most wear locations. This allows us to remove shims as things wear and re-bore a hole if absolutely necessary. It will greatly reduce the need to fabricate a completely new piece.

Essentially, in the building process we’ve left more material on so we can remove it over time to keep everything running true.
 

AShipShow

Lieutenant Commander
Joined
Jul 8, 2016
Messages
1,792
Thats one of the coolest things I've seen on this forum! Keep it up, can't wait to see more!
 

GA_Boater

Honorary Moderator Emeritus
Joined
May 24, 2011
Messages
49,038
Oh boy! All the bells and whistles.

Wait - No bells and whistles. Must be on the pre-launch punchlist. :D

Still one of the coolest builds. Or hottest build!
 

seikeinlemming

Petty Officer 2nd Class" & 2020 Splash of the Year
Joined
May 23, 2011
Messages
140
GA_Boater - You got that right! I figured the whistle was in the previous video and we didn't want to waste a whole bunch of steam with no way to refill the water while hot. Once we get on the water the whistle will be in the video for sure.

The pre-launch punch list gets shorter each week. We'll keep chugging through it and get pictures and videos up as fast as I can!
 

GA_Boater

Honorary Moderator Emeritus
Joined
May 24, 2011
Messages
49,038
I heard the whistle in that video, but what's wrong with one more time? :smile:

Just keep in mind that if you're stopped for a safety check, I'm not sure if saying wait for steam to build up will get you off the hook. :lol:
 

seikeinlemming

Petty Officer 2nd Class" & 2020 Splash of the Year
Joined
May 23, 2011
Messages
140
GA_Boater - I always carry a back up air horn on any vessel of mine regardless of the primary sound producing device, but maybe I'll have to use that line before revealing I have a backup. "uhhhh - you're gonna have to wait for steam to build". They would probably tell me it is a bit like having an air horn on the boat with no air...

Just for you, here's the video of the whistle this time around. You will see it being blown while the engine is running. There is a bit too much steam coming out which causes it to not sound as nice as normal. This can be adjusted with the valve that is shut off at the end of the video.

https://www.youtube.com/watch?v=XEKXc-z6ong&feature=youtu.be
 

Scott Danforth

Grumpy Vintage Moderator still playing with boats
Staff member
Joined
Jul 23, 2011
Messages
49,574
Word of caution.... The canned compressed air cans for the hand held air horns will blow up in florida sun. They blow the pre-scored safety flap on the bottom
 

GA_Boater

Honorary Moderator Emeritus
Joined
May 24, 2011
Messages
49,038
There's the whistle. Might be a little too steamy, but still rates a :thumb: and a thanks.
 

seikeinlemming

Petty Officer 2nd Class" & 2020 Splash of the Year
Joined
May 23, 2011
Messages
140
Not too many updates but we keep moving forward. Small things like building the thrust bearing to protect the steam engine from damage to the propeller, as well as cutting the drive shaft to length are done or close to completion. Also a few prerequisites for other larger parts like drawers to hold the electrical switches that need to be done so that we can build the steering wheel column.

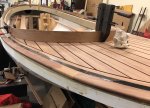
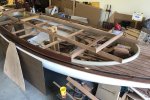
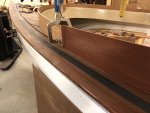
Photos below are the mahogany being applied to the cockpit coaming. The first photo shows dry fitting the wood and testing that the curvature matches the deck. Photo #2 is part of the coaming that has been attached (stained vertical wood) and how the front wraps around and mates with it (unstained part with clamp). The deck hardware to hold the canopy up will attach at the joints of this wood, and grain has been selected to look as though it continues through these joints. This will make the finished product look like it is one solid band of wood that runs around the entire cockpit. The unstained fore and aft pieces started getting stain today, so in the upcoming days they should be ready to be permanently affixed to the boat.

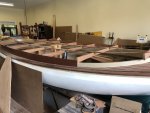
Photo 3 starts the structure for the canopy on top. In order to match the exact curvature of the boat, we are building the coaming and canopy together. The canopy frame has been rough-cut and located approximately where they will finally be. You will see that there is quite a bit of coaming sticking up above the cockpit edge. We will build the canopy right on top of the coaming and then cut the two apart and the canopy will match the contour of the boat exactly. A few layers of mahogany will be laminated together to give strength to the outside ring of the canopy.

Aside from this, last week I ordered the trailer, LoadRite tandem axle with all four wheels having brakes. We have about a 5 week wait time yet on that, so around the end of August we should be able to slide everything on wheels.
 

Attachments

  • photo335940.jpg
    photo335940.jpg
    855.7 KB · Views: 3
  • photo335941.jpg
    photo335941.jpg
    925.4 KB · Views: 3
  • photo335942.jpg
    photo335942.jpg
    807.3 KB · Views: 3

GA_Boater

Honorary Moderator Emeritus
Joined
May 24, 2011
Messages
49,038
Excellent work! Ordering a trailer is a good sign a splash is in the offing. :D
 

seikeinlemming

Petty Officer 2nd Class" & 2020 Splash of the Year
Joined
May 23, 2011
Messages
140
Quick Update: I revised the canopy design a tiny bit to make it easier and lighter to build. All the crossbars have been notched for the lengthwise supports as well as received a curve cut in the bottom that is for cosmetic purposes. photo 2 shows the lengthwise wood in place and ready to get laminated in. Everything for the canopy frame is now cut and it is just a matter of how fast we can get it put together with epoxy.

You will also see in the second photo how the canopy follows the curve of the cockpit front to back. This is why we built it right on top of the coaming. We are able to duplicate that exact curve and then just cut it off and add the 6 support poles. Hopefully in the next week this should be fastened together.
 

Attachments

  • photo336072.jpg
    photo336072.jpg
    681.5 KB · Views: 1
  • photo336073.jpg
    photo336073.jpg
    633 KB · Views: 1

archbuilder

Vice Admiral
Joined
Sep 12, 2009
Messages
5,697
As usual you have done very nice work sir! You keep stirring up my itch to build a wood boat....I was actually looking at Glen-L builds the other night. I need another boat like I need a hole in the head lol! I am going to suppress the itch and keep following your thread! Keep up the excellent work and looking forward to your next update!
 
Top