Steam Launch parts acquired

seikeinlemming

Petty Officer 2nd Class" & 2020 Splash of the Year
Joined
May 23, 2011
Messages
140
Alright - substantial progress has been made since Thanksgiving when we fired up the boiler for the first time. Stay at home orders are great for getting huge projects like this done.

All the bench seat supports were designed with levelers on top so the benches do not rock (or warp) when you sit on them. Most of those levelers have been fastened into place and I am pleased with the lack of movement from the benches here.

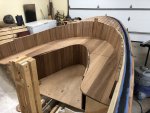
Photo 1 shows the aft bench seat with backrest pieces rough cut. They will be tongue in groove with some roundover similar to the bottom.

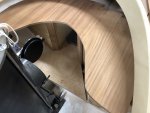
Photo 2 shows the fore bench which has had the curve rough-cut. These may get slightly smaller yet, as we finalize how much clearance is necessary for things. You will see the firebox door is open in the photo, The seat was partially designed around making this door not hit the woodwork when open. That would wear through the finish VERY fast.

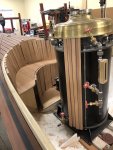
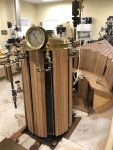
Photo 3 shows the boiler jacket slats with the fore bench backrest and bottom rough cut. The boiler slats will eventually wrap the entire way around the boiler with holes where all the pipes come out.

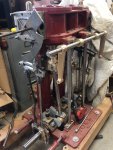
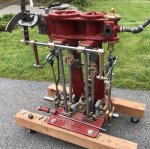
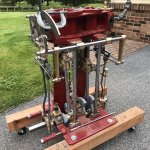
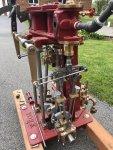
The engine continues to make progress as well. Finishing out the reversing lever on it , so we can control putting the boat in forward and reverse. A few other small parts of it have been finished as we work towards having it run on both cylinders.

With unknown days of shop time ahead for me, who knows how much I can get done in the next few weeks - I'm betting it will be quite a bit.
 

Attachments

  • photo327378.jpg
    photo327378.jpg
    225.5 KB · Views: 3
  • photo327379.jpg
    photo327379.jpg
    223.1 KB · Views: 3
  • photo327380.jpg
    photo327380.jpg
    412.5 KB · Views: 3
Last edited:

archbuilder

Vice Admiral
Joined
Sep 12, 2009
Messages
5,697
Beautiful work, thanks for sharing it and please keep us in the loop! I can't wait to see her in the water!
 

seikeinlemming

Petty Officer 2nd Class" & 2020 Splash of the Year
Joined
May 23, 2011
Messages
140
GA_Boater - Fortunately for you there are still many years ahead of progress for this boat. It will technically be out and steaming on the water soon (relatively speaking) but we will still have many additional things after that to build that are extra to make operation more efficient and nice including but not limited to: Canopy, steam-powered water pump, steam condenser, lighting and other electrical.

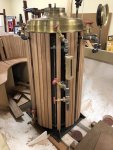
Today I got the majority of the boiler jacketing cut. You will see the pieces in place on the boiler where the full the height of the wood was unobstructed. Ultimately pieces will be cut to fit around all the pipes that come out of the boiler. We aren't 100% sure where all those will be yet so for now this is just to see what it will look like. There will be insulation between the steel of the boiler and the wood, so while this wood "jacket" will be warm, it will be much less painful if a rider brushes against it.
 

Attachments

  • photo327454.jpg
    photo327454.jpg
    318.5 KB · Views: 3
  • photo327455.jpg
    photo327455.jpg
    309.7 KB · Views: 3

GA_Boater

Honorary Moderator Emeritus
Joined
May 24, 2011
Messages
49,038
Well, you have 26 more days of forced work at home. Back on Oct. 16th, 2011, I remember a bucket of parts and a propeller and saying I was looking to seeing her steaming. I've waited this long, so what's a few more days? :D
 

oldrem

Commander
Joined
Nov 7, 2013
Messages
2,002
Really look forward to seeing your progress as you move along.
 

seikeinlemming

Petty Officer 2nd Class" & 2020 Splash of the Year
Joined
May 23, 2011
Messages
140
Steam engine update since most updates have been focused on the hull woodwork lately.

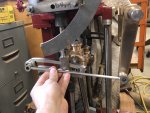
Photo 1 is the current state of the steam engine. The primary change here is the reverser bar on the right side at the top of the engine. It will be linked in as shown in the second photo.Rotating this bar slightly will allow us to put the engine in forward and reverse. There will be a handle (already made, just not pictured) that allows us to control the forward/reverse. Ignore the curved plate you see dangling on the end of the engine with a long rod coming out. It is currently out of position but will allow us to lock the directional lever in forward or reverse.

The low pressure cylinder is also reassembled (the one towards the camera). Technically It could be run as is, but we want to get the reverser system in place before doing the second test run.
 

Attachments

  • photo328778.jpg
    photo328778.jpg
    444.4 KB · Views: 3
  • photo328779.jpg
    photo328779.jpg
    222.3 KB · Views: 3

Ned L

Commander
Joined
Sep 17, 2008
Messages
2,266
Just beautiful work!

I see you mentioned a canopy in in her future. Something you might want to consider is to install some very big and long zippers in the top canvas. Long time ago a friend of ours had an original 1880's 22ft launch (basically the same boat as yours, only it had been converted to gasoline in the 1920's). He was out one day when a real blow kicked up, and the wind got under the canopy making it like an umbrella in a storm. He said the boat was pulled right over on her side and the water started pouring in over the gunwale. He had to take his pocket knife and slice the canopy all to pieces to let the wind out and keep the boat from going right to the bottom. After that he always had big zippers put in, big "U" shaped ones at each end and some straight ones.
 

seikeinlemming

Petty Officer 2nd Class" & 2020 Splash of the Year
Joined
May 23, 2011
Messages
140
Ned L - you had mentioned that a few years ago and it has stuck with me as a must-do on this boat. I’m not sure when we will start the canopy, but we will definitely be putting zippers in exactly for the reason you stated.
 

seikeinlemming

Petty Officer 2nd Class" & 2020 Splash of the Year
Joined
May 23, 2011
Messages
140
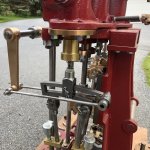
Alright - Here are the glamour shots of the engine with one piece left to create. The curved piece that is clamped to the engine is the remaining piece that needs to be finished. It will allow the reverser to be latched in forward and reverse. Technically you could hook this up to steam as is and it would run on both cylinders but we wanted to get the reversing system entirely complete before testing everything.

The parts left after this until splash are:
- Weld together the steel structure that will support the steering wheel
- Connect the engine to the propeller shaft with 2 universals
- Mount Seastar hydraulic cylinder and attach to rudder. (connect to helm base station)
- Tweak a misalignment in the skeg to the rudder.
- Slide everything on a trailer and go to the water.

I'll throw a question out there that maybe someone will have some insight on more than I've researched: When turning a rudder, at what angle does it start not working? My background research shows that beyond 35 degrees in either direction starts causing issues (total 70 degrees). This is a displacement hull if that makes any difference. Also - does the 'useful' degrees change when moving at low near-dock speeds?

Thanks in advance for any information you may have!
 

Attachments

  • photo329831.jpg
    photo329831.jpg
    352.4 KB · Views: 2
  • photo329832.jpg
    photo329832.jpg
    561.9 KB · Views: 2
  • photo329833.jpg
    photo329833.jpg
    564.1 KB · Views: 2
  • photo329834.jpg
    photo329834.jpg
    671.3 KB · Views: 2
Last edited:

archbuilder

Vice Admiral
Joined
Sep 12, 2009
Messages
5,697
Beautiful work Sir! I can't wait to see her in the water, some video would be great if you get it! That is going to be a rewarding day for you!

I'm not much help on the rudder, other than what you said seems reasonable.
 

GA_Boater

Honorary Moderator Emeritus
Joined
May 24, 2011
Messages
49,038
Not familiar with a rudder on a displacement hull, but I would guess max rudder angle is dependent on the hull design. Is there an Elliott Bay forum with real life experienced owners?

I'm so waiting to see this engine in the boat and steaming upriver. Turning the sound up to hear the steam whistle. :D
 

Grub54891

Admiral
Joined
Jun 17, 2012
Messages
6,078
On some boats that are displacement hulls, you might find that throwing it in neutral will let the rudder do its job, especially in reverse. It eliminates the prop wash. This don't hold true in all situations depending on the boat. The prop will want to pull either port or stb depending on rotation. Hope this helps ya a bit.
 

Scott Danforth

Grumpy Vintage Moderator still playing with boats
Staff member
Joined
Jul 23, 2011
Messages
49,574
here is an engineering article I found on rudder design and angles. I only had a bit of time to do a quick cursory review

your mas of 35 degrees is referenced in here with the most favorable in the +/-15 degree range. it does go into the science as to why. it is also based on the geometry of the hull, the prop and the rudder itself.

https://www.tandfonline.com/doi/full/10.1080/17445302.2016.1178205
 
Top