Starcraft 1971'? 16' to Duck Boat Rebuild

danimal045

Petty Officer 3rd Class
Joined
Feb 18, 2022
Messages
88
It doesn’t look pretty, but i cut all the ribs out with a hot knife and used some adhesive to stick em together. Finished last night. going to refit my plywood flooring and mark were i am going to have the conduit poke out for running wires before i dry fit the floor again and make sure i don’t have any high spots. After that, it’s vinyling the floor and fastening down. My steering came in yesterday and new run rail is set to be delivered from wefco todayy
 

Attachments

  • 4B874774-9A42-4761-B8CC-B022F71C96BE.jpeg
    4B874774-9A42-4761-B8CC-B022F71C96BE.jpeg
    2.1 MB · Views: 13

danimal045

Petty Officer 3rd Class
Joined
Feb 18, 2022
Messages
88
Got the rub rail put on as well as the all the caps fitted and fastened. When everything’s done I’ll do some touch ups on rivets and paint. Plywood lines up good over the foam and i don’t seem to have any high spots.

Going to pull it, give it a light sanding then Either apply the vinyl or do a layer of epoxy scuff it, then apply vinyl. I have read people doing it each way. I don’t want to half ass it and regret it, but a lot of things I’ve read have shown success with just sanding, wiping, and adhesive, i don’t know. If i do a coat of epoxy going to add a few more days until i can cover floor.

I’ve decided to run the wiring through flexible conduit i have that fits almost perfect in the chines, right above the floor. I will paint it or cover it w wood covered in the same vinyl as the floor, that will be down the road though. Still have to mock up bow battery box and rear box/seat in front of transom.
 

Attachments

  • 2D386DD7-C35E-4F78-8BD8-36DEFEAFA79E.jpeg
    2D386DD7-C35E-4F78-8BD8-36DEFEAFA79E.jpeg
    1.2 MB · Views: 10
  • 56A9BC57-B319-476B-A540-04EFE3C927F0.jpeg
    56A9BC57-B319-476B-A540-04EFE3C927F0.jpeg
    4.3 MB · Views: 9
  • 54DBA489-91E0-49BB-AF9D-66C26B240BA9.jpeg
    54DBA489-91E0-49BB-AF9D-66C26B240BA9.jpeg
    1.8 MB · Views: 9
  • C67428EC-7BF6-4A35-994B-4FE1FE59B410.jpeg
    C67428EC-7BF6-4A35-994B-4FE1FE59B410.jpeg
    1.3 MB · Views: 9
  • 888150BE-A6A1-45E3-A3D6-07D60E847408.jpeg
    888150BE-A6A1-45E3-A3D6-07D60E847408.jpeg
    1.7 MB · Views: 9

danimal045

Petty Officer 3rd Class
Joined
Feb 18, 2022
Messages
88
Got the rub rail put on as well as the all the caps fitted and fastened. When everything’s done I’ll do some touch ups on rivets and paint. Plywood lines up good over the foam and i don’t seem to have any high spots.

Going to pull it, give it a light sanding then Either apply the vinyl or do a layer of epoxy scuff it, then apply vinyl. I have read people doing it each way. I don’t want to half ass it and regret it, but a lot of things I’ve read have shown success with just sanding, wiping, and adhesive, i don’t know. If i do a coat of epoxy going to add a few more days until i can cover floor.

I’ve decided to run the wiring through flexible conduit i have that fits almost perfect in the chines, right above the floor. I will paint it or cover it w wood covered in the same vinyl as the floor, that will be down the road though. Still have to mock up bow battery box and rear box/seat in front of transom.
Got the rubrail from Wefco. They were very helpful, responsive, and they made it, shipped it, and got it to me in a week. Very happy i decided to get a new rub rail vs trying to salvage the old one. Definitely tightens things up
 

SHSU

Lieutenant Junior+Starmada Splash Of The Year 2019
Joined
Mar 8, 2017
Messages
1,665
I see you have the original end caps. Suggest you secure them with bolts and nuts. To many have lost them the rivet fails after a good strike on a dock or such. Once lost, finding replacement would be like looking for a live dinosaur...

SHSU
 

danimal045

Petty Officer 3rd Class
Joined
Feb 18, 2022
Messages
88
I see you have the original end caps. Suggest you secure them with bolts and nuts. To many have lost them the rivet fails after a good strike on a dock or such. Once lost, finding replacement would be like looking for a live dinosaur...

SHSU
I can prob get one or 2 areas secured with a bolt and nut, others i don’t even know how i would
 

danimal045

Petty Officer 3rd Class
Joined
Feb 18, 2022
Messages
88
She’s ready for vinyl. Just hit it with a coat of epoxy. Once that dries i can do it to it.

Excuse my garage. It looks like it threw up. Lol. In the middle of projects things get western. Need to take an hour and reorganize and clean up.
379242C2-7EA8-49E7-9A76-65127C7044E5.jpeg
 

Attachments

  • 04E06094-BD20-48E0-B7EB-CEB531D16796.jpeg
    04E06094-BD20-48E0-B7EB-CEB531D16796.jpeg
    1.7 MB · Views: 2
  • 9D4CB138-0A03-4F5D-A08F-2D72AE55125B.jpeg
    9D4CB138-0A03-4F5D-A08F-2D72AE55125B.jpeg
    1.7 MB · Views: 1
  • B1D37431-68A5-4AF7-8188-06844EDE1006.jpeg
    B1D37431-68A5-4AF7-8188-06844EDE1006.jpeg
    1.9 MB · Views: 2

danimal045

Petty Officer 3rd Class
Joined
Feb 18, 2022
Messages
88
Was able to grab this off fb marketplace for $40 this morning. Need to clean it up, rivet on a new face, and paint it, but i think it will be way more functional than the OG console. Gotta play w the height, I can drop it another 1.5-2” if i remove the base. The final fitting with the joiners went well, now gotta get the floor vinyled and back in and secured
 

Attachments

  • DC0CB8A2-54F0-44C8-9D4F-21C3B70B7F24.jpeg
    DC0CB8A2-54F0-44C8-9D4F-21C3B70B7F24.jpeg
    2.2 MB · Views: 6
  • 44ECC7C8-CC97-41A7-8784-643578909704.jpeg
    44ECC7C8-CC97-41A7-8784-643578909704.jpeg
    3.6 MB · Views: 6
  • EF4837FD-9EBD-44D5-9292-BD305020EDC8.jpeg
    EF4837FD-9EBD-44D5-9292-BD305020EDC8.jpeg
    1.9 MB · Views: 6
  • E790B40A-C9C0-4C20-96DB-FBA108CB51ED.jpeg
    E790B40A-C9C0-4C20-96DB-FBA108CB51ED.jpeg
    2.2 MB · Views: 6

danimal045

Petty Officer 3rd Class
Joined
Feb 18, 2022
Messages
88
That's what I thought. I strongly urge you to use aluminum for your underdeck reinforcement joiners. The last thing you want is steel rusting under your deck, rotting things out. :)

This is how I did my underdeck aluminum joiners. ☺️

View attachment 369140

View attachment 369141
Riddle me this. After you countersink your rivets, do you use wood filler, sealant/caulk, etc to fill the divot?

I am ready to do the vinyl and need to figure out what i am to do, let glue fill the hole, etc.

I am now planning on affixing all the decking w the rivers then vinyling.

Any input appreciated
 

BWR1953

Vice Admiral
Joined
Jan 23, 2009
Messages
5,857
Riddle me this. After you countersink your rivets, do you use wood filler, sealant/caulk, etc to fill the divot?

I am ready to do the vinyl and need to figure out what i am to do, let glue fill the hole, etc.

I am now planning on affixing all the decking w the rivers then vinyling.

Any input appreciated
I used 2 part wood filler epoxy from HD slathered over the counter-bored holes, then sanded it down flat with the deck. Painted over the filled holes with deck paint and anti-skid.

1.jpg
 

BWR1953

Vice Admiral
Joined
Jan 23, 2009
Messages
5,857
When it was done, my neighbor buddy said that the next guy who has to put a deck on there will hate me. But! I'm leaving the boat to him in my will! :LOL:

2.jpg
 

danimal045

Petty Officer 3rd Class
Joined
Feb 18, 2022
Messages
88
I used 2 part wood filler epoxy from HD slathered over the counter-bored holes, then sanded it down flat with the deck. Painted over the filled holes with deck paint and anti-skid.

View attachment 369578
Thank you! Seems like a good course of action. I like that idea better than seeing a ton of dimples in the vinyl
 

danimal045

Petty Officer 3rd Class
Joined
Feb 18, 2022
Messages
88
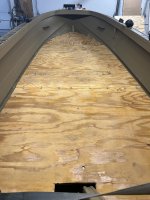
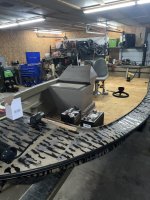
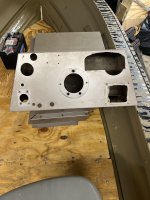
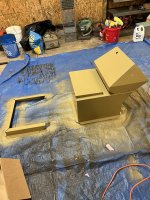
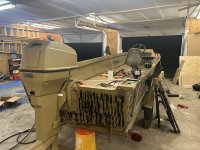
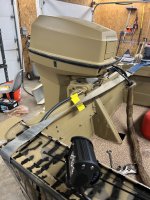
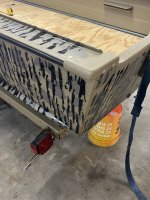
Got the floor riveted down, and per BWR’s suggestion, got some of that epoxy wood filler I’m gonna put down tomorrow to cover the countersunk rivets. Cleaned up the console and the face were the new face will be welded or riveted on depending when if my buddy can weld the aluminum for me. Cleaned it up to start prep for paint, then i started figuring out where inwanna mount my 4 light pods, gonna have a light bar on the front above the running rights. Probably going to dry fit the blind first to make sure they can still be used if the blind is on.

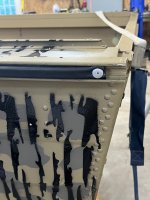
Do you guys use any thing to help add rigidity were you mount the lights through the gunwale, seems just drilling and dropping would be asking to tear the metal.

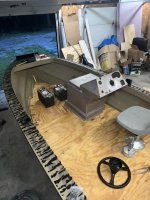
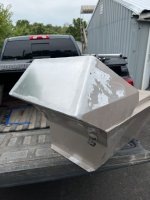
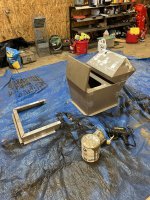
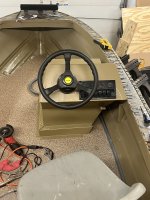
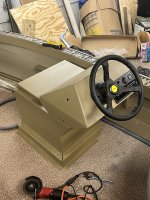
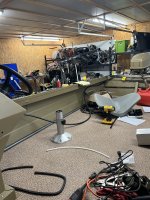
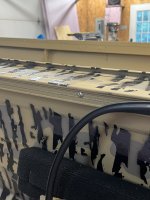
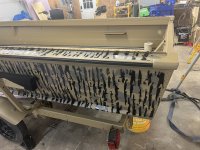
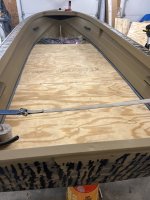
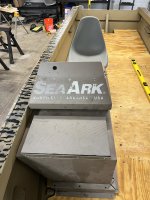
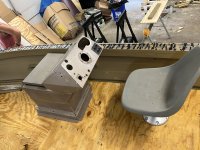
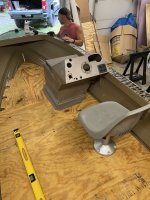
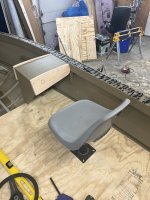
That’s about were the captains Shari and console will go. Only thing that can move is the console, as i put a piece of 3/4” under where the seat base goes and ran 5/8” bolts through both sheets into T nuts, great suggestion. Going to build a box to cover the batteries, that’s where they will be, and an anchor compartment in front of it.

Prob gonna mount a swivel eze on top of a piece of ply covered in vinyl on the livewell lid so another shooter can sit there.

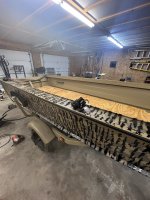
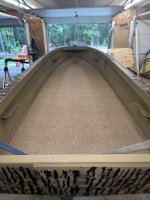
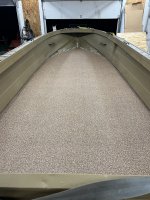
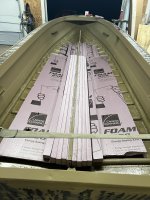
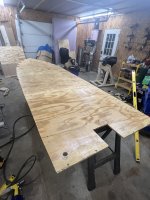
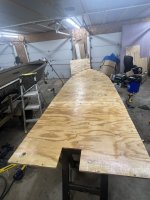
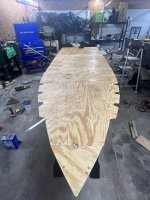
Cut the floor shape out of the vinyl leaving about 2” over hang everywhere. Hopefully i can get it down in the next day or 2, then i will will
Like some real progress has been made… appreciate all the guidance
 

Attachments

  • 9238F63C-3609-4E6F-B9B7-BDCE569B8BFA.jpeg
    9238F63C-3609-4E6F-B9B7-BDCE569B8BFA.jpeg
    1.9 MB · Views: 11
  • 4458993A-D9DE-4FC9-A890-A6403E7A683A.jpeg
    4458993A-D9DE-4FC9-A890-A6403E7A683A.jpeg
    2 MB · Views: 7
  • C314958A-E00F-4554-9D67-0E8A0F148975.jpeg
    C314958A-E00F-4554-9D67-0E8A0F148975.jpeg
    1.3 MB · Views: 9
  • 096C4ED0-1630-4A26-B6C1-48B29D1457D6.jpeg
    096C4ED0-1630-4A26-B6C1-48B29D1457D6.jpeg
    1.5 MB · Views: 10
  • 751F928A-2C5F-4C54-B0A1-9ECBD99D26A9.jpeg
    751F928A-2C5F-4C54-B0A1-9ECBD99D26A9.jpeg
    1.7 MB · Views: 12
  • 58C70EE4-BEDC-4B61-8EAD-FEA5B40A31CF.jpeg
    58C70EE4-BEDC-4B61-8EAD-FEA5B40A31CF.jpeg
    1.6 MB · Views: 11

danimal045

Petty Officer 3rd Class
Joined
Feb 18, 2022
Messages
88
Thank you! New face for the console welded on tomorrow, and got the blind fitted today to make sure about my light mounts, and countersunk holes filled with epoxy sanded and floor prepped for glue! Just gotta get it down
 

Attachments

  • 3F5DAEA6-1584-4FCC-BF03-A66DEEAE5077.jpeg
    3F5DAEA6-1584-4FCC-BF03-A66DEEAE5077.jpeg
    1.6 MB · Views: 11
  • 33B1C00D-202D-489A-AB8B-B5CFF22A03C8.jpeg
    33B1C00D-202D-489A-AB8B-B5CFF22A03C8.jpeg
    2.7 MB · Views: 11
  • 656527FB-C9E9-4205-A897-CF6D8F65EC43.jpeg
    656527FB-C9E9-4205-A897-CF6D8F65EC43.jpeg
    2.8 MB · Views: 11

Moserkr

Chief Officer + Starmada Splash Of The Year 2021
Joined
Nov 23, 2020
Messages
835
Love the way thats looking!! I floated the idea, of building mine into a duck boat like yours, by the Admiral and she shot it down haha. Glad to see it coming together so nicely.
 

danimal045

Petty Officer 3rd Class
Joined
Feb 18, 2022
Messages
88
New face on console welded and grinded down. Console painted. Vinyl glued down. Steering and wheel hole cut and mounted, switch panel cut out and mounted. Still have to secure the console and May get the motor set tonight and steering hooked ul. Neighbor brought me up an engine hoist
 

Attachments

  • 2394CE02-1FC4-4A93-84AA-49A760253683.jpeg
    2394CE02-1FC4-4A93-84AA-49A760253683.jpeg
    1.9 MB · Views: 2
  • 1CAC5EB4-0E92-46D6-8F95-C7972A3D14D6.jpeg
    1CAC5EB4-0E92-46D6-8F95-C7972A3D14D6.jpeg
    1.7 MB · Views: 2
  • 749E7410-BFE2-40B7-97B8-182D1CFB3ED7.jpeg
    749E7410-BFE2-40B7-97B8-182D1CFB3ED7.jpeg
    1.4 MB · Views: 2
  • 5348A5C3-D1EC-4B6D-BC6C-4FB7A6B56753.jpeg
    5348A5C3-D1EC-4B6D-BC6C-4FB7A6B56753.jpeg
    4 MB · Views: 2
  • BC242A0D-353D-4A7D-B3E7-119F266F3ED1.jpeg
    BC242A0D-353D-4A7D-B3E7-119F266F3ED1.jpeg
    3.7 MB · Views: 2
  • 797F34DA-C33F-4ED6-AC91-ED9734BA63BA.jpeg
    797F34DA-C33F-4ED6-AC91-ED9734BA63BA.jpeg
    3.5 MB · Views: 3
  • A35D5C56-EB93-45A2-85F7-16AF5A7A95B6.jpeg
    A35D5C56-EB93-45A2-85F7-16AF5A7A95B6.jpeg
    2.1 MB · Views: 3
  • 6E9305E3-E4AF-4F39-B582-F35FF2DEFF1A.jpeg
    6E9305E3-E4AF-4F39-B582-F35FF2DEFF1A.jpeg
    2.3 MB · Views: 3

danimal045

Petty Officer 3rd Class
Joined
Feb 18, 2022
Messages
88
Very nice progress! (y)
Thank you! Got the engine mounted, well mostly mounted. I’m going to have to take the bolts out, coat with sealant and out them back in. The keel seems to line up pretty well at the current height with the anti ventilation plate.

Also got the steering cable ran. Bought it as a kit with helm from Vevor. Using the measurements they said to take, i ordered a 13’ cable length…. Obviously 1-2 foot too big, unless I’m missing something?
 

Attachments

  • 66E04A09-10ED-440D-A9C2-6E35CE6A71B2.jpeg
    66E04A09-10ED-440D-A9C2-6E35CE6A71B2.jpeg
    4.1 MB · Views: 3
  • 448ACD78-7296-4D44-B7D3-46DF4FDA993B.jpeg
    448ACD78-7296-4D44-B7D3-46DF4FDA993B.jpeg
    2 MB · Views: 3
  • 56560ACE-ED31-4784-B1E6-D736D66CD7CE.jpeg
    56560ACE-ED31-4784-B1E6-D736D66CD7CE.jpeg
    2 MB · Views: 3
  • 8A509E5C-F6D0-455B-9672-301C7EB57665.jpeg
    8A509E5C-F6D0-455B-9672-301C7EB57665.jpeg
    3.1 MB · Views: 3

danimal045

Petty Officer 3rd Class
Joined
Feb 18, 2022
Messages
88
Looking at these for passenger seats on swiveleze mounts that can me moved around. Only plan to hunt 3x, could squeeze a 4th.

I’m torn between the color scheme, any input?
 

Attachments

  • BE34E0F0-1B56-48E3-A40D-36A6A67049A4.png
    BE34E0F0-1B56-48E3-A40D-36A6A67049A4.png
    3.2 MB · Views: 1
  • 7467FAB9-D6C0-476C-9EC6-945B7E8F14D8.png
    7467FAB9-D6C0-476C-9EC6-945B7E8F14D8.png
    3.2 MB · Views: 1
Top