Some good stuff happening

BWR1953

Vice Admiral
Joined
Jan 23, 2009
Messages
5,802
I do have some garage updates.

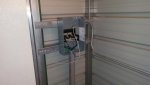
Last month I bought a WiFi repeater and hung it up in the garage so that I could have better internet access inside. At first it worked really well but lately it's been finicky. Still tweaking it and will try a couple ideas to improve performance further.
3.jpg


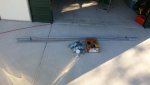
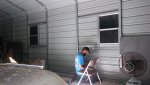
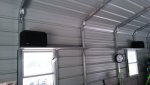
Over the weekend we cut some shelves to mount over the windows. Got 'em primed and painted and finished installing them this morning.


Primed.
3.jpg


Pre-fit into place. I did it that way so that the finished paint wouldn't be marred by man-handling during the fitting process. After mounting, the shelves were removed and then painted. No marring on the finished shelves. Worked well!
1.jpg

Painted and drying.
2.jpg
 

Attachments

  • 1.jpg
    1.jpg
    354.9 KB · Views: 2
  • 2.jpg
    2.jpg
    382.6 KB · Views: 2

BWR1953

Vice Admiral
Joined
Jan 23, 2009
Messages
5,802
And this morning we mounted the finished shelves. Got the Bose 301's moved up there and rocked the shop a bit! Then later we started rearranging stuff from the rack shelves. Making room and organization happen. ;)

1.jpg


Oh yeah, I also bought a new, very appropriate key lanyard! :lol:
2.jpg
 

Watermann

Starmada Splash of the Year 2014
Joined
Jan 12, 2013
Messages
13,747
Best thing for internet out there would be to run cat5 from the house internet router to another router out there in the garage.
 

BWR1953

Vice Admiral
Joined
Jan 23, 2009
Messages
5,802
Best thing for internet out there would be to run cat5 from the house internet router to another router out there in the garage.
That would definitely be ideal.

I think I may have "cooked" the WiFi Repeater a little. And maybe cracked it some. :doh:

I'd not been paying much attention to it hanging up there in direct sunlight from the glorious Florida sun over the last few weeks since installation. And it does get hot inside the garage when it's all locked up. Sorta like an EZ Bake oven! :rolleyes: Of course, direct hot sunlight can have a deleterious effect on sensitive electronics.

Then a couple days ago while working on the overhead shelves, the boy accidentally knocked the repeater down and it bounced off a couple things along the way. It didn't directly hit the concrete floor though.

I was the one who knocked it down shortly thereafter, with it dropping 7 feet directly onto the concrete floor! D'oh! :facepalm:

The case had popped open a little but it snapped back together okay. The signal still locks up right away to my phone and the boy's tablet but throughput is low. I sometimes get better response by connecting to the router in the house. Not a good sign. :culpability:

I tested inside the house and am getting 57MBPS down and about 7MBPS up via the WiFi router. Good enough. So we tested just outside the house between the garage and the house and speed dropped to 17MBPS. Inside the garage is less than 6MBPS now, often less than 1MBPS.

The house router is in a poor location. Works great anywhere in the house but I think I'll relocate it so that I can get better signal strength at the garage. Gonna have to pull wires and whatnot, so I'm not highly motivated yet. :lol:
 

BWR1953

Vice Admiral
Joined
Jan 23, 2009
Messages
5,802
I have an update! I finally got started with the electric installation. Well, my young neighbor buddy is doing the work. The boy is the tool "go-fer" and I supervise! :lol:

My bud is doing the work on an "as available" basis. So sometimes he's there and making progress and other times he's gone for days at a time. And that's fine by me. Progress is progress! And he has a newborn baby keeping him busy too! :)

I have pretty much all the materials purchased and in the garage. Still need to figure out what floodlight I want to use on the back entrance to the building. I have the one for the front entrance but it was the only one in stock at the time I made the buy. It would be nice to have a matching unit for the rear, but whatever.

We'd actually started a couple weeks ago with project planning and purchase lists and whatnot but got interrupted with my latest trip to the ER. Then last week my bud was suddenly available and we got going. Made a couple of purchase trips and my bud got to work.

Here's where we are so far.

This is the initial purchase of some conduit, boxes and the main power box. We went back and got a LOT more stuff!
01.jpg

Main breaker box installed. Leftover steel framing material from the initial garage installation was used to fabricate cross braces.
1.jpg

Conduit runs through the steel framing.
2.jpg

3.jpg


1.jpg

2.jpg

3.jpg

4.jpg

5.jpg

The underground conduit isn't connected to the main power meter yet. That will come later.
3.jpg

4.jpg

This is the floodlight which will be over the big front door.
2.jpg
 

Attachments

  • 2.jpg
    2.jpg
    22.2 KB · Views: 2
  • 1.jpg
    1.jpg
    65 KB · Views: 2
  • 1.jpg
    1.jpg
    324.5 KB · Views: 2
  • 01.jpg
    01.jpg
    79.6 KB · Views: 2
  • 1.jpg
    1.jpg
    131.2 KB · Views: 2

BWR1953

Vice Admiral
Joined
Jan 23, 2009
Messages
5,802
This is the barn style "porch light" which will be installed over the walk-thru door at the front of the building.
1.jpg


And today I took delivery of 8 of these 4 foot long LED shop lights, each with an output of 4500 lumens. That'll put 36,000 lumens into the garage. That should brighten things up a bit! :eek: :D
2.jpg
 

Attachments

  • 2.jpg
    2.jpg
    22.2 KB · Views: 0

BWR1953

Vice Admiral
Joined
Jan 23, 2009
Messages
5,802
I've done a lot of grading on the west side of the building. The ground slopes quite a bit from west to east and I've had some serious water erosion issues. Finally got the grading done the other day.

1.jpg


And this is what I have to fix as a result of the water erosion. :grumpy: I sure hope my little tractor is capable of shoving the dirt back under there. I do have plenty of sand from the excavation I did on the other side of the building.
1.jpg

.
 

DirtyHarry83

Petty Officer 1st Class
Joined
Jun 5, 2012
Messages
302
I've flipped through your pages. This is some cool work.

I saw the wireless range extender you have died? Is there a way to set it up so you don't have to worry about the heat?
Disclaimer due to my experience in networking (IT). I am a massive proponent of wired connections. Wired is reliable, secure, and with the right cabling always faster.
That said, for cost the pluses to the extender would mean you can connect and add multiple devices. This is important with an environment that you may want to have a mobile computer, phone, heck even cameras connect to WiFi.
If you're just looking for a stationary device. Then you just really need a small switch in your garage. For cabling to that switch I'd run a Cat v6 cable from your home router to that switch. That leaves you the ability to connect wired devices to as many ports available on the switch.

They also make wireless access points that can connect to this switch and then you can add wireless devices in and around your garage. Some routers even can act as wireless extenders. I want to warn you that sometimes there can be a difficulty with routers connected to routers. Sometimes it can be tricky because one will try to push private addresses on the other with DHCP. This part requires some homework.

For cabling, you're going to want shielded twisted pair when going outside. Most of the stuff that you might see in a store is Un-shielded Twisted Pair (UTP).

If you really want to go crazy you can setup a wireless PTP connection between the garage and the house.

You have a nice thing going for you because you're primarily dealing with sand around your garage. I have clay, packed dirt and concrete. I hope you're next networking solution solution works out solid for you!


Personal experience: I had to put a range extender in my house due to my neighbors saturating the area with their WiFi networks. Once I put the extender on our second floor I was able to have steady a network connection in my garage.


Water is a pain in the butt. I am dealing with water intrusion on my roof.

That erosion outside your shop is wild. Is there anyway to maybe lay stone around the pad? I am guessing a gutter system is in your future?

I look forward to the future work.
 

BWR1953

Vice Admiral
Joined
Jan 23, 2009
Messages
5,802
I've flipped through your pages. This is some cool work.

I saw the wireless range extender you have died? Is there a way to set it up so you don't have to worry about the heat?
Disclaimer due to my experience in networking (IT). I am a massive proponent of wired connections. Wired is reliable, secure, and with the right cabling always faster.
That said, for cost the pluses to the extender would mean you can connect and add multiple devices. This is important with an environment that you may want to have a mobile computer, phone, heck even cameras connect to WiFi.
If you're just looking for a stationary device. Then you just really need a small switch in your garage. For cabling to that switch I'd run a Cat v6 cable from your home router to that switch. That leaves you the ability to connect wired devices to as many ports available on the switch.

They also make wireless access points that can connect to this switch and then you can add wireless devices in and around your garage. Some routers even can act as wireless extenders. I want to warn you that sometimes there can be a difficulty with routers connected to routers. Sometimes it can be tricky because one will try to push private addresses on the other with DHCP. This part requires some homework.

For cabling, you're going to want shielded twisted pair when going outside. Most of the stuff that you might see in a store is Un-shielded Twisted Pair (UTP).

If you really want to go crazy you can setup a wireless PTP connection between the garage and the house.

You have a nice thing going for you because you're primarily dealing with sand around your garage. I have clay, packed dirt and concrete. I hope you're next networking solution solution works out solid for you!


Personal experience: I had to put a range extender in my house due to my neighbors saturating the area with their WiFi networks. Once I put the extender on our second floor I was able to have steady a network connection in my garage.


Water is a pain in the butt. I am dealing with water intrusion on my roof.

That erosion outside your shop is wild. Is there anyway to maybe lay stone around the pad? I am guessing a gutter system is in your future?

I look forward to the future work.

Hey, thanks for stopping by and giving that great info!

We're back in the garage again, three days in a row. Woohoo! I have over 50 pix to winnow through, not including any new ones from today. Gonna be awhile before I can get to them but I'll post up when I can. Almost done!
 

BWR1953

Vice Admiral
Joined
Jan 23, 2009
Messages
5,802
Let there be light! :D
After a busy week, the electric installation in my garage is complete. We have the power! :rockon: There were some late nights getting it done, but it's done! We stayed up till 1am the other morning. A major feat for me, since I normally turn into a pumpkin after 8 o'clock. :rolleyes:

Lighting installation is 99% complete. There are 8 overhead LED four foot long lights installed providing 36,000 lumens of interior illumination. But that's still not enough for me! I ordered 2 more, which will crank it up to 45,000 lumens! :eek: Y'all know how it is. If some is good, more is better and too much is just right! Gonna have to wear sunscreen in there! :lol:

I'm awaiting a floodlight set for the rear of the building. The front set has LED bulbs with 1100 lumens each but I found some that are 2800 lumens so I'll be upgrading! :nevreness:

I am one happy camper! :)

We used extension cords to connect the new LEDs which were spread around the garage, giving pretty good illumination. Made it a lot easier to get work done.

Running conduit and installing outlet boxes on the west side of the building. 5.jpg


A view from outside with the extension cords powering the LED lights., 2.jpg


This side is done. image_280756.jpg


The plan was to put 2 rows of 5 lights in the center 5 "rafter bays" of the garage.
4.jpg
 

Attachments

  • 5.jpg
    5.jpg
    188.9 KB · Views: 2
Last edited:

BWR1953

Vice Admiral
Joined
Jan 23, 2009
Messages
5,802
Man what a mess! :lol: 1.jpg


But then my bud arrived and made some more room by moving the KF outside! 2.jpg


That room was needed to acommodate a scaffolding! 3.jpg


Overhead conduit and boxes going in. 4.jpg


Switches mounted. 5.jpg


Getting there. 6.jpg


Daisy chaining the lights. 7.jpg


Using aluminum tape to attach the power cords from the first two LED lamps to the rafter. 8.jpg


Five lamps on... producing half the light of the fully completed installation. 9.jpg


Eight lamps on, powered by extension cord, viewed from outside. 10.jpg
 
Last edited:

BWR1953

Vice Admiral
Joined
Jan 23, 2009
Messages
5,802
Front exterior "porch" and flood light fixtures installed!
1.jpg

Digging the conduit trench further and deeper.
2.jpg

Power connection at the meter.
3.jpg

Lights on! :D
4.jpg
 

BWR1953

Vice Admiral
Joined
Jan 23, 2009
Messages
5,802
Cleanup and reorganization started! Gonna keep us busy for awhile. Then more KF work??? :lol:

View of the taped LED lamp cords. 1.jpg


View of the daisy chained lamps. 2.jpg


Floor swept and tool chests rearranged. They'll be changed again. :rolleyes: 3.jpg


View of only the 1100 lumen floodlights on, from inside the garage. 4.jpg
 
Last edited:

Watermann

Starmada Splash of the Year 2014
Joined
Jan 12, 2013
Messages
13,747
Yeah man having real power is great, extension cords suck and can't carry any kind of load. Is that a 100 amp service out there? I didn't see a pic inside of the breaker panel.
 

BWR1953

Vice Admiral
Joined
Jan 23, 2009
Messages
5,802
Yeah man having real power is great, extension cords suck and can't carry any kind of load. Is that a 100 amp service out there? I didn't see a pic inside of the breaker panel.
Yep, 100 amp panel and provision to use 240v at a later date.

I have pix of the inside of the main panel before final connections and hookup to the meter. I was doing other stuff while my bud was working on the electric. After that got done, we were too busy and excited to bother with another pic. :D


Main panel before it was all ldone.
6.jpg

Panel cover mocked in place before final connections and hookup to the meter.
5.jpg
 

BWR1953

Vice Admiral
Joined
Jan 23, 2009
Messages
5,802
So the boy and I have been cleaning and reorganizing in the garage/shop. When I first had it built, we started shoving stuff in there from the old 10'x10' shed. Didn't really organize much. Getting it done now is working out well. No rush, no fuss. :)

Just finished lunch and heading back out now. The boy is thrilled. ;)
 

Decker83

Commander
Joined
Apr 5, 2011
Messages
2,592
That is some great progress.. It lights up the whole neighborhood.. Big :thumb:.. :yo:eek:ff to you sir..
 

BWR1953

Vice Admiral
Joined
Jan 23, 2009
Messages
5,802
This afternoon my bud came over and installed the 2 overhead lights I'd ordered and received this week. I now have 10 LED lights totaling 45,000 lumens of light output inside the garage. It is bright in there! :cool: :joyous:

He also installed the new flood lights I bought this week for the rear of the garage. Cool stuff!

And I also upgraded the flood lights front and rear. Each light now puts out 2800 lumens, compared to the 1100 lumen lamps I'd put in there previously. The new lamps provide 3,600 degree Kelvin light which is warmer than the prior lights which were 5,000K. Plus I replaced the 100W incandescent porch light with an LED which has 1700 lumen output.

Meanwhile, this week the boy and I have been slowly cleaning and reorganizing the shop after the electric installation. Made some really great progress too. So today we messed it up again! :lol: We finally emptied my old 9'x9' shed which will be taken by my other bud. Took a bunch of junk to the dump this afternoon. Then what was left had to go into the garage. We'll be sorting and organizing all that while the boy is off school for the next 8 days. Gonna put that kid to work! :lol:

So while he was here, my bud went aloft and looked for the leak we discovered. He didn't see anything obvious, so we'll pull up several of the roof screws and seal them with 5200, then tighten them back down. We'll test with a hose after that to see how it went.

Finally, we also hung up my unfinished RC airplane. I started working on that thing over 4 years ago but stopped when I got sick. I have a long history (as in 50 years) with the full sized aircraft and its manufacturer. So I kept that particular model around when I sold the bulk of my RC stuff 2 1/2 years ago. Maybe I'll finish it someday. ;)

My bud also agreed to install another outlet close to the rear door. I have to pick up supplies for that tomorrow.

Lighting things up!
2.jpg

Rear of building with new floods in place.
4.jpg

Upgraded front flood and porch lights
5.jpg

Looking for leaks.
3.jpg

Messed up again! That stuff in the right center of the pic will need to be sorted and organized.
6.jpg


This is the closest to the sky that this plane has ever been! :lol:
1.jpg

Once finished, the plane should look something like this. On my model I created a simulated 20mm 3-barrel Gatling gun which can sweep left and right from the door to mimic the full sized plane. And I built a provision behind the gun where a micro camera can be mounted to record the action from inside while airborne. :D
au23-4.jpg
 

Watermann

Starmada Splash of the Year 2014
Joined
Jan 12, 2013
Messages
13,747
Yeah roof leaks in a rainy climate isn't good, what's bad here with a metal roof is the temp changes from night to day creates a rainstorm inside the building.

I find with my garage the main enemy is the always present invading junk. It's without mercy and is always attacking. :lol:
 
Top