Shoestring Starcraft SS160 Resto-mod - let the long slow road begin

ShoestringMariner

Lieutenant Commander
Joined
Apr 18, 2015
Messages
1,593
Rut-roh Raggy…. I didn’t think this one ahead. This rod locker has four lights on it. And the connections will be hidden. I’m using Marine tinned wire. I was thinking about soldering and heat shrinking the joints but heat shrink won’t work on multi wire connections.

These wires will be sitting on top of the flotation insulation underneath the boards. So they should not be immersed in water unless the bilge pumps fail. Am I overthinking this? I don’t want to have a problem that I can’t fix later.

I can run individual wires out to gang the connection outside of the floor area but that’s a lot of wire. Will the tin wire not prevent corrosion issues especially if soldered?
 

BOYS & TOYS

Petty Officer 2nd Class
Joined
Mar 1, 2008
Messages
146
Rut-roh Raggy…. I didn’t think this one ahead. This rod locker has four lights on it. And the connections will be hidden. I’m using Marine tinned wire. I was thinking about soldering and heat shrinking the joints but heat shrink won’t work on multi wire connections.
Heat shrink with the adhesive/glue liner should be fine with multiple wire connections. Maybe I'm not understanding
 

ShoestringMariner

Lieutenant Commander
Joined
Apr 18, 2015
Messages
1,593
Heat shrink with the adhesive/glue liner should be fine with multiple wire connections. Maybe I'm not understanding
Thanks. I was thinking of connecting two wires to one wire.
Heat shrink will seal nicely around one wire but when it has to wrap around two wires side by side, water can get down between the two wires where heat shrink cannot close.
I’m just worried about corrosion at the solder joint, or I guess more rather beside it where I’m worried the tin coating may thin.
 

renns

Petty Officer 1st Class
Joined
Dec 20, 2017
Messages
316
You can get those wire splice kits for submersible pumps that have some sort of waterproof sealant in them. You should be able to do the same with an appropriate sealant applied first, then heat-shrink over-top to squeeze it all tight. Just thinking out loud here, I've never tried this. But if I was going to give it a go, I'd use that goop I posted earlier. I'm a fan of that stuff, although maybe that's just the solvents speaking - who knows at this point in the project!
 

BOYS & TOYS

Petty Officer 2nd Class
Joined
Mar 1, 2008
Messages
146
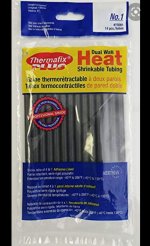
I have been joining multiple wires and sealing with this for years under vehicles and on boats. In NS we see lots of corrosion and this stuff works.

When you shrink it the glue/adhesive fills any gaps. I only use regular shrink tubing in dry locations.

I buy it from automotive parts stores or the tool truck.
 

Attachments

  • 20220410_232559.jpg
    20220410_232559.jpg
    481.8 KB · Views: 8

ShoestringMariner

Lieutenant Commander
Joined
Apr 18, 2015
Messages
1,593
I have been joining multiple wires and sealing with this for years under vehicles and on boats. In NS we see lots of corrosion and this stuff works.

When you shrink it the glue/adhesive fills any gaps. I only use regular shrink tubing in dry locations.

I buy it from automotive parts stores or the tool truck.
Excellent. I did not know there was such a thing as adhesive lined heat shrink tubing. I’ll definitely look for that tomorrow. Thank you
 

renns

Petty Officer 1st Class
Joined
Dec 20, 2017
Messages
316
Excellent. I did not know there was such a thing as adhesive lined heat shrink tubing. I’ll definitely look for that tomorrow. Thank you
Let me know what you find. Sounds like a good addition to the marine wiring kit.
 

classiccat

"Captain" + Starmada Splash Of The Year 2020
Joined
Dec 20, 2010
Messages
3,412
+1 on marine heat shrink with the adhesive. I also heat shrink the individual wire connections then put a larger heat shrink over the gang of soldered connections.
 

ShoestringMariner

Lieutenant Commander
Joined
Apr 18, 2015
Messages
1,593
Let me know what you find. Sounds like a good addition to the marine wiring kit.
Found some at the local auto supply. Grote makes it, but you have to really look for “Adhesive lined” on the package as all the packaging looks the same in their product line. They only had the one size that was adhesive lined and I think it just may work for my application. I’ll know tonight
 

ShoestringMariner

Lieutenant Commander
Joined
Apr 18, 2015
Messages
1,593
Update; Grote’s site says they are all adhesive lined. So perhaps it does not matter if the packaging says so or not.
 

ShoestringMariner

Lieutenant Commander
Joined
Apr 18, 2015
Messages
1,593
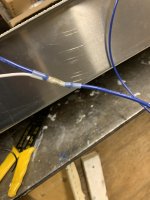
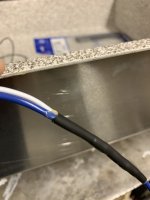
Back to the wiring question; To do a T-connection, I did a 2 into one connection with a shrink-solder connection when I realized I could fit 2 wires in one end. Then I covered the works with adhesive lined heat shrink. The adhesive seemed to bubble out a bit so hopefully we managed to seal between the pair of wires. Thanks @classiccat for mentioning the adhesive type of heat shrink. If water still gets in at least it’s tinned wire and much heavier than it to needs to be for this circuit….so should have good longevity
 

Attachments

  • 5E215521-8C7B-434B-9542-62C1A9EE75FC.jpeg
    5E215521-8C7B-434B-9542-62C1A9EE75FC.jpeg
    1 MB · Views: 11
  • 29A109CD-09CE-4046-8AE7-A07AC212AA78.jpeg
    29A109CD-09CE-4046-8AE7-A07AC212AA78.jpeg
    942.6 KB · Views: 11
Last edited:

ShoestringMariner

Lieutenant Commander
Joined
Apr 18, 2015
Messages
1,593
Todays progress; Still very slow but moving forward.
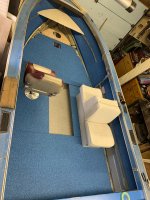
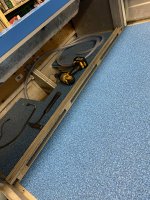
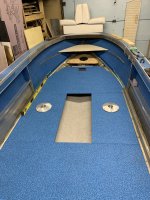
I wired up the rod locker lights, tested it and installed it and tan the leads. Swivel bases were installed on top of some .080” or .100” thick neoprene gaskets That I made. (Which I hope doesn’t react with the vinyl) I have to figure out a quick removal attachment for the sleeper seats so it looks good when the swivel seats are used.

I marked existing rivet hole locations on rib ends using a good idea from @renns and target locations for new ones. I had to do some styro shaving as there was a few high spots but I think the boards are ready for fastening once I lay out the rivet pattern.

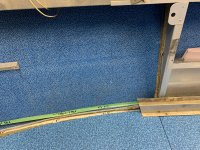
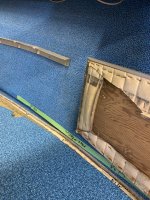
I mocked up a few items. Wondering about making the side board longer to hide the gap at the floor to hull. Maybe terminating the side board into the console front wall. I’m also thinking about adding a board above it under the console so I can mount fuse blocks and bus bars. Thoughts on this? Anyone else do this?

Also considering re-cladding and reusing the sliding doors at the splashwell. I don’t particularly like this set up or design, but it looks like a mess left wide open, so until I re-work the splashwell, it will have to do. The track was petty rough. I straightened it out. Some work with some files and nylon wire wheels will clean it up enough so it’s not offensive. Again, it’s probably temporary.

Tomorrow I’ll have the floor riveted and then I can wrap the last piece. I’m going to mock up the consoles and figure out the V-bench new configuration. The footwell is going to be smaller to create more storage beneath. I’m concerned with the footwell size being to tight. Anyone reconfigure this for the same reason and find it either worked well or was too cramped?
 

Attachments

  • DDF5FD7B-EF2F-499F-8A8C-A07C2108C16C.jpeg
    DDF5FD7B-EF2F-499F-8A8C-A07C2108C16C.jpeg
    2.5 MB · Views: 21
  • 02961AAE-DFBE-46E6-B2A5-040091F082D3.jpeg
    02961AAE-DFBE-46E6-B2A5-040091F082D3.jpeg
    5.1 MB · Views: 19
  • 5EBF8490-A09F-4486-80D5-C66D1B67DD7F.jpeg
    5EBF8490-A09F-4486-80D5-C66D1B67DD7F.jpeg
    3.1 MB · Views: 20
  • 92BB5F2A-EC14-410A-9003-5E6D6535E215.jpeg
    92BB5F2A-EC14-410A-9003-5E6D6535E215.jpeg
    2.3 MB · Views: 21

ShoestringMariner

Lieutenant Commander
Joined
Apr 18, 2015
Messages
1,593
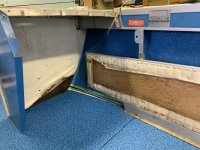
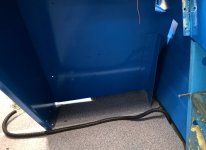
Hey, for you guys who have run your sideboards forward to the console, were you able to get it to meet the back panel? Looks like a one piece board won’t do the trick As it grounds out on the hull near the floor.
Might have to do 2 piece with a mitred aluminum riser bases at the floor…Sound about right??
 

Attachments

  • E5355074-CE61-4E02-842B-D88209F29D7D.jpeg
    E5355074-CE61-4E02-842B-D88209F29D7D.jpeg
    2.9 MB · Views: 13
  • AC2AAFB8-DC07-42FB-9209-DAAC14890843.jpeg
    AC2AAFB8-DC07-42FB-9209-DAAC14890843.jpeg
    3.6 MB · Views: 13
Last edited:

renns

Petty Officer 1st Class
Joined
Dec 20, 2017
Messages
316
My consoles have an aluminum return riveted to the inboard side, extending aft around 4". If you did something similar, it would give a mounting surface for your extended side panel, and would close off that transition a bit. That's assuming you can 'twist' that side panel enough to end up parallel with the hull up at the front of the console. I'll post up a pic shortly.
 

renns

Petty Officer 1st Class
Joined
Dec 20, 2017
Messages
316
It is closer to being aligned with the side panels than I thought. Should be pretty straight-forward to implement something similar. I have plans to eventually trim that out somehow, likely incorporating the fusebox/busbar mount.
 

ShoestringMariner

Lieutenant Commander
Joined
Apr 18, 2015
Messages
1,593
Aside from an old friend dropping in to see me for a few hours, I spent the almost the entire day installing rivets and under floor backer strips on the floor, and I’m STILL NOT DONE. I still have to install rivets on the rib ends when the longer ones come in next week.

But I have to say, I’m perplexed with my snails pace. I’m an ex tradesman and aside from being older and out of shape, I should be able to get good, quantifiable work done.

This riveting has been fiddly with trying to twirl in marine goop to seal the hole and vacuuming frequently to prevent aluminum shaving embedment in the new nautolex…but wow man, I need to take time off of work to get this thing done….crazy how long it takes!!
 

renns

Petty Officer 1st Class
Joined
Dec 20, 2017
Messages
316
Do you have an air riveter? I got one of those for this project, and I went from hating pop rivets to loving them! I do know what you mean about the vacuuming though. Seems even with the constant cleaning, I'm still tracking shiny bits of aluminum back in the house.
Hang in there though. Any rivet you set for good is one step closer to the finish line!
 
Top