Restoration project - 1965 AlumaCraft Maracaibo

kcassells

Fleet Admiral
Joined
Oct 16, 2012
Messages
8,596
I despise people like you cause you are too SMART! And have the coolest tools!
Excellent work says I! Dam good. Next you want to poly every inch of the ply prior to setting it in. All edges all cuts need sealed.
Best would be to glass it prior to setting then recut the grooves and poly again so it does the flex cuts you made.
Will last till your grandchildren's children. Set in place the glass the top.
It may be an argued point to the value of glassing the bottom but sealing the heck out of it will last at least 2 generations.
Utters may say seal it no glass cause you are on a light boat.
Cool build!
How do you plan to secure the deck?
Then there is the ole' timers recipe to seal wood.
 

kcassells

Fleet Admiral
Joined
Oct 16, 2012
Messages
8,596
I had a buddy on another forum who owned a cnc machine. Boy the work and cuts were beautiful!
 

Rad Racer

Seaman
Joined
May 17, 2022
Messages
54
Too Smart...you have mistaken me for someone else.

My plan is to seal the ply with the ole' timers formula I read about. Not sure I want to mess with glass at this time. Besides now that I have the CAD file its easy to replace the floor if/when necessary.

The floor will be attached with pop rivets just like the original. I am planning to cover the floor with SeaDeck or OrthoDek EVA. It's spendy but looks great.

Yes, cnc equipment make jobs like this go quickly. Fortunately my shop is outfitted with all the equipment necessary for this project.
 

Wildey

Petty Officer 1st Class
Joined
Nov 24, 2021
Messages
202
Nice job RR.
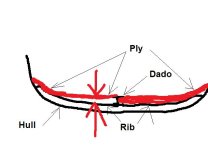
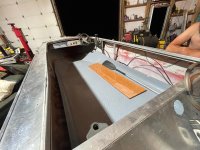
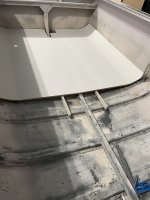
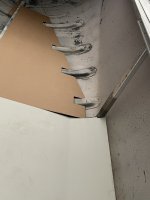
Question: do you plan to put the ply on top of the I beam as shown in your pic ? If so, it will span above the ribs, for the most part, and be quite springy with no support underneath.
If the ply went into the channel of the I beam, with appropriate size dado cuts to match the thickness of the flanges, and the proper thickness of plywood was used to fill the voids the floor would be setting solidly on the ribs.
Just wondering ...........
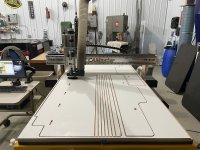
My CAD skills are lacking .. (as well as my software)
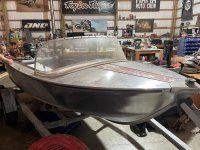
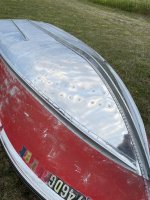
I really like that little boat !
 

Attachments

  • floor.jpg
    floor.jpg
    27.2 KB · Views: 2

Wildey

Petty Officer 1st Class
Joined
Nov 24, 2021
Messages
202
just noticed, looks like there were secondary stringer / spacers across the ribs to support the floor while being fastened to the top of the beam.
 

Attachments

  • ribs1.jpg
    ribs1.jpg
    107 KB · Views: 4

Rad Racer

Seaman
Joined
May 17, 2022
Messages
54
Yup, exactly your exactly right. From what I can tell it looks like there was a stringer on each side of the I beam. (Yellow highlight in the photo). The ply on the outer edge was riveted directly to the rib. This arrangement provided for a flat floor in the center part of the boat.
empty-hull (1).JPG
 

jarrod42

Recruit
Joined
Jun 25, 2022
Messages
5
This is my 1965 Alumacraft
 

Attachments

  • IMG_10581.jpg
    IMG_10581.jpg
    2.8 MB · Views: 18
  • IMG_1061.jpg
    IMG_1061.jpg
    3.3 MB · Views: 15
  • IMG_1062.jpg
    IMG_1062.jpg
    3.3 MB · Views: 18
  • IMG_1063.jpg
    IMG_1063.jpg
    4.1 MB · Views: 18

jarrod42

Recruit
Joined
Jun 25, 2022
Messages
5
I used diamond plate for the floor
 

Attachments

  • IMG_1513.jpg
    IMG_1513.jpg
    1.3 MB · Views: 21
  • IMG_1514.jpg
    IMG_1514.jpg
    978.5 KB · Views: 19
  • IMG_1515.jpg
    IMG_1515.jpg
    656.7 KB · Views: 19
  • IMG_1608.jpg
    IMG_1608.jpg
    1.1 MB · Views: 20
  • IMG_1609.jpg
    IMG_1609.jpg
    499.6 KB · Views: 21

Rad Racer

Seaman
Joined
May 17, 2022
Messages
54
Nice job polishing the boat. Are you planning to add a little paint or just keep it shiny?
 

jarrod42

Recruit
Joined
Jun 25, 2022
Messages
5
I am going to paint the dash and stripe up the middle for now.
 

Attachments

  • IMG_1624.jpg
    IMG_1624.jpg
    3.5 MB · Views: 14

Rad Racer

Seaman
Joined
May 17, 2022
Messages
54
Remaking the floor boards. I originally used CDX ply I got from my local lumber yard but found it had some serious delamination problems....basically junk ply. I returned the remaining sheets and exchanged it for MDO plywood. The MDO is much higher quality and it was only $10 more per sheet.
 

Attachments

  • cnc floor.JPG
    cnc floor.JPG
    4.5 MB · Views: 11

Rad Racer

Seaman
Joined
May 17, 2022
Messages
54
Finally moving forward again...work keeps getting in the way of my project.

After making a bunch of measurements, and a few adjustments, I cut a card board template to test the fit of front floor of the boat.
Now that all looks good, I can cut the MDO with reasonable certainty it will fit.
 

Attachments

  • template.JPG
    template.JPG
    2.8 MB · Views: 9
  • template1.JPG
    template1.JPG
    1.6 MB · Views: 9
Top