Re-upholstery Job on Cruisers Yacht 338 Bowrider

Status
Not open for further replies.

bruceb58

Supreme Mariner
Joined
Mar 5, 2006
Messages
30,548
What are you using for thread this time?

I buy vinyl and "sew foam" from Albright's if Trivantage doesn't have it.
 

tpenfield

Moderator
Staff member
Joined
Jul 18, 2011
Messages
18,089
What are you using for thread this time?

I buy vinyl and "sew foam" from Albright's if Trivantage doesn't have it.
I am using the regular Tenara (92). I did get some material from Albright's. I had to really shop around for the material, because no single (or several) places had much of what I needed.

I'm using the 1/4" sew foam, same as last time. I still have some of the heavy Tenara (138) thread left, and I am using it on the diamond quilting.

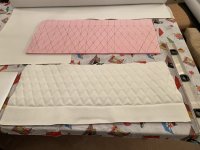
Here is my first attempt at quilting . . .
.
IMG_2653.JPG
.
Looks OK?

Of course, the quilting distorts the size/shape of the panel (which I made oversize anyway). This panel started out as 36" across, but now the top is 34.5" while the very bottom (not quilted) remains at 36".

I had intended that the bottom of the panel would be where it attaches to the base board of the seat, but I should probably go with a separate panel and sew it to the diamond quilted panel.
 

Scott Danforth

Grumpy Vintage Moderator still playing with boats
Staff member
Joined
Jul 23, 2011
Messages
49,872
if you have to line up top and bottom patterns on a quilted seat, make the panels 2" oversized in all directions. then you have to move the panel around until the patterns line up. then use a china marker to make alignment marks
 

tpenfield

Moderator
Staff member
Joined
Jul 18, 2011
Messages
18,089
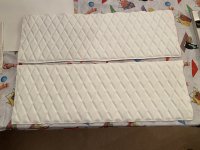
Here is the second panel (bottom in picture), which came out much better. I also fixed the first panel. I've got to make 4 more. The panels are 12" tall x 35" wide +/-.
.
IMG_2654.JPG
.
The diamonds are a 4" tall x 2" wide pattern. The boat sidewalls have a slightly larger diamond pattern . . . maybe 1/4" bigger. Not worth it to me to do the fractional math in measuring to make them identical.
 

nola mike

Vice Admiral
Joined
Apr 22, 2009
Messages
5,383
Looks good. Gotta say, I admire you. Not many people would buy a six figure boat and then immediately start putting all that work into it. Can't wait to see how it turns out!
 

Scott Danforth

Grumpy Vintage Moderator still playing with boats
Staff member
Joined
Jul 23, 2011
Messages
49,872
looking good Ted...... Looking good.
 

tpenfield

Moderator
Staff member
Joined
Jul 18, 2011
Messages
18,089
Looks good. Gotta say, I admire you. Not many people would buy a six figure boat and then immediately start putting all that work into it. Can't wait to see how it turns out!
Yes, it was a bit of craziness in terms of spending some big bucks and needing work. We looked at 3 of these boats (Cruisers 328/338) . . . they all needed some work of various forms (engine, gelcoat, upholstery). We also looked at a Formula 330 CBR, which needed some upholstery work as well and was under-powered.

This boat happened to be the one of the lower asking price of the boats and I figured nobody else would bid on it because of the seats. So, we were able to get some price concession on this boat, where the other boats were holding onto their asking prices. I still spent more money that I had originally planned, but probably typical based on the market.

This boat 'checked enough of the boxes' vs. the others, and the broker was happy to have a quick sale.
 

tpenfield

Moderator
Staff member
Joined
Jul 18, 2011
Messages
18,089
Quick update . . .

I sent the red vinyl panels out to the embroidery house to get embroidered.

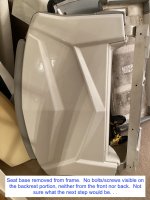
I've taken one of the helm seats out, but could not figure out how to get the backrest portion of the seat apart. So, I've been in contact with Cruisers Yacht tech support about how to disassemble the helm seats and sent them the picture below. - They in turn contacted the company that they buy the seats from and I've got the information needed.
.
IMG_2670.JPG
.
I was originally thinking the fiberglass back panel would 'pop' off, but it turns out there are some hidden fasteners that are accessible from the front.

I must say, Cruisers Yacht Tech Support has gone above and beyond to assist. (y) :D :cool:
 

bruceb58

Supreme Mariner
Joined
Mar 5, 2006
Messages
30,548
I must say, Cruisers Yacht Tech Support has gone above and beyond to assist. (y) :D :cool:
I never knew what good tech support was until I recently bought my Cobalt. Hard to find that these days with other brands of boats. The best I have seen personally, are Cobalt, Formula, Mastercraft(somewhat), and now Cruisers.
 
Last edited:

tpenfield

Moderator
Staff member
Joined
Jul 18, 2011
Messages
18,089
Quick Update . . .

I got the backing off of the helm seat without incident. (5 hidden fasteners)

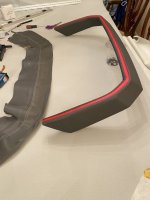
I finished my first piece . . . This is the coping trim for the instrument panel. To the left in the picture is the original skin with a 'faux' french seam. I first made one that was similar (except RED thread), but I didn't like it. So, I added a strip of red around the rim.
.
IMG_2673.JPG
.
It took much of the day to make, since I had to make its own set of patterns. More red trim today, then onto seat bases.

I am finding that the original seat upholstery did not have many alignment marks vs. what I found with the Formula 330 upholstery. I made one small base cushion skin, which will go in the trash, as it did not go together well enough. My plan is to add a bunch of alignment marks for more precise stitching.
 

Wave34

Petty Officer 1st Class
Joined
Oct 17, 2017
Messages
336
Nice work! I appreciate your skill.
I just bought a used sewing machine to repair dried / broken stitches on some of my roof zippers and seams.
It went well, but it was a very easy job compared to what your doing!
 

tpenfield

Moderator
Staff member
Joined
Jul 18, 2011
Messages
18,089
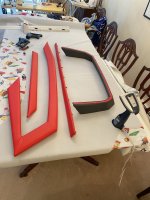
I completed some of the sidewall trim this AM. The original was GRAY, but I am going with the RED to accent a few things.
.
IMG_2676.JPG
.
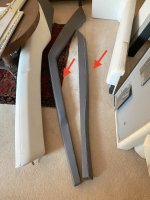
There are a couple more sidewall pieces that are in the DARK GRAY - same as the instrument panel coping, and will remain so on the re-make.
.
IMG_2677.JPG
.
Those pieces currently have a 'faux' french seam (white stitching), and I will probably go with a true french seam, with RED stitching. So, I'll have to break-out the existing skins into two pieces, then sew them together 'a La french seam'.
 

Lou C

Supreme Mariner
Joined
Nov 10, 2002
Messages
12,815
Amazing work Ted. If you ever retire imagine what you could do! And we all know how hard it is to find people who do really good work, almost at any price.
 

tpenfield

Moderator
Staff member
Joined
Jul 18, 2011
Messages
18,089
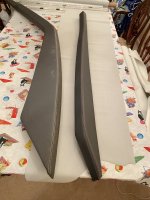
I did the first of the DARK GRAY sidewall pieces today. As I mentioned, I made a real french seam, replacing the 'faux' french seam in the OEM piece. Here are a couple pictures of the new and the original (old).
.
IMG_2679.JPG
.
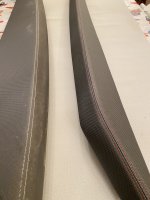
Here is a closer picture showing the difference .
.
IMG_2678.JPG
.
The OEM material (left) is the Spradling and the new material (right) is the Nautolex. The seam is a lot of work, but I like the results.
 
Status
Not open for further replies.
Top