Project Fuggly - No Longer Fuggly And Splashed!!!!!!

Pcolafisher

Petty Officer 2nd Class
Joined
Jun 26, 2013
Messages
188
It ought to be as your unFuggly is definitely design build/re-build! Sorry, I couldn’t help myself!
Cheers
 

archbuilder

Vice Admiral
Joined
Sep 12, 2009
Messages
5,697
Yes sir, we are teamed with a very good contractor. The owner of the company is actually a structural engineer. We have done some nice work with them....my favorite is the 3' thick floor slab, with the 20,000# wide flange I beams and 125 ton bridge crane at a transformer plant. But they are good with architectural details also.
 

Pcolafisher

Petty Officer 2nd Class
Joined
Jun 26, 2013
Messages
188
I used to do that for Navy Morale, Welfare and Recreation and had a continual battle with Navy Facility types who wanted to go Design-Draw-Build and call it D-B. We had some great results. With contractor/architect teams around the country and internationally. Great way to work, at least from the owner point of view! We often got more and/or better than expected!
Cheers
 

GA_Boater

Honorary Moderator Emeritus
Joined
May 24, 2011
Messages
49,038
125 ton bridge crane

Can you borrow it to drop the now unoffensive component into Fug?

I was starting to worry, Arch. No updates for a few days and naturally I thought oh-oh, another setback put you into a funk. Fortunately it was working to pay for all the Fugly gas you're gonna need soon. :D
 

archbuilder

Vice Admiral
Joined
Sep 12, 2009
Messages
5,697
I talked with Tom today, the guy who specializes in building these engines. He said that 90% of the blocks have my missing tab....go figure lol! It is apparently an industrial engine mount for things like air compressors, forklifts, and apparently also boats. He said it was never used for anything on cars , but most of them have it. He was very impressed with the bracket lol!
 

archbuilder

Vice Admiral
Joined
Sep 12, 2009
Messages
5,697
Ok here is a bit of an update:

So this is the quick disconnect for the small seat piece that goes between the back seats, and in front of the doghouse. I have the cushion off of it. You have to remove it to tilt the doghouse forward. Not one of my better designs, but it should now come out once you pull the two pins. I sleeved the wood with thin wall stainless so there would be a wear surface and they would fit tight. The two backseat bottom frames come out with 2 star knob screws (in process) and the seat backs have quick release pins in the hinges. I should be able to remove the entire back seating in a couple minutes if need be for service. 20200614_175715 (002).jpg The last photo was the mock-up before I trimmed and cut off the stainless tubing. I over-drilled the holes 1/32" and epoxied it in place. You can also see the quick-release pin on the doghouse in this shot.
 

Attachments

  • 20200614_175739 (002).jpg
    20200614_175739 (002).jpg
    565.3 KB · Views: 4

archbuilder

Vice Admiral
Joined
Sep 12, 2009
Messages
5,697
Next up I finally quit waffling and committed to places for the engine bay venting and blower. It took a lot of thinking before getting the hole saw drilling through that rear deck that I spent days sanding, filling and shaping! Not perfect, but it was the best real estate I had for this and worked out really well I think. I also made gaskets to go between the clam-shells and paint.....My hose mounting flange was a cheap plastic vent that I cut the louvers out of.

20200617_193916 (002).jpg20200616_195046 (002).jpg20200616_185258 (002).jpg20200616_194945 (002).jpg
 

Attachments

  • 20200616_184600 (002).jpg
    20200616_184600 (002).jpg
    475.3 KB · Views: 3
  • 20200616_183512 (002).jpg
    20200616_183512 (002).jpg
    490.3 KB · Views: 2

archbuilder

Vice Admiral
Joined
Sep 12, 2009
Messages
5,697
Here is the blower below on the starboard side

20200620_173415 (002).jpg
 

Attachments

  • 20200620_173403 (002).jpg
    20200620_173403 (002).jpg
    511.4 KB · Views: 4

archbuilder

Vice Admiral
Joined
Sep 12, 2009
Messages
5,697
And finally my Dad and I dropped it (slowly) in tonight. I took the last pic so you can see the clam shells.

20200625_184920 (002).jpg20200625_184920 (002).jpg
 

Attachments

  • image_333558.jpg
    image_333558.jpg
    554.4 KB · Views: 5
  • 20200625_175423 (002).jpg
    20200625_175423 (002).jpg
    591.7 KB · Views: 5
  • 20200625_192905 (002).jpg
    20200625_192905 (002).jpg
    595.5 KB · Views: 6

sphelps

Supreme Mariner
Joined
Nov 16, 2011
Messages
11,435
Really nice ! Fuggly just keeps getting better and better ! I don't think you could have tucked everything in any better !
 

archbuilder

Vice Admiral
Joined
Sep 12, 2009
Messages
5,697
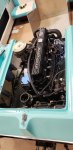
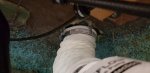
Never a boring moment here......dropped the very awkwardly placed nut for the starboard engine mount after repositioning the fiber washer late this afternoon while fiddling with the engine alignment........fell right where I was afraid it would, into the hole where the starter snout sticks through the dust cover into the bell housing....naturally it fell between the bell housing and the flywheel not between the dust cover and flywheel where I could have gotten it out. So I pulled the engine back out, pulled the dust cover and bell housing to get the nut out....:facepalm::mad-new::facepalm:

So I guess we will repeat the engine install again tomorrow! I have pulled the starter for better access to where the nut goes, and taped over the hole! I am sure getting the starter installed in the boat will be a chore. But that is where the removable seat bases come in handy! At least I can get to it without having to play contortionist!

I am blaming my dad, he said aligning the engine sounds easy lol! At least I have air conditioning in the Hangar. It help to moderate my frustrations today! Well it is par for the course, so round two tomorrow! or is it something like 9 at this point lol!
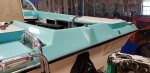
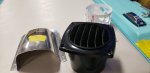
 

pekstrom

Chief Petty Officer
Joined
Dec 31, 2015
Messages
490
Wow! I don't think I'll complain about my trials and tribulations with my Merc 350! That was a lot of work for a stinking nut. Your engine looks great though and I'm sure things will go just peachy this next time. Good luck! Can't wait to see it installed!
 

archbuilder

Vice Admiral
Joined
Sep 12, 2009
Messages
5,697
Hey Pek I have to say I was a bit tweaked for a few minutes. But at least pulling this one is fairly easy. I wish cars used a cannon plug, boats are way easier than car engines. I only had it about 50% hooked up, so 30 minutes and I had it out. I am glad I took the time to put together the little spreader bar I made for the hoist. That really sped things up on taking it out and will on putting it back in. Should hopefully be back to fiddling with the alignment by mid-morning tomorrow. I knew this would take some time with the new engine mounts and the fiber washers that were missing in the back. By the way Mercury says to just set them on the mounts and drop in the engine, no problem.......they are now glued to the engine mounts lol! :D
 

sphelps

Supreme Mariner
Joined
Nov 16, 2011
Messages
11,435
It just couldn't have just fallen in the bilge could it ... LOL!
Thats the way the cookie crumbles sometime I guess ..
 
Top