Clear Penetrating Epoxy Sealer (CPES) is well liked over on the Wooden Boat board.
Note that it is a sealer, NOT adhesive.
If you use it, be sure you have plenty of ventilation, it has some nasty solvents.
Thanks DLNorth, I did read some of the talk on CPES on there before and more again. I spent the extra $160 over Spar and Boild Linseed oil and I should be sealing up the transom soon.
Im also going to use it as a primer on the hull. I might only do the below water line area, once I figure out how much the transom and deck will require. I might go a bit lighter on the front 2 sections of Deck, or do them in Spar if the 2 gallons won’t go as far as I’d like it to.
I grabbed some Marine Tex also, firstly to level out the minor pitting in the transom skin. I didn’t expect that to cost as much as it did. Nearly $100 for it, ouch.
Ive been working on my garage putting better insulation in it, and wiring up 240v for a heater. 50 feet of finished ceiling and 2 rooms between the breaker and the garage, so it’s no small, or cheap task.
Ive spent a small fortune so far, but I’m hoping I’m over half way there in terms of cost. And the rest I can do in a pace that’s more affordable and relaxed.
$200 for 2 quarts of paint, 2 quarts of primer, both Rustoluem marine ‘topside’, and a quart of the same brand of Spar, and a bigger tube of 5200.
I spent the better part of $200 on paint stripper and nylon brush cups along with scrubbers and goofOff and lacquer thiner to clean up the primer.
$100 on solid rivets and a rivet set from AirCraft spruce. 3/16” x 3/8,7/16 & 1/2 (6-6, 6-7, 6-8). I went with the soft rivets, just because it felt better IMO to use what they did building it. Harder isn’t always better, yet in this regard I’m sure either will work.
$380 on System 3 S-1 CPES ($260), $85? For the Marine Tex, cups, stir sticks and what not.
$50 for Valspar hardener ($5 for 1/8th of a gallon I think at a local auto body supplier, along with scotchbrite pads, and some polishing/sanding stuff.
$40 for new respirator, and probably $200-$300 on odds and ends at Home Depot like brushes, acetone, Mineral spirits, etc.
Oh and $80 on the 3/4” good 1 side fir.
$100 on Gluvit also and $40 on Gflex ‘aluminum repair kit’
im going to need at least another 2 quarts of paint, deck wood, seats and the doodads for the interior, and that’ll be at least $1500 if I don’t get a deal on seats which I’m not expecting to. Oh, and $500 on deck vinyl. Pop rivets, and probably a mountain of other stuff I can’t think of at the moment.
Im justifying the expense in comparison to the 2019 Starcraft Renegade I like. $30,000 minus the $6000 motor. So if I stay under $24,000 I’m in the black, lol.
I was told about a 16’ Aluminum with an 80hp late 70’s early 80’s mercy on it that needs some work, for $500. The thought of grabbing it and working on both at the same time to flip (sell) the other one to help with the cost, but I thought better of that soon after.
Selling a boat in that $1000-$5000 price range isn’t all that easy here. And I don’t need more expenses at the moment. If anyone is looking for an $750 boat let me know, lol.


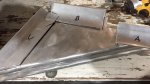
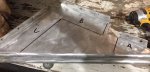
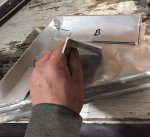
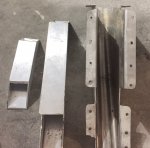
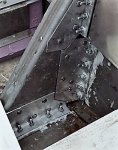
 When I repaired the brace in my Holi, I also added angles on the inner and outer part where the tabs are for strength. I also slid a piece 2x4x1/4" AL as long as possible to the inside, this really stiffened it up. I riveted it all with 1/4"x7/8" ss structural magnaloks and added 4x1/4" ss throughbolts with nylocs as Watermann suggested.