PlayDoh’s 16 SS resto underway

PlayD0h

Petty Officer 1st Class
Joined
Apr 23, 2009
Messages
326
The mid 70's boats weighed in right about 630 lbs for the SS 1 and 2

You can find information on a lot of the Starcraft boats on this website at this location:

http://boatspecs.iboats.com/Starcraft_Marine/bp/20br1466

Thanks MT
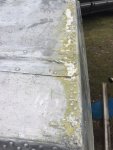
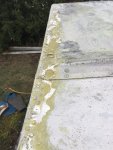
I'd guess I'm around 500 or so without the deck and interior. I'm having a heck of a time getting all the glue off, that was plastered on to keep the astro-turf on. I might get it down another 100 pounds once its all off, lol.

I'm using a paint / adhesive remover, and while its gel(ish), its tough to get any sort of even layer on the sides. I did get it working with a spray bottle, but it takes forever to pump it on. I'm thinking of using a pump sprayer, like what you use for fertilizer. maybe I'll leave whats left there and while I'm rolling the boat over, I'll keep it on its side for an hour while pouring on the stripper.

I've been dreaming up ideas to use as alternatives to rivets to secure the deck, perhaps welding bolts to the ribs? I'm also in the process of deciding what to use for the deck. Standard 5/8" fir, Marine ply, or I'm even looking at some of these composite boards. specifically Plascore, and Nidaplast, both honeycomb core specifically designed for boats. I'm guessing sourcing these would be very expensive, and not practical for a 30+ year old 16' fishing boat. Yet the idea of never having to worry about the deck, for even my grandkids sake is appealing.

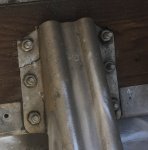
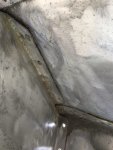
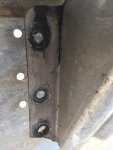
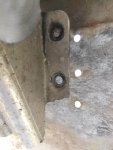
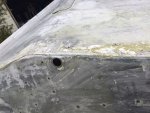
I'm also working on my Phd in rivet-ology, starting from kindergarten, so its a bit daunting. I noticed a small crack on my transom knee, so removal and a beef-up job looks in order. I also really like Figmo's relocating the drain, to center. The bottom of my boat had lots of sand, small strips of wood, and styrofoam pieces, which jammed up the small spaces mid rib, and prevented drainage.I'm not sure how or if I should try to prevent that from happening again.
 

PlayD0h

Petty Officer 1st Class
Joined
Apr 23, 2009
Messages
326
[No message]
 

Attachments

  • photo300430.jpg
    photo300430.jpg
    288.6 KB · Views: 4

MTboatguy

Fleet Admiral
Joined
Jul 8, 2010
Messages
8,988
Awe, I see you have a cracked knee brace, welcome to the club a lot of use do. I was surprised when I bought mine, the knee brace was fine. As far as the floor, I use regular old plywood, but make sure and seal it correctly and it will outlast you as well as your kids kids, properly sealed wood will last a really long time.

Last time I flipped one by myself, I rigged it with blocks on the back tacked to the ground and a cradle over the bow and pulled it over with the winch on my truck. Now I have a strap cradle system that I use with my engine crane, I pick a boat up with the cradle and we turn it while still in the strap system and then set it down on the supports upside down.
 

PlayD0h

Petty Officer 1st Class
Joined
Apr 23, 2009
Messages
326
Awe, I see you have a cracked knee brace, welcome to the club a lot of use do. I was surprised when I bought mine, the knee brace was fine. As far as the floor, I use regular old plywood, but make sure and seal it correctly and it will outlast you as well as your kids kids, properly sealed wood will last a really long time.

Last time I flipped one by myself, I rigged it with blocks on the back tacked to the ground and a cradle over the bow and pulled it over with the winch on my truck. Now I have a strap cradle system that I use with my engine crane, I pick a boat up with the cradle and we turn it while still in the strap system and then set it down on the supports upside down.

So I forgot to use my strongest muscle (Brain), and let the strap loose. Do'h. I was trying to lift the hull and the trailer. I can lift the stern fairly easily, well easy might not be accurate, Yet I can lift it, and with a couple old farts I have for helpers, to lift the Bow, I should be able to lift her off. I'm not sure why I expected it to weigh so much more than a truck-top aluminum boat. Maybe the stripper fumes did some damage, lol.

I'm pretty sure I'll use some G1S fir, with plenty of coats of spar urethane. I won't expect it to last forever, yet like you said it will be long enough. I'm not completely set on the Spar urethane, cause I'm always trying to find the absolute best thing to do. I've read mixed results with Spar coated wood, and I'm wondering if an oil sealer would be better, or something to use under Spar. A sealer would really penetrate the wood, as urethane isn't going to do much to the wood itself, other than coat it.
 

MTboatguy

Fleet Admiral
Joined
Jul 8, 2010
Messages
8,988
Go over to the boat restoration threads and read some of Woodonglass stuff, he comes up with some real good mixtures that last a long time when properly applied.
 

PlayD0h

Petty Officer 1st Class
Joined
Apr 23, 2009
Messages
326
Go over to the boat restoration threads and read some of Woodonglass stuff, he comes up with some real good mixtures that last a long time when properly applied.

Ya, the man is a treasure trove of info, and lucky for the thousands of guys like me, he’s taken a lot of time to share his knowledge.
Thanks for the tips also, much appreciated.
 

PlayD0h

Petty Officer 1st Class
Joined
Apr 23, 2009
Messages
326
ugh, I'm getting information overload. so I think I'm going to go with WOG's Old timers recipe on either 5/8" or 3/4" exterior ply. I've read that some only treat the top and sides, which puzzles me, although the 'let it breath' reason makes some sense. Of course I dont ever imagine my boat flooding with water enough to soak the underside of the deck, yet if it did, it would cause issues with untreated deck underside. That and some splashing is also possible. Thoughts? I'd treat the entire sheet if I was to just do it today.

I've looked on Fastnal website at 3/16" aluminum rivets, yet the terminology or description is different than Waterman's Rivet post.I guess talking to someone there on the phone would get me what I need. I'm only now aware of having to use an air hammer to install blind rivets. Can anyone recommend a source for everything I'm going to need, including rivets? Preferably Canadian, or atleast Canadian friendly shipping prices? I have an air rivet gun, hand riveters, and some aluminum rivets from a big box store kit.

I was planning on applying gluvit in the near future, but I didn't account for the rivet work that should be done first. I've been thinking about flipping the hull and just getting started on painting while I get my rivet supplies, tools, and knowledge ready. Yet then I'm wondering if applying gluvit is better done before painting the exterior of the hull. The notion being the gluvit could flow completely and more easily through seams and rivets.
 

MTboatguy

Fleet Admiral
Joined
Jul 8, 2010
Messages
8,988
ugh, I'm getting information overload. so I think I'm going to go with WOG's Old timers recipe on either 5/8" or 3/4" exterior ply. I've read that some only treat the top and sides, which puzzles me, although the 'let it breath' reason makes some sense. Of course I dont ever imagine my boat flooding with water enough to soak the underside of the deck, yet if it did, it would cause issues with untreated deck underside. That and some splashing is also possible. Thoughts? I'd treat the entire sheet if I was to just do it today.

I've looked on Fastnal website at 3/16" aluminum rivets, yet the terminology or description is different than Waterman's Rivet post.I guess talking to someone there on the phone would get me what I need. I'm only now aware of having to use an air hammer to install blind rivets. Can anyone recommend a source for everything I'm going to need, including rivets? Preferably Canadian, or atleast Canadian friendly shipping prices? I have an air rivet gun, hand riveters, and some aluminum rivets from a big box store kit.

I was planning on applying gluvit in the near future, but I didn't account for the rivet work that should be done first. I've been thinking about flipping the hull and just getting started on painting while I get my rivet supplies, tools, and knowledge ready. Yet then I'm wondering if applying gluvit is better done before painting the exterior of the hull. The notion being the gluvit could flow completely and more easily through seams and rivets.


Time to take a little time off, go fishing and have a beer, I end up doing that a few times each year when working on projects, it saves times, clears the head and gives you a new perspective.
 

PlayD0h

Petty Officer 1st Class
Joined
Apr 23, 2009
Messages
326
Time to take a little time off, go fishing and have a beer, I end up doing that a few times each year when working on projects, it saves times, clears the head and gives you a new perspective.

Sound advice, thanks. I’ll just plug away at the stripping, and heed your words and take a break from trying to learn it all in a day.
 

Watermann

Starmada Splash of the Year 2014
Joined
Jan 12, 2013
Messages
13,753
I'd for sure replace the transom wood, especially since your knee brace is broken, that normally will only happen with a transom that is flexing too much. Also the inside transom skin is going to be needing attention as well with corrosion pitting.

For a SW redesign, it's become somewhat common for guys to do this, one thread to look at is Candutch 18' SS SOTY winner.

Gluvit after all the flipping and painting when the boat is back on it's trailer to avoid flexing the hull unnaturally which can crack the gluvit epoxy.
 

PlayD0h

Petty Officer 1st Class
Joined
Apr 23, 2009
Messages
326
I'd for sure replace the transom wood, especially since your knee brace is broken, that normally will only happen with a transom that is flexing too much. Also the inside transom skin is going to be needing attention as well with corrosion pitting.

For a SW redesign, it's become somewhat common for guys to do this, one thread to look at is Candutch 18' SS SOTY winner.

Gluvit after all the flipping and painting when the boat is back on it's trailer to avoid flexing the hull unnaturally which can crack the gluvit epoxy.

Thanks WM, I was thinking of doing the transom regardless, yet at the same time convinced it was good. Now I’ll replace it for sure.

Im nearly done stripping the paint and I’m wondering how or if I should deal with dents. I’ll have to post pics once the hull is bare, but I have some on the bottom that I’m not sure how easy or possible it would be to bang them out from the inside. There a little too deep to just fill with JB, yet I’m guessing the worst is 1/4” max and say 4” round. Again pics will come.
I have one dent that is more of a crease along the side, just above the water line. Looks like someone slid against a dock, yet it’s somewhat hard to see. From my limited auto body knowledge the metal stretches in those types of dents, and don’t bang out well, if at all.
Im not really after a flawless hull look, yet I’ll do all I can to get as close as possible. Of course I have lots of scratches and chips, yet the majority of them should fill with paint after smoothed out. I think there’s a ‘marine bondo’ Yet I’m reluctant to go that route. It could cost a fair bit to JB them all though.
I have a 3/16” brazier Head rivet set in the mail, and finally found the solid rivets I’ll need and should be ordering them in a day or so. I have to decide if I’ll go ahead and paint with some rivets missing, then touch them up, or wait and paint the hull after it’s 100%.
 

Watermann

Starmada Splash of the Year 2014
Joined
Jan 12, 2013
Messages
13,753
Personally I would do all the hull repairs, leak test, gluvit and then paint lastly.

I used Marine Tex on the few creases that were visible on my Chief but I did nothing about the dents on the bottom as nobody would ever see them and they did nothing to hinder the hull performance.
 

PlayD0h

Petty Officer 1st Class
Joined
Apr 23, 2009
Messages
326
Personally I would do all the hull repairs, leak test, gluvit and then paint lastly.

I used Marine Tex on the few creases that were visible on my Chief but I did nothing about the dents on the bottom as nobody would ever see them and they did nothing to hinder the hull performance.

That would seem to contradict what you said previously;
"Gluvit after all the flipping and painting when the boat is back on it's trailer to avoid flexing the hull unnaturally which can crack the gluvit epoxy."

Not trying to pick at you, just pointing it out. I would like to have everything done by next june and trying to plan things out so I can work of the interior all winter. Winter comes early here, and if I haven't gotten paint done by then, I might be screwed. I wont be able to flip and paint with the interior done, so I might have to commit to touch ups if there needed afterwards. Since it will be on the hull bottom most likely, it shouldn't be a problem. Yet obviously not ideal.

Since your username could be "Rivet-Man", I wonder if you could let me know if these rivets I'm thinking of getting look like the right stuff?

Solids
3/16" x 3/8" Modified Brazier Head Solid 2117T4 Aluminum Alloy Rivet
Fastenal Part No. (SKU) 11138207
HTML:
https://www.fastenal.com/products/details/11138207

3/16"Dia x 1/2"L Brazier Head Aluminum Rivet
Fastenal Part No. (SKU) 11137657
HTML:
https://www.fastenal.com/products/details/11137657

Blinds Dome head
5/32" Dia .126-.187" Grip Range AB5-3A Aluminum Rivet
Fastenal Part No. (SKU) 0126174
HTML:
https://www.fastenal.com/products/details/0126174

3/16" Dia .626-.750" Grip Range AB6-12A Aluminum Rivet
Fastenal Part No. (SKU) 0126185
HTML:
https://www.fastenal.com/products/details/0126185

Also a collection of grip lengths of the 1 above from;
(0.126" - 0.250") - (0.251" - 0.375") - (0.376" - 0.500") - (0.501" - 0.625") - (0.626" - 0.750") - (0.751" - 0.875") - (0.876" - 1.000")

Blinds Large Flange
3/16" Dia .501-.625" Grip Range ABL6-10A Aluminum Rivet
Fastenal Part No. (SKU) 0126204
HTML:
https://www.fastenal.com/products/details/0126204

3/16" Dia .626-.750" Grip Range ABL6-12A Aluminum Rivet
Fastenal Part No. (SKU) 0126205
HTML:
https://www.fastenal.com/products/details/0126205

3/16" Dia .875-.1.00" Grip Range ABL6-16A Aluminum Rivet
Fastenal Part No. (SKU) 0126206
HTML:
https://www.fastenal.com/products/details/0126206

With the Blinds there is the choice of "Length"
0.450"
0.473"
0.575"
0.591"
0.700"
0.748"
0.825"
0.866"
0.950"
1.075"
1.200"
I'm presuming this is the length of the mandrel, and somewhat irrelevent? Most of the ones I've chosen have a length of close to or more than 1".
 

Watermann

Starmada Splash of the Year 2014
Joined
Jan 12, 2013
Messages
13,753
Sorry... It's best not to confuse so rule of thumb is gluvit last. If your not painting the bottom and the boat is on a trailer since you won't be flipping the boat over then it could be the last thing is to paint. Which is how I did my SS. The main thing is to not crack that gluvit epoxy by flipping which can create a twisting stress on the hull.

Your right the length of a blinds doesn't matter much but I believe it's the length of the body.
 

PlayD0h

Petty Officer 1st Class
Joined
Apr 23, 2009
Messages
326
Sorry... It's best not to confuse so rule of thumb is gluvit last. If your not painting the bottom and the boat is on a trailer since you won't be flipping the boat over then it could be the last thing is to paint. Which is how I did my SS. The main thing is to not crack that gluvit epoxy by flipping which can create a twisting stress on the hull.

Your right the length of a blinds doesn't matter much but I believe it's the length of the body.

Ah, ok gotcha. Sorry I tend to ask a million questions and essentially let those with more experience call all the shots. I sometimes forget to think for myself, lol.

I was planning on painting the entire hull, yet after finally stripping all the paint today and seeing the partial shine of the bare aluminum, I almost want to polish the whole thing now. Maybe a pin stripe or 2, lol.

I think ill play it smart and not try to try to make a deadline dictate what gets done, ahead of what’s best. Plus I can always design and build the interior, yet not fasten it until later. It only took me a day to strip everything out, and taking an extra week or two in the spring won’t ruin anything.

As for the rivet body length, I’d imagine that the grip range determines the length of the body. So maybe they list the length as a filter of results, as maybe that could be the method some use to choose rivets? Yet that doesn’t make a lot of sense, now that I type it out. Anyways, I’ll ask when I call.

Do those solid dimensions look right? There’s a crop sprayer hanger a couple miles from my place and I thought about finally paying him a visit, with rivets as my excuse. Since he essentially buzzes our house every time he lands, he owes me at least some advice.

Anyways, I’m so glad to be done with the paint stripper. I told my wife that I picked up a few strippers, and it cost me a near fortune. The look I got was worth every cent, lol. I think it’s been near 20 years since I spent over $100 on strippers. There’s a near dozen jokes that spin off of that.

After all the work and money it took to get every last bit of paint off, I wondered if it was even a good idea to bother with it. I good scuff sanding probably would have worked fine. Although with all the scratches and chips, it wouldn’t have looked near as good as it will. Plus it’s satisfying to get it all down to bare skin and bones.

Thanks again WM.
 

Watermann

Starmada Splash of the Year 2014
Joined
Jan 12, 2013
Messages
13,753
Having an assortment like you listed for rivet lengths is best since the solid are dirt cheap, I have 3/8", 7/16" and 1/2" in my inventory. What you need depends on how many layers of AL you're going through.
 

PlayD0h

Petty Officer 1st Class
Joined
Apr 23, 2009
Messages
326
Some Progress. Transoms out
photo301133.jpg
 

Attachments

  • photo301134.jpg
    photo301134.jpg
    135.5 KB · Views: 4
  • photo301135.jpg
    photo301135.jpg
    432.5 KB · Views: 3
  • photo301136.jpg
    photo301136.jpg
    178.6 KB · Views: 3
  • photo301137.jpg
    photo301137.jpg
    212.7 KB · Views: 3
  • photo301138.jpg
    photo301138.jpg
    864.9 KB · Views: 4
  • photo301139.jpg
    photo301139.jpg
    646.6 KB · Views: 4
  • photo301140.jpg
    photo301140.jpg
    867.2 KB · Views: 4

PlayD0h

Petty Officer 1st Class
Joined
Apr 23, 2009
Messages
326
The transom was in good shape, completely solid. No rot either. I'm not sure what 1/8th + is going to matter, or if when the 2 halves are laminated if there will still be a 1/8th" + difference. The transom is 1 5/8" thick, and I have a 3/4" sheet of G1S fir, which is just under 1 1/2" doubled. Maybe the transom swelled a bit, but doubtful. Thoughts?
 

Attachments

  • photo301135.jpg
    photo301135.jpg
    432.5 KB · Views: 2
  • photo301141.jpg
    photo301141.jpg
    116.5 KB · Views: 2
  • photo301142.jpg
    photo301142.jpg
    143.4 KB · Views: 2
  • photo301143.jpg
    photo301143.jpg
    88.1 KB · Views: 2
  • photo301144.jpg
    photo301144.jpg
    205.5 KB · Views: 2
  • photo301145.jpg
    photo301145.jpg
    204 KB · Views: 2
  • photo301146.jpg
    photo301146.jpg
    181.8 KB · Views: 2
  • photo301147.jpg
    photo301147.jpg
    262.3 KB · Views: 2
  • photo301148.jpg
    photo301148.jpg
    201.1 KB · Views: 2
  • photo301149.jpg
    photo301149.jpg
    365.6 KB · Views: 2
  • photo301150.jpg
    photo301150.jpg
    711.5 KB · Views: 2

PlayD0h

Petty Officer 1st Class
Joined
Apr 23, 2009
Messages
326
photo301136.jpg To get the transom out, I spread both sides of the trim on the gunnels. I had to peel the rub strip out a few feet, and if did split at the end a couple inches. It was a balmy -1 c when I did it, so no surprise. Yet its one of those things that are irreplaceable, so it sucks bad.
 

Watermann

Starmada Splash of the Year 2014
Joined
Jan 12, 2013
Messages
13,753
The transom should be 1-3/4" but it's delaminating and growing in size and it's the 3 piece style which means not completely solid. Also see that white on the old wood all around the holes? That's where water leaked in and started corroding the inner AL transom skin. Wire wheel that stinky stuff off the skin, clean well, fill pitting with Marine tex, sand if needed, then prime and paint it to prevent any further damage.

You can buy replacement rub rail insert, I have for both my SC boats, yours should be the same profile. Post a pic of the insert end.

fetch
 
Top