My First StarCraft; 1975 18' SuperSport

classiccat

"Captain" + Starmada Splash Of The Year 2020
Joined
Dec 20, 2010
Messages
3,411
Re: My First StarCraft; 1975 18' SuperSport

This is interesting ^^^ Are you bending an area specific panel, or more plates to accomplish this tweak?

Looking forward to seeing the rest of this playing out. Great work so far. Graphics are spot on, good job on them too..........

thanks JB!

I'm going to fab Z brackets and place them between every-other-rib...they'll transfer the load to heavy-gauge aluminum angles & onto the ribs.

In the illustration, the left-tab of the z-bracket is riveted to the hull, the top of the z-bracket will have a tab for locking the shelf. The right-side of the z-bracket would be closest-to-you...this grabs the rib-angle as well as the side-panel.


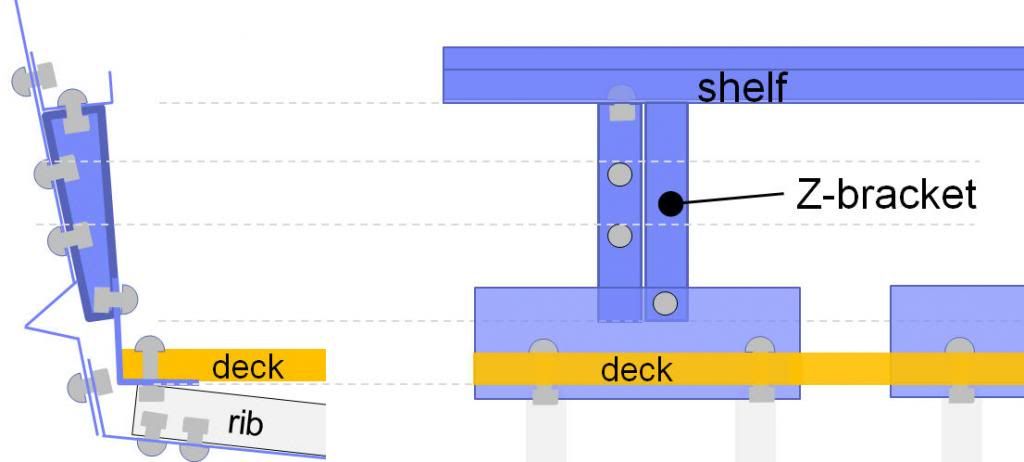
With this configuration, the hull is no longer dependent on the side-panel to keep its stuff together :thumb:
 
Last edited:

dozerII

Admiral
Joined
Oct 25, 2009
Messages
6,527
Re: My First StarCraft; 1975 18' SuperSport

Now I see why you asked me to come to New York, you know I'd be there in a heart beat, but for the fact I know the beer stores don't carry my favorite.:rolleyes:
 

classiccat

"Captain" + Starmada Splash Of The Year 2020
Joined
Dec 20, 2010
Messages
3,411
Re: My First StarCraft; 1975 18' SuperSport

Now I see why you asked me to come to New York, you know I'd be there in a heart beat, but for the fact I know the beer stores don't carry my favorite.:rolleyes:

You'll BYOB if you saw our forecast :lol: :bolt:
 

dozerII

Admiral
Joined
Oct 25, 2009
Messages
6,527
Re: My First StarCraft; 1975 18' SuperSport

62F is bad if you planned on playing pond hockey :laugh:

62F WHAT!!! how can you play pond hockey at that temp without fins and a snorkel, I keep the hanger at 50F so I don't sweat, sometimes I even have to take my hoodie off.:wave:
 
Last edited:

barato2

Commander
Joined
Dec 7, 2010
Messages
2,956
Re: My First StarCraft; 1975 18' SuperSport

that's fishin weather. go catch some holiday cheer, and work on the chine reinf when the snow flies in a week or 2.
 

DirtyHarry83

Petty Officer 1st Class
Joined
Jun 5, 2012
Messages
305
Re: My First StarCraft; 1975 18' SuperSport

I love these temps. It lets epoxy dry faster and it saves me on the heating bill.

I Liked the diagrams. Just to make sure I understand it completely. You're building a triangle inside the space to add more weight distribution through the area of the hull. This will limit the stress points?

The stress point in this case would be the splash rail around the hull?
 

classiccat

"Captain" + Starmada Splash Of The Year 2020
Joined
Dec 20, 2010
Messages
3,411
Re: My First StarCraft; 1975 18' SuperSport

62F WHAT!!! how can you play pond hockey at that temp without fins and a snorkel, I keep the hanger at 50F so I don't sweat, sometimes I even have to take my hoodie off.:wave:

It has been in the teens-20's for the past 2 weeks however Santa is bringing some temporary relief our way :)

that's fishin weather. go catch some holiday cheer, and work on the chine reinf when the snow flies in a week or 2.

That...or winterize the rest of my lawn equipment! Pulling all of my gas powered equipment into the garage is my late-fall ritual...when the space isn't being occupied by a decrepit, old tinnie.

I love these temps. It lets epoxy dry faster and it saves me on the heating bill.

I Liked the diagrams. Just to make sure I understand it completely. You're building a triangle inside the space to add more weight distribution through the area of the hull. This will limit the stress points?

The stress point in this case would be the splash rail around the hull?

I'm adding a piece of angle that will connect the triangle / z-bracket to the floor ribs; the load will be distributed to the top of the floor ribs which reduces the chance of concentrated stress...esp at the weak points. Make sense?
 

DirtyHarry83

Petty Officer 1st Class
Joined
Jun 5, 2012
Messages
305
Re: My First StarCraft; 1975 18' SuperSport

I see what you're saying.
I don't want to criticize because I like the work. I did see another build where someone had a rib location crack the hull below the rib ends.
Now will what you're doing reduce the chance of that happening? I know the build wasn't an SS, I believe it was a Chief. So this could be all of nothing and only deal with a Chiefs hull not an SS's. Different stress points.

Again I like the work so please keep it coming. :first:
 

classiccat

"Captain" + Starmada Splash Of The Year 2020
Joined
Dec 20, 2010
Messages
3,411
Re: My First StarCraft; 1975 18' SuperSport

I see what you're saying.
I don't want to criticize because I like the work. I did see another build where someone had a rib location crack the hull below the rib ends.
Now will what you're doing reduce the chance of that happening? I know the build wasn't an SS, I believe it was a Chief. So this could be all of nothing and only deal with a Chiefs hull not an SS's. Different stress points.

Again I like the work so please keep it coming. :first:

Thanks DH!

Magnumdeke's '69 deceased Islander is the worst that I've seen.

both outer-chine & spray rail where shot. The PO tried using welds...
100_0378.jpg


...and added backing plates directly under the rib ends but did nothing to address root-cause:
100_0613.jpg


...the braces, ribs & spray rail cracked with just the patches in place:
100_0610.jpg


Time will tell how my approach holds-up. I personally have confidence in it. Prevent vertical movement and transfer the load to the top of the rib (and deck) so that it can be distributed over a greater area of hull skin...and away from the weak points.
 

Grandad

Lieutenant Commander
Joined
Jun 7, 2011
Messages
1,504
Re: My First StarCraft; 1975 18' SuperSport

I wanted to keep Phase-2 as a surprise but since I already let the cat out of the bag...

side-panel removed for clarity:
Hi BlueFin. Your fix looks labor intensive. What if instead, you made a 1-piece L shape about 8' long? You'd make only 1 bend with no fitment issues. A couple less rivets, but the same structural strength. - Grandad
 

classiccat

"Captain" + Starmada Splash Of The Year 2020
Joined
Dec 20, 2010
Messages
3,411
Re: My First StarCraft; 1975 18' SuperSport

Hi BlueFin. Your fix looks labor intensive. What if instead, you made a 1-piece L shape about 8' long? You'd make only 1 bend with no fitment issues. A couple less rivets, but the same structural strength. - Grandad

Thanks for the suggestion Grandad! That was my starting point and it went downhill from there...plus, I need to get my $$'s worth out of my bending brake :lol:

A bending brake makes short work of the pillars. You're going to get alot more structural support out of an angled vertical riser. I'll then tab into shelf removing the shelf's vertical slop.

Brake setup:


Blanks cut from A sheet of 5052:


1st prototype riser. I could've saved some material @ the lower flange but company was arriving & I was late getting supper marinating :lol:

^^no worries, that blind-rivet @ the rib-end is temporarily holding an exterior patch.

Thanks for stopping by guys! Have a Wonderful Holiday!
 

astor

2018's Starmada Splash Of The Year.
Joined
Jul 31, 2011
Messages
425
Re: My First StarCraft; 1975 18' SuperSport

Nice work Bluefin! looks like that little brake bends that aluminum pretty nice. Enjoying following your thread.
 

dozerII

Admiral
Joined
Oct 25, 2009
Messages
6,527
Re: My First StarCraft; 1975 18' SuperSport

Looking real good BF, and Merry Christmas to you as well.
 

classiccat

"Captain" + Starmada Splash Of The Year 2020
Joined
Dec 20, 2010
Messages
3,411
Re: My First StarCraft; 1975 18' SuperSport

Nice work Bluefin! looks like that little brake bends that aluminum pretty nice. Enjoying following your thread.

Thanks Astor! This is the HF 30" model...HIGHLY recommend this! I handled the 18" and it was pretty skimpy. My next trick is to bend the rib-tabs out of 0.090" 6061.

Looking real good BF, and Merry Christmas to you as well.

Thanks Glen!

Originally I was going to put one at every-other rib. These things are so easy to fabricate (and I have almost enough blanks already cut), I'm putting one at every rib from Stern -> Helm.

I have cracking under 1 rib forward of the helm so the aluminum is already weakened. We're dealing with different forces forward of helm...rotation is the enemy and more of a challenge to deal with on an open-bow. A full bulk-head (as opposed to the walk-through recess) is best but I want to maintain the classic look...therefore I'm envisioning phase-3 being a truss system for the bow area.
 

GA_Boater

Honorary Moderator Emeritus
Joined
May 24, 2011
Messages
49,038
Re: My First StarCraft; 1975 18' SuperSport

BF - Is this your last boat? I only ask because it's gonna last forever. :D
 

classiccat

"Captain" + Starmada Splash Of The Year 2020
Joined
Dec 20, 2010
Messages
3,411
Re: My First StarCraft; 1975 18' SuperSport

BF - Is this your last boat? I only ask because it's gonna last forever. :D

Ga, I can say with confidence that when the good lord decides that it's my time, I will still be the registered owner. Maybe I'll even will-it-out to the Starmada :lol:
 

classiccat

"Captain" + Starmada Splash Of The Year 2020
Joined
Dec 20, 2010
Messages
3,411
Re: My First StarCraft; 1975 18' SuperSport

It sure is nice having a day to work on the boat! I finished fabbin' the vertical gunwale braces...breeze compared to the spray-rail / outer-chine (SR/OC) braces. ...and they'll probalby make life a hellofalot easier for the SR/OC braces as well!


probably video-worthy process but my miniDV recorder took a dump and my daughter's "video recording device" is still wrapped :cool:
 

classiccat

"Captain" + Starmada Splash Of The Year 2020
Joined
Dec 20, 2010
Messages
3,411
Re: My First StarCraft; 1975 18' SuperSport

If you're following this thread and interested in fabbin' some of these braces for your tinnie, here's my process flow.

1.) cut your blanks. I made all of mine 4" wide. The forward braces can probably be 1/2" wider & the aft-most braces can be 1/2-1" narrower.

2.) Mark the top of the shelf on the brace.


* at this point you have to decide 2 things, (a.) how wide do you want to make the outer tab (recommend 1/2" to 1") and (b.) how far do you want the bottom to extend relative to the floor rib. 1" from the gunwale measured at the top of the spray rail seems Ideal on mine.


3.) Take (a) above and add it to the mark from the top of the shelf. Also, add (a) to the bottom extension distance. For Example. If I want a 7/8" tab, make a mark 7/8" from the top shelf-mark and measure-in 1 7/8" for the bottom. Strike a line and line-it-up on the bending brake.
 
Last edited:
Top