My first boat restoration, I need some guidance - PLEASE HELP!

  • Thread starter Deleted member 340796
  • Start date
D

Deleted member 340796

Guest
Re: My first boat restoration, I need some guidance - PLEASE HELP!

wlImage09132012095757.jpgwlImage09132012095641.jpgwlImage09132012093430.jpgwlImage09132012095813.jpg

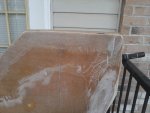
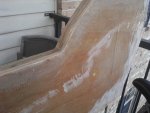
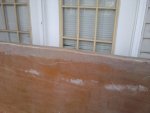
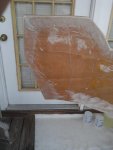
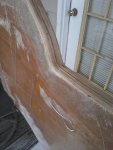
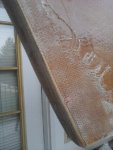
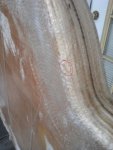
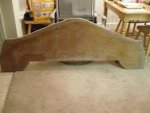
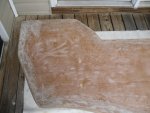
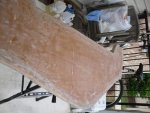
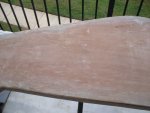
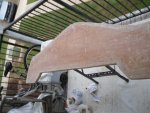
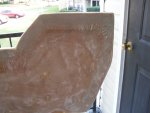
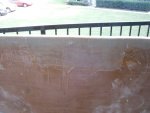
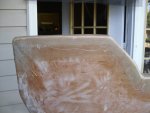
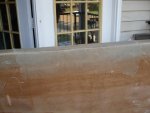
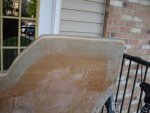
Nice update on the transom instructions Wood. I like it. Well I have saturated the wood with resin and applied my first coat of 10oz cloth. I think it went real smooth. Definitely helps seeing others' photos and having the general support of this community. I did not see any bubble on the first side that needed to be sanded out, and the second side looks good and is drying now. I can definitely see where the edges will be trickier to master. Still, I will get them done good too. It is so exciting getting to this point in the process. Feels like I just reached a right of passage in life. WOW. ;)

I used 12oz of epoxy resin (Raka A+B - Medium 2:1) on each side of the transom to saturate the wood and apply the 10oz cloth.

In other news, my oldest Sidney (aka Black Beauty, Grey Bearded Woman, and Ethel when she is walking slow) took a tumble down the apartment stairs yesterday. The good news is I had her on leash and was able to stop it before she fell down all of them. She seems to have a front leg that gives out on her even during walks and she will nose dive into the ground. Poor Baby. So we were all super excited when the other half got the OFFICIAL letter yesterday that will take us home to Texas where we will live on a 1 acre lot, fenced in with a doggie door. My girls will be free again to come and go as they please! YAH! Hmmm, so AJ wonders, will I get the boat done in time for a cruise in the Reservoir to see the alligators in their natural habitat????? Sorry to bore you all, just feel so excited I have to tell the world. LOL.
 

Attachments

  • wlSDC16048.jpg
    wlSDC16048.jpg
    64.5 KB · Views: 0

Woodonglass

Supreme Mariner
Joined
Dec 29, 2009
Messages
25,932
Re: My first boat restoration, I need some guidance - PLEASE HELP!

Refresh my memory. Are we using Poly or Epoxy?
 
D

Deleted member 340796

Guest
Re: My first boat restoration, I need some guidance - PLEASE HELP!

Epoxy
 

Woodonglass

Supreme Mariner
Joined
Dec 29, 2009
Messages
25,932
Re: My first boat restoration, I need some guidance - PLEASE HELP!

Ok , Kool, I did not see any CSM and was worried for a minute. You're GOLDEN. Cut the edges back a bit and then fray them out a little and you should be able to wrap em over the edges pretty easy. Epoxy's a bit harder to keep the bubble out since it does not set up as quick as the Poly. You have to baby sit it a bit more so make sure you keep checking on it to ensure those pesky bubbles don't creep in there.;)
 
D

Deleted member 340796

Guest
Re: My first boat restoration, I need some guidance - PLEASE HELP!

Ok, reminder I am using Epoxy resin (Raka) NOT poly. I am currently working with 10oz cloth. Wood, you said to fray the edges hanging over but most of that area already had resin on it from me being sloppy with it so when I tried to fold it over and fray what was around it - it broke. So I tried cutting pieces a few inches thick, laying it over top or edges and then overlapping what was already glassed on sides. I definitely see what you mean with baby sitting it to keep bubbles from coming up. I have also learned to wait longer before putting the cloth on as then the tackiness holds the cloth in place more. Corners are a challenge but not terrible. I tugged on the material to allow a little looser material in the corners. I also overlapped the 2 pieces you see by about 3 or 4 inches.

I am concerned that it might need a second coat of either resin or both resin and material as there is a place or 2 that seems more exposed still. Is there any reason this way will not work? What are your thoughts on the second coat of either resin or both resin and cloth? I still have to do the 1 side and the entire bottom. Just checking to make sure this way will work.

I did take more photos if you want to see them too just say so. Also, I tried folding corners sort of like a Christmas package and if it is too bulky or in the way I can grind it down some. Thanks. aj
 

Attachments

  • wlImage09162012170736.jpg
    wlImage09162012170736.jpg
    89.6 KB · Views: 0
  • wlImage09162012170750.jpg
    wlImage09162012170750.jpg
    91.7 KB · Views: 0
  • wlImage09162012170802.jpg
    wlImage09162012170802.jpg
    71.3 KB · Views: 0
  • wlImage09162012170821.jpg
    wlImage09162012170821.jpg
    73.8 KB · Views: 0
  • wlImage09162012170828.jpg
    wlImage09162012170828.jpg
    88 KB · Views: 0
D

Deleted member 340796

Guest
Re: My first boat restoration, I need some guidance - PLEASE HELP!

wlImage09162012173049.jpgwlImage09162012173118.jpgwlImage09162012173150.jpgwlImage09162012173209.jpg

Here are the areas that I described above that concern me and might need a second coat of resin / and or cloth. What are your thoughts?
 

jbcurt00

Moderator
Staff member
Joined
Oct 25, 2011
Messages
25,259
Re: My first boat restoration, I need some guidance - PLEASE HELP!

From the pix, I don't see the areas you mention being concerned about.

You will be adhering the wooden transom (which has 'roughly' 1 complete coat of epoxy & cloth on both sides & all edges) to the boats fiberglass skin w/ epoxy PB correct?

Filleting the wood transom to the sides & bottom of the hull w/ epoxy PB, and tabbing the transom to the hull w/ additional epoxy & cloth, correct?

Epoxy is stronger then poly, add in the cloth w/ the epoxy, and as long as you get thin or light spots covered at installation, you shouldn't have any problems proceeding.

Unless it's air bubbles under the cloth, that prevents the epoxy from being well adhered to the wooden transom, that's something else entirely. Air bubbles need to be ground out & re-covered.

Just continue to use epoxy, as the poly won't adhere to it very well.
 
D

Deleted member 340796

Guest
Re: My first boat restoration, I need some guidance - PLEASE HELP!

JB, they are not air bubbles, they look more like a spot where the weave on the cloth opened and the resin soaked into the wood more. I circled the areas with red. Perhaps the ones on the end will cover well enough with the PB and additional resin. The 1 near the top of transom, I might just do a touch-up patch over with an additional small piece of cloth to be safe. I am NOT using poly for anything. I am strictly using epoxy resin.
 

Attachments

  • wlImage09162012173103.jpg
    wlImage09162012173103.jpg
    109.5 KB · Views: 0
  • wlImage09162012173150.jpg
    wlImage09162012173150.jpg
    102 KB · Views: 0
  • wlImage09162012173209.jpg
    wlImage09162012173209.jpg
    85.5 KB · Views: 0

Woodonglass

Supreme Mariner
Joined
Dec 29, 2009
Messages
25,932
Re: My first boat restoration, I need some guidance - PLEASE HELP!

No problems that I see! Actually you did a GREAT JOB!!! I keep forgetting about epoxy and cloth!!! Grind off the overlap areas and feather em out. Lay on the next layer of glass and you're good to go.
 

jbcurt00

Moderator
Staff member
Joined
Oct 25, 2011
Messages
25,259
Re: My first boat restoration, I need some guidance - PLEASE HELP!

I didn't see any air bubbles, or anything really that I'd call a defect that needed attention pre-installation.....

But sand & cover area in pix #3 just to be on the safe side.....

Other's look to be in areas that will be well covered w/ PB, fillets & tabbing, but if you have scraps & are mixing epoxy to fix 1, you can fix any other areas that you think need to be addressed... If only for your own piece of mind, and it will cost very little & have no down side, to hitting even 5 or 6 more spots, if YOU think they need to be addressed...
 
D

Deleted member 340796

Guest
Re: My first boat restoration, I need some guidance - PLEASE HELP!

Awesome, Thanks Wood and JB. It is suppose to rain so more than likely it will be tomorrow or Wed before I get to do more, but I am getting more comfortable with it and what it takes to get it to lay down good.
 
D

Deleted member 340796

Guest
Re: My first boat restoration, I need some guidance - PLEASE HELP!

Well, we have had some good weather so I have been working on the transom. However, while sanding it down for the next step I came across air bubbles and once a part of it is exposed - the whole bubble came off easily. So I have re-done it a few times. Perhaps the perfectionist side coming out. Just want this to be a great job.

This last time I did it a bit differently. I cut material for each of the corners separately. Got the resin on and let it get tacky. Once it was tacky I put the material over the corners and made sure they were good - no bubbles at all. Then I let that all get tacky and I laid the longer / straighter pieces and overlapped the corners. Turns out, where I had air bubbles was where the wood did NOT match up well or had an uneven surface. I think what was happening was the air was removed the way I put the cloth down (starting center and going outward) but the lower lying areas allowed the cloth to pull up as I was rolling it thereby creating the air pocket.

So I fixed that by adding a drop or 2 more of resin over those areas as I saw them. Result = awesome coverage with NO BUBBLES. YAH! Going to finish the final area of the transom today and then I will get photos up for you guys. Hoping when I have my other half around this weekend, we will get the transom mounted in the boat. I have spent a lot of time on the transom, sanding, glassing, sanding, glassing, sanding, glassing all to get 1 good coat all over. The important thing is I LEARNED FROM IT ALL! Router ALL Edges (or PB them out) and 1 - 2 extra drops of resin will take care of uneven surfaces!
 

Woodonglass

Supreme Mariner
Joined
Dec 29, 2009
Messages
25,932
Re: My first boat restoration, I need some guidance - PLEASE HELP!

Yer learnin'!!! Corners and edges are tough!
 
D

Deleted member 340796

Guest
Re: My first boat restoration, I need some guidance - PLEASE HELP!

Ok guys here it is. I have put the final (cross fingers and knock on wood) glass on the transom before installing it in boat. :D Tomorrow I will sand it down again and we will do some dry runs on putting it in the boat. Then tomorrow afternoon or Sunday we will PB it in the boat and clamp it. I need to read the other posts again and figure you if I can PB the corners and let them set up before PB in the transom, or if it all HAS to be done together.

I will also start getting measurements on the stringers as there was nothing left of mine to measure from. I think I want to create a slight pitch to the front of the boat and the sides so that any water is directed to the center and then back to the bilge area.

Since I have not worked a lot with PB so far, I will need to look up the mixture amounts again just to be safe.
Notice I put a second piece over the top middle of the transom. That was mostly because of some unevenness and the cloth did not want to remain down, but with the second piece on there I was able to keep the bubbles out.

When mixing PB for laminating the transom to boat shell, about how much do you think I might use? Is it best to mix that all at once or in smaller amounts? The transom area is about 23" high by 73" wide. Well, here are the photos: these are from earlier this morning before doing the final glassing to top of transom. All corners were done, then went back and did the longer areas and overlapped corners. (using Raka Epoxy Resin and 10oz cloth)
 

Attachments

  • wlSDC11442.jpg
    wlSDC11442.jpg
    101.9 KB · Views: 0
  • wlSDC11450.jpg
    wlSDC11450.jpg
    109.3 KB · Views: 0
  • wlSDC11451.jpg
    wlSDC11451.jpg
    116 KB · Views: 0
  • wlSDC11453.jpg
    wlSDC11453.jpg
    104.4 KB · Views: 0
  • wlSDC11454.jpg
    wlSDC11454.jpg
    120.6 KB · Views: 0
D

Deleted member 340796

Guest
Re: My first boat restoration, I need some guidance - PLEASE HELP!

As it turned out, most of the edges have 2 layers of glass, but there were bubbles here and there that I had to grind out so I thought better safe than sorry. Here are photos after the final glass is on transom. (HOPEFULLY).
 

Attachments

  • wlSDC11455.jpg
    wlSDC11455.jpg
    105.7 KB · Views: 0
  • wlSDC11456.jpg
    wlSDC11456.jpg
    108 KB · Views: 0
  • wlSDC11460.jpg
    wlSDC11460.jpg
    95.5 KB · Views: 0
  • wlSDC11462.jpg
    wlSDC11462.jpg
    103.1 KB · Views: 0
  • wlSDC11464.jpg
    wlSDC11464.jpg
    108.1 KB · Views: 0

jbcurt00

Moderator
Staff member
Joined
Oct 25, 2011
Messages
25,259
Re: My first boat restoration, I need some guidance - PLEASE HELP!

Just to make sure you get accurate estimates for PB, it's for EPOXY PB, correct? Since you used epoxy @transom wood, it'll need to be epoxy PB.

If so, I can't help, but WOG may be along shortly, or others....

BTW transom wood looks fab! And yep practice practice practice on the installation, although epoxy PB should give you more working time.

Have extra epoxy pre-measured, but un-mixed on stand by in case you need it. Try to have someone on stand by & available to mix it for you. Let them know you need it mixed before you run out :)
 
D

Deleted member 340796

Guest
Re: My first boat restoration, I need some guidance - PLEASE HELP!

JB,

Thanks for the pointers. YES it is EPOXY PB I will be using.
 

Woodonglass

Supreme Mariner
Joined
Dec 29, 2009
Messages
25,932
Re: My first boat restoration, I need some guidance - PLEASE HELP!

I'd guess-ti-mate 3 qts. Your mix will be approx, 1 qt resin, 1 1/2 qt cabosil 1/4 cup 1/4" chopped milled fibers. Add additional cabosil if needed to bring the mix to the consistency of creamy peanut butter. I'd recommend using a 3/8- 1/2" notched trowel and put the PB on both the transom and the skin. I would also recommend, now don't freak out, drilling some 1" holes in the transom to allow the PB to squeeze thru and form a mechanical bond too! If you stude craigweavers install again you'll see that he did that. If you apply the PB kinda heavy around the edges and the bottom it should squeeze out and give you material to use for your filleting. You may need to add some more. JBC is correct about a helper. I'd mix only a quart at a time and see how it goes. I'll PM you my cell# so you can call me if you run into any issues and need to talk about it. Practice, Practice, Practice then "Just DO IT!!!!" Don't clamp to hard. Just enuf to get the squeeze out started. Clamp the top first with the bottom bolts then tighen the top bolts to clamp the bottom of the transom then to half turns on each to make em tighten up equally.
 

jbcurt00

Moderator
Staff member
Joined
Oct 25, 2011
Messages
25,259
Re: My first boat restoration, I need some guidance - PLEASE HELP!

Those 'extra' holes in the transom actually help you make sure that the PB is getting evenly spread out & that your getting good adhesion of the wood to the fiberglass skin. And lessens the likelihood to trap an air pocket w/out good contact in between the 2.

Good luck in the am. And I look forward to seeing the pix of a well installed transom. The stand-by helper can do double duty as camera operator too :)
 
D

Deleted member 340796

Guest
Re: My first boat restoration, I need some guidance - PLEASE HELP!

Wood and JB, thanks so much for all the help getting me to this point. So far I have had a lot of fun with this boat restoration. I find I wake up each morning and go to bed each night with excitement as I can't wait to look at iboats and see what advised you two guys have. I feel like I have extended my family size by a few here at iboats.

I keep going back to craigweavers project and others to enjoy some of the humor and see their projects take shape. Getting to the point of putting the transom in the boat (and feeling in my gutt that it is solid - and I did it) seems like yet another major step in life. Normally I would be scared to death to drill a 1" hole in the transom, not to mention several of them. Since I know it worked others, I am not as fearful doing it to mine. I love having all you big brothers, fathers, and uncles to learn from. I sure do miss my Grandfathers through this project. Thanks guys.

Wood, I printed your directions out so I can read them over and over and have them close by when time comes to do it. I am sure it will go fine. Will post pictures when I get it in. Might be today, but tomorrow for sure.
 
Top