Monmouth's 1979 Starcraft Kingfisher Rebuild

Monmouth00

Petty Officer 2nd Class
Joined
Nov 26, 2017
Messages
198
Keep holding, Gentlemen!

A buddy came up last weekend and was able to help get the wiring started. some of the lights have gone in, as well as some of he other electrical accessories.

I'll get you more pictures this weekend.

I'm super pleased how it's coming along!

Thanks for all the positive feedback!
 

fishrdan

Admiral
Joined
Jan 25, 2008
Messages
6,989
The benches are 3/4" thick, so i was thinking 1 1/4" threaded stainless bolts. I just don't know if they need to be hex-head, or what diameter they should be.

Any suggestions?

Thanks!

I used 1/4" hex bolts to attach the swivels to the plywood, washer and nyloc nut below. Attach the seat to the swivel, then fish the bolts into the plywood.

Use Lock-tite on the bolts/screws that attach the seat to the swivel. I had my plastic seat's screws loosen several times, then lock-tited them, heavy dose of lock-tite.
 

Monmouth00

Petty Officer 2nd Class
Joined
Nov 26, 2017
Messages
198
Use Lock-tite on the bolts/screws that attach the seat to the swivel. I had my plastic seat's screws loosen several times, then lock-tited them, heavy dose of lock-tite.

Great tip. Thank you. Was wondering if loctite would be a good solution in several places, as a matter of fact.

I've installed a battery switch at the back of the boat, which is through-bolted to the rail. I think some there might do some good too. Unless I can find some nyloc nuts that match the threads on the 3" SS screws. Did I mention how crappy the Home Depot selection of stainless hardware is?
 

Monmouth00

Petty Officer 2nd Class
Joined
Nov 26, 2017
Messages
198
A productive few weekends.

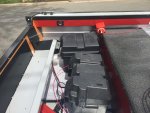
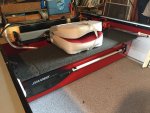
The batteries went in - I'm running with a Group 24 Starting Battery, with a Group 27 Bank Battery. The smart battery switch is being wired in. This will allow me to run my bank battery for the trolling motor down to almost nothing, and still have reserves to start and motor back to the dock.

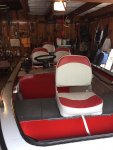
In the battery picture, you can see the plug where the trolling motor will be installed on the rail. The T/M was previously wired directly to the battery. With the plug, I can now put an inline fuse on, and not risk frying the rest of my electronics if the T/M shorts.

You can see the plate on the inside of the splash well that will hopefully add some strength to the single piece transom wood. It's not plywood, it's a single piece of douglas fir, and some were concerned about the torsional strength. Hopefully the plate adds some guts to it. But I'm only hanging a 20 Hp two stroke on it, so I'm thinking it will hold without issue.

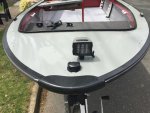
I had an extra battery powered LED light, and a big hole from the previous owner in my bow, so the light was installed there, right behind the new LED bow light.

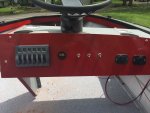
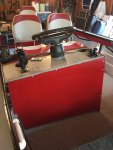
The switches were also installed in the dash. I have a six gang switch panel with fuses, a voltage meter (with three-way switch so I can check either battery), two 2-position toggles, a 12 volt socket, and a two plug USB charger. I don't know which switch will work which electronics yet, but I think I have more than enough. Likely some will be left open to add other electronics later.

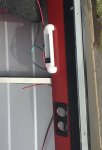
Just behind the front bench, and in front of the rear bench, are directional LED lights. These can rotated to be pointed 180 degrees. So, when we're fishing at night and have to tie a knot, I don't have to turn on every light in the boat.

Also, just in front of the console and in front of the rear bench I've put another 12 volt plug and USB plug. There's one of each in both locations. People will be able to charge their phones, or I can move the position of my underwater light. The 12 volt plug in front of the console where will be where my aerator will plug in. The bait bucket will sit between the console and the front bench.

There will be inline fuses on most of the runs.

If you look closely, you can see the bus bar under the console. All the power from the batteries will be sent there, then distributed to the dash. This will allow me to trouble shoot electronics right under the console, rather than chasing bugs all over the boat.

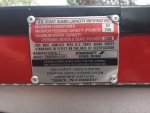
Last, I replaced the data plate. I had to drill out the rivets on the metal plate, and before I could punch the rivets out, my son grabbed the plate and bent it. I hammered it as flat as I could, but it's pretty warped. Another imperfection I'll have to live with, as the plate no longer sits flush with the rail.

My daughter has been jealous of her brother helping Daddy on the boat, and wanted to contribute something. She's been drawing pictures, and asking what she can put on the boat. She has a shirt that has a picture of a giraffe on it, and it says "MOO, I'm a Goat." She thinks it's hilarious. She comes up with different incorrect animal combinations. When I had extra space on the data plate, she suggested it say "Quack, I'm a Donkey". It's her contribution to the boat that will remind me of my goofy little 4 year old as long as we have the boat (no matter how old she gets).

I also added red LED strip lighting under the rails on both sides of the boat. That was a pain in the butt. The adhesive on the LED strips is awful, so I had to put outdoor double-sided tape on the underside of the rail first. But of course, the tap was too wide for both the rail and the strip lighting, so I had to cut it. That was awful - trying to cut it with an exacto knife while not destroying it was frustrating. Then laying it out on my back, and again to stick the LED strip to it. Ugh. The LED Strips will have RF remote sensors installed, so I can dim them, make them flash, etc. It's a vanity project, to make the boat look cool while we're running at night. Maybe it will be useful while we're anchored and fishing, but I doubt it.

More wiring next weekend!

Hopefully the OB will be done soon, because we're getting really close to putting her back in the water. SPLASH!!
 

Attachments

  • photo289860.jpg
    photo289860.jpg
    194.2 KB · Views: 8
  • photo289861.jpg
    photo289861.jpg
    178 KB · Views: 7
  • photo289862.jpg
    photo289862.jpg
    179.6 KB · Views: 7
  • photo289863.jpg
    photo289863.jpg
    69.2 KB · Views: 7
  • photo289864.jpg
    photo289864.jpg
    171.2 KB · Views: 8
  • photo289865.jpg
    photo289865.jpg
    176.2 KB · Views: 8

Watermann

Starmada Splash of the Year 2014
Joined
Jan 12, 2013
Messages
13,754
Nice work, the little but mighty Kingfisher is going to be a fishing machine :encouragement:
 

fishrdan

Admiral
Joined
Jan 25, 2008
Messages
6,989
Looking good!

Quick tip, get some waterproof switch covers for the dash toggle switches, about $1 each on Ebay. If the switches get rained on (or water in them from washing the boat) it could ruin the switch. Had this happen on my boat, engine blower switch, not one you want to have fail.
 

BWR1953

Admiral
Joined
Jan 23, 2009
Messages
6,052
"MOO I'm a goat" would make an awesome sig line! :D

You're making excellent progress. I'm really looking forward to seeing your splash. :joyous:​​​​​​​
 

Monmouth00

Petty Officer 2nd Class
Joined
Nov 26, 2017
Messages
198
Quick tip, get some waterproof switch covers for the dash toggle switches, about $1 each on Ebay. If the switches get rained on (or water in them from washing the boat) it could ruin the switch. Had this happen on my boat, engine blower switch, not one you want to have fail.

Thanks for the tip. These were all-weather switches from Blue Sea Systems, and are supposed to be waterproof by themselves. But, I guess it couldn't hurt too much if I spent another $3 on covers. Might make it look a bit cleaner too!
 

Monmouth00

Petty Officer 2nd Class
Joined
Nov 26, 2017
Messages
198
Hello Everyone!

I'm so close I can taste it!

My buddy came up to complete the wiring this weekend - thank God for his help. I wouldn't have had the first clue how to do this all correctly. I learned a ton, and the boat is now wired professionally. It should last a long time.

But, SO MUCH WIRE! I had no idea it would have been so complex, or I would have dropped about half of the components. I feel like I crimped connectors all day on Saturday (I did). My hand aches from squeezing the tool.

Here's a video of the results (sorry the beginning of the video is so dark):

https://www.youtube.com/watch?v=_9Pu8mI4a0g&feature=youtu.be

Now I just have to bundle and tuck the wires, put on the front of the console, install the seats, hang the engine, and put the registration on. A much shorter to-do list than I ever thought I'd get to.

The boy and I will be fishing again soon!
 

BWR1953

Admiral
Joined
Jan 23, 2009
Messages
6,052
Looking good! Wiring is so much fun. :lol:

I originally used pool noodles as wire conduits on my KF. They tuck nicely up under the gunnels. At this point in my project I'm going to use actual wire loom, but will put those into the pool noodles and then tuck the whole shebang up under the gunnels again. Might put a couple small cross braces in to hold everything up on the long runs.

Like so:
image_232081.jpg

image_232082.jpg
 

Monmouth00

Petty Officer 2nd Class
Joined
Nov 26, 2017
Messages
198
That's an awesome idea!

But, unfortunately, the majority of the wires will have to be tucked under the same gunnel where the steering cable and electric start lines run. I don't think there's room for a pool noodle, unless it's a really skinny one.

ll look into it though! Thanks!
 

fishrdan

Admiral
Joined
Jan 25, 2008
Messages
6,989
When I rebuilt my Crestliner I used fiberglass rods to hold the wires up and out of the way, to keep the wires suspended up under the gunnels. Some of it old tent poles (knew they would come in handy one day) and other areas fiberglass "wire fish sticks" from Harbor Freight. (Covered the metal ends with heat shrink tube so it didn't chafe the wires). Worked well and keeps the wires from drooping down and being seen.
 

Monmouth00

Petty Officer 2nd Class
Joined
Nov 26, 2017
Messages
198
The quality of the video was great too!

Except for the beginning where you can't tell what or where the battery switches are!

Thanks, fellas. I appreciate the encouragement.

Looking into both skinny pool noodles (they make 2.5" diameter ones) and the "fish sticks". I love the idea - I just need to make it work with those steering and starting cables, which occupy a bunch of room under that right side gunnel.

The end is in sight!!
 

Monmouth00

Petty Officer 2nd Class
Joined
Nov 26, 2017
Messages
198
Rolled around on the boat floor for four hours last night tying up and tucking all the wires that we put in last weekend. It wasn't fun. So many zip ties.

Instead of the pool noodles, which was a great suggestion, I opted for plastic split tube conduit from Home Depot. It was 1" diameter, which barely held the bundle, but it was cheap. It made for a much easier install since i have limited space under the rail. It made the wire bundle disappear nicely.

The wiring in the stern, where the battery switches, batteries, stern bus bar, and trolling motor plug are all in close proximity turned out to be a mess. I won't say it to my buddy who took time out of two of his weekends to help me, but it did not turn out like I had envisioned it. We were both anxious to get as much done as we could in a short amount of time, and it shows. We didn't take the time to properly measure wire runs, so I have a lot of extra "service loops" of bundled wire. Oh well. It's wired, and it lights up when I flick the switches. For that I am grateful, because I couldn't have done it without him.

As far as the "to do" list goes, I'm getting to the end of it. I have to put the front on the console, and the new piece that closes off the underside of the bow. Then comes putting the numbers on, and hanging the engine. After that, fishing, hopefully.

With regard to the engine, I heard back from my guy. I was pleasantly surprised that the problem was what I had predicted - a bad float valve. The rest of the engine is in pretty good shape. I was told that the cylinders have good compression, and are within one psi of each other. The motor had been neglected for a few seasons (despite being told that it was recently serviced), but there were no major problems.

The float valve will be replaced, a new gasket kit will go in, the carb will be rebuilt, and the lower gear oil will be replaced. I'll get out from under it for just over $300, which is a welcome relief.

I'll try to post pictures of my progress soon.

Thanks again, Fellas!
 

BWR1953

Admiral
Joined
Jan 23, 2009
Messages
6,052
You're getting closer and closer. Cool beans! :cool:

Sounds like you got a fair price on the engine work. It would have been a lot more around here.
 

Monmouth00

Petty Officer 2nd Class
Joined
Nov 26, 2017
Messages
198
Home stretch!

I got the front of the console on yesterday. I also installed my RAM mount for my phone, and the fish finer mount.

I put an oar on each of the rear and front benches (just in case, right?). I was skeptical of the clips I bought, which were originally for a kayak, but they seem to be pretty sturdy. At least they were cheap, so when somebody inevitably kicks and breaks one, I can replace it.

I also installed each of the seats. One on the back bench, two for the middle, and my daughter's bow seat (specifically requested by Princess Chicken herself). All were mounted on the swivels, and through drilled with 1/4 inch bolts.

I'm running out of things to put on the boat! All of the wiring and accessories are done, rod holders are flush-mounted, and the cleats are on.

I do have two more cleats to find and install. I don't want to put more holes in my boat, so I'm desperately searching for cleats with mounting holes spaced 2 1/8th" apart. No luck so far, so any suggestions where I can fine some would be appreciated.

The motor is done, and will be hung on the boat tomorrow! We could be splashin' this weekend!!

It's been a long 7 months, and I'm happy to be bringing this project to a conclusion!
 

Attachments

  • photo290998.jpg
    photo290998.jpg
    177 KB · Views: 7
  • photo290999.jpg
    photo290999.jpg
    215.8 KB · Views: 7
  • photo291000.jpg
    photo291000.jpg
    128.7 KB · Views: 7
  • photo291001.jpg
    photo291001.jpg
    162.7 KB · Views: 7
  • photo291002.jpg
    photo291002.jpg
    155.8 KB · Views: 7
Top