Man of Steel Goes Aluminum

PikeHunter431

Petty Officer 2nd Class
Joined
Sep 8, 2015
Messages
171
No Title

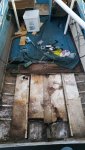
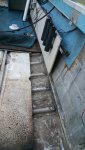
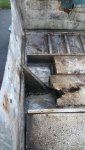
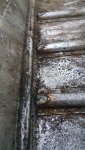
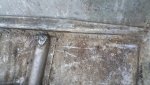
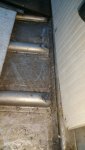
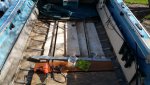
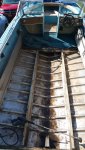
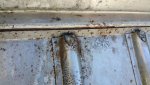
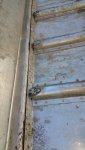
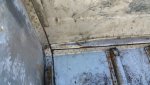
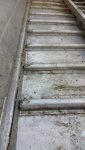
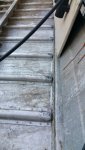
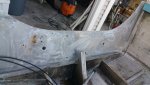
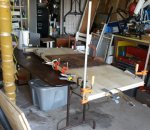
Then to get the rear section of plywood flooring up, I removed the port side panel and the brace that supported it at the bottom. On the starboard side, I was able to take the brace out without having to completely remove that side panel. With the grime on the plywood, it was sort of seek and find to locate all the rivets to drill out. Probably since I have never taken on of these things apart, the melody of that kids tune about "the hip bone is connected to the leg bone and the leg bone is connected to the ...." kept going through my mind. Eventually, out cane the one sheet of plywood. And to no surprise, it's pretty gunky down there and the foam had seen better days. After vacuuming out the loose stuff, I didn't see any issues yet. I believe I will need to remove the grunge before I can be sure though.
 

Attachments

  • photo240816.jpg
    photo240816.jpg
    187 KB · Views: 4
  • photo240817.jpg
    photo240817.jpg
    190.4 KB · Views: 4
  • photo240818.jpg
    photo240818.jpg
    170.1 KB · Views: 4
  • photo240819.jpg
    photo240819.jpg
    166.9 KB · Views: 4
  • photo240820.jpg
    photo240820.jpg
    180.4 KB · Views: 4
  • photo240821.jpg
    photo240821.jpg
    161.7 KB · Views: 4
  • photo240822.jpg
    photo240822.jpg
    151.7 KB · Views: 4

PikeHunter431

Petty Officer 2nd Class
Joined
Sep 8, 2015
Messages
171
Hi Pike Hunter:
I think Starcraft put the wings at the top of the transom because they ripped a 4x8 sheet down the middle for the bottom part rather than trim two whole sheets.

That would make sense and fit the cost saving aspect.

I am going to stick with the one piece approach. My carpentry skills are somewhat rough. I am just hoping to get the 15 degree angle cut reasonably well. However, having not measured the transom before buying the plywood, I only picked up one sheet. It would seem I need to get a second one for the approach I am taking.

Sounds like you are part way through your project. If so, why not get the thread going now?
 
Last edited:

PikeHunter431

Petty Officer 2nd Class
Joined
Sep 8, 2015
Messages
171
Varnish is compatible w adhesives for vinyl

Several members used Spar Varnish on the deck plywood before gluing Nautolex down.

Thanks for verifying. I thought that was the case. I seem to remember some people put a top coat of something else on, but that may have only been when they weren't covering it.
 

PikeHunter431

Petty Officer 2nd Class
Joined
Sep 8, 2015
Messages
171
Given I am putting in the new transom now, as part of the patch job and given I am doing a full gut starting in July, I am guessing I should "complete" the interior of the transom now and not do anything with it in the July gut. In that path, I would remove the z-brace, clean off all the corrosion on the inside, prime, and paint it. I also need to repair the knee brace on this round, which I am planning no doing with a couple pieces of angle aluminum (drill and attach to the knee brace and to the transom.) I am also looking to JB weld any holes in the transom I don't intend to be reusing. Then in July, I can just leave the new transom in as that should be all down with no need to come out. Anything I am overlooking / missing on this section?
 

classiccat

"Captain" + Starmada Splash Of The Year 2020
Joined
Dec 20, 2010
Messages
3,409
Now the CSI investigation begins!! Good progress Pike!

Is your intention to use the boat until July? If not, the one thing I'd hold-off on is putting in the fasteners & splashwell drains until you know you're in full gut mode.
 

Watermann

Starmada Splash of the Year 2014
Joined
Jan 12, 2013
Messages
13,753
Now that's being serious and going at the deconstruction. Be sure to take lots of close ups for later when you start putting things back together.

Hey is that a home made Aplen horn in there? :lol:

fetch
 

PikeHunter431

Petty Officer 2nd Class
Joined
Sep 8, 2015
Messages
171
No Title

Now that's being serious and going at the deconstruction. Be sure to take lots of close ups for later when you start putting things back together.

Hey is that a home made Aplen horn in there? :lol:

fetch

Watermann, I take and have 10-15 other photos for everyone I post. The pics from my phone camera, even not in HD format are about 72x42" and over 5 Mb a piece. I run the ones I am going to post through Photoshop to get them under 250kb in size. Many of them are close ups, mostly so I will be able to remember how it was originally put together, when I try and put it back together. I will post more, particularly close-ups as I start putting it back together: partly for others to see and learn, partly so you guys can continue to help me not get too far in the weeds.

Hmmm, I wonder if I put a reed in the small end at the bow, If I could sell the coast guard that it was my ball-less whistle for the safety equipment checklist?

Actually it is my homemade cover support for the snow and rain here. I saw a guy tossing some PVC away on Craigslist, got it and $20 of connectors at Lowes; voila, a sturdy cover support that has worked good this winter. But time to button things down again. We are supposed to get 3-5" of snow tonight and 50 mph wind gusts. Ah, April/spring in upstate NY.
 

Attachments

  • photo240843.jpg
    photo240843.jpg
    154 KB · Views: 2
  • photo240844.jpg
    photo240844.jpg
    171 KB · Views: 2
Last edited:

PikeHunter431

Petty Officer 2nd Class
Joined
Sep 8, 2015
Messages
171
Now the CSI investigation begins!! Good progress Pike!

Is your intention to use the boat until July? If not, the one thing I'd hold-off on is putting in the fasteners & splashwell drains until you know you're in full gut mode.

Thanks classiccat, Yes I am going to take her up to NE Ontario in late May and use her, leaver her and use her again at the end of June, bring her back around the 4th of July and then start the Gut. I think the splashwell drains were the hardest thing I have faced in removing so far. It was a brute force hammer / chisel destructo removal. Maybe I should just improvise some flexible plastic tubes for splash well drainage. The splash well is likely to become much smaller and perhaps narrower. I haven't figured that part out yet.

What I am currently thinking is to use (somewhat small diameter) screws to attach the one new piece of flooring and the rear raised deck. The new rear raised deck will be aluminum angle and plywood with some additional angle aluminum vertical supports for the gun whales. The plan in using screws is they will be easy to remove when I come back. I could then use rivets in the same, and maybe slightly bigger, holes when I put it back together for "good", so to speak. It would also make it easier if I want to change part of the rear deck design.

I have never operated a boat like this. I am also adding a some non-trivial additions. One is a 24 Volt trolling motor setup on the bow. Another is a large capacity live well (which currently I am heading towards a movable/portable design). Then there is the rear casting deck. So I am a little hesitate to get too permanent in the design until I use her a bit with this set of changes in place.
 
Last edited:

Candutch

Chief Petty Officer
Joined
May 8, 2015
Messages
637
Nice progress Pike. Since you are planning on a smaller splashwell and rear deck have a look at my thread for ideas as that is what I did. I'm not fished yet but the deck and splashwell are in.
 

PikeHunter431

Petty Officer 2nd Class
Joined
Sep 8, 2015
Messages
171
Thanks Candutch, I just oogled your thread. I especially liked what you did on the transom in raising the two sides between the splash well.
 

PikeHunter431

Petty Officer 2nd Class
Joined
Sep 8, 2015
Messages
171
Building a front casting deck with below deck storage and a live well is fairly easy if you have the right tools and a good idea of what you want.


The blacked out openings are storage area and a live well, the red dot is where the pedestal seat goes.

Using .063" (1/16") aluminum angle will be light and it won't rot. I have more pics of the procedure if you're interested.

Hi jigngrub , now that I further down the road, I would be interested in getting a peak at those pictures of the process you used. How wide was the aluminum angle you used and the plywood?
 

PikeHunter431

Petty Officer 2nd Class
Joined
Sep 8, 2015
Messages
171
No Title

I think we are finally done with the white stuff, no more in the 10 day forecast. In the meantime I decided on the livewell system. I am going to make a portable/removable setup. I picked up a 150 quart Igloo cooler with a top access hatch. I plan on putting in an input feed, recirc/areation setup, an option for 2 water levels and and exit hose. I am not sure yet if I am going to use 1 pump or 2.

We are suppose to have nice weather this weekend and hope to get the grunge out of the back bottom of the hull for the close inspection. Also hoping to get the transom cut and glued not that the temperature is suppose to stay above freezing.

I also picked up the aluminum angle, a swim ladder and rivet gun. The 4200 and 5200 adhesives, Gluv-it sealer, rivets and snaps should be here over the next couple days.
 

Attachments

  • photo241670.jpg
    photo241670.jpg
    131.4 KB · Views: 2
  • photo241671.jpg
    photo241671.jpg
    84 KB · Views: 2
  • photo241672.jpg
    photo241672.jpg
    79.2 KB · Views: 2

PikeHunter431

Petty Officer 2nd Class
Joined
Sep 8, 2015
Messages
171
No Title

On Friday, I decided to take a second piece of the flooring up to get a better look underneath. And I decide to get the foam out, even though I plan on putting most of it back in until July. A bit of shop vac and some light power washing.
 

Attachments

  • photo241878.jpg
    photo241878.jpg
    191.5 KB · Views: 2
  • photo241879.jpg
    photo241879.jpg
    197.3 KB · Views: 2
  • photo241880.jpg
    photo241880.jpg
    191.1 KB · Views: 2
  • photo241881.jpg
    photo241881.jpg
    75.3 KB · Views: 2
  • photo241882.jpg
    photo241882.jpg
    121.7 KB · Views: 6
Last edited:

PikeHunter431

Petty Officer 2nd Class
Joined
Sep 8, 2015
Messages
171
No Title

One thing I noticed is that there have not been any cutouts in the plywood for the ribs and the plywood didn't really come all the way out to the edge of the hull.

Shouldn't the plywood floor come all the way out to touch where the double row of rivets are?
 

Attachments

  • photo241881.jpg
    photo241881.jpg
    75.3 KB · Views: 2
  • photo241882.jpg
    photo241882.jpg
    121.7 KB · Views: 2

PikeHunter431

Petty Officer 2nd Class
Joined
Sep 8, 2015
Messages
171
No Title

I did some cleanup around the rib ends and I haven't seen any signs of cracks, holes, loose rivets, etc. As far as places where there is a space between the bottom of the ribs (at the end) and the hull floor, there are a couple, but they seem relatively minor and isolated (not two ribs in a row.) I am thinking that with a new transom, fixing the knee brace, two new pieces of plywood for the flooring, building the rear casting platform with some added vertical angle on the gun whales, I should be ok to run her for my May and late June trips. Than I can tear things apart again for a full gut, thorough cleaning, gluv-it, etc.
 

Attachments

  • photo241883.jpg
    photo241883.jpg
    173.5 KB · Views: 3
  • photo241884.jpg
    photo241884.jpg
    161.9 KB · Views: 2
  • photo241885.jpg
    photo241885.jpg
    161.1 KB · Views: 2
  • photo241886.jpg
    photo241886.jpg
    152.5 KB · Views: 1
  • photo241887.jpg
    photo241887.jpg
    159.4 KB · Views: 1
  • photo241888.jpg
    photo241888.jpg
    143.2 KB · Views: 1
Last edited:

PikeHunter431

Petty Officer 2nd Class
Joined
Sep 8, 2015
Messages
171
No Title

Some of the corrosion removal on the transom skin is done, so far no surprises. And I cut most of the transom and glued it. I still need to cut out a rectangular section where the motor mounts with enough width to accommodate the motor tilted up and turned to either side.
 

Attachments

  • photo241889.jpg
    photo241889.jpg
    142.9 KB · Views: 2
  • photo241890.jpg
    photo241890.jpg
    146.7 KB · Views: 2

classiccat

"Captain" + Starmada Splash Of The Year 2020
Joined
Dec 20, 2010
Messages
3,409
That hull is in pretty good shape Pike; chine area appears intact and you have minimal corrosion to deal with.

Nice progress! :thumb:
 

oldhaven

Chief Petty Officer
Joined
Aug 30, 2015
Messages
568
Regarding your question about deck width, what was left of my Starcraft installed deck had beveled edges that came almost but not quite to the rivet line on the hull seam. I would think that it might be best to not have it touching the rivets, just close, as this would help with under deck ventilation. I can imagine that on the trailer or in warm waters with sun on the deck and even a little water in the bilge that it turns into a hot moist greenhouse under there, ideal for moisture penetration. I know some others even go as far as sealing the edges, but water will find its way under there regardless. My opinion only though.
 

Watermann

Starmada Splash of the Year 2014
Joined
Jan 12, 2013
Messages
13,753
One thing I noticed is that there have not been any cutouts in the plywood for the ribs and the plywood didn't really come all the way out to the edge of the hull.

Shouldn't the plywood floor come all the way out to touch where the double row of rivets are?

If the ply decking was properly installed it should go out to the semi-flattened ends of the ribs but not rubbing on the seam. The rib cut outs and beveling are in the bow section only. So for the replacement take the measurement from rib end to rib end.

fetch
 
Top