Man of Steel Goes Aluminum

Watermann

Starmada Splash of the Year 2014
Joined
Jan 12, 2013
Messages
13,787
Not sure about a catastrophic failure, the boat does't look in that bad of shape. What happens is more damage for you to repair from use with compromised decking and transom. If the splashwell has any cracks then chances are the transom is rotten and the knee brace could also be broken, the two seem to go hand in hand.
 

PikeHunter431

Petty Officer 2nd Class
Joined
Sep 8, 2015
Messages
171
Thanks (really) Waterman, you did hit on something there. The splash pan does have some cracks in it.They are visible just below the bimini cover.
 
Last edited:

classiccat

"Captain" + Starmada Splash Of The Year 2020
Joined
Dec 20, 2010
Messages
3,412
Oh yeah, that's pretty much par for the course for these old tinnies.

fetch


there's a good chance that you're knee-brace tabs are cracked as well.

There aren't many issues that would result in us to giving-up on vintage tin...

2 that I'd consider throwing in the towel: severe outer-chine cracking (directly below the seam) & severe galvanic corrosion in the seam itself.
 

Watermann

Starmada Splash of the Year 2014
Joined
Jan 12, 2013
Messages
13,787
Those are the catastrophic failures that CC is talking about in his last sentence but yeah you should consider what's going on with your old boat before deciding to go out and use it for a season before restoring her. Just saying you should be informed.
 

Candutch

Chief Petty Officer
Joined
May 8, 2015
Messages
637
Welcome PikeHunter. I had those same cracks in mine. Transom was rotten and knee brace was broken at the top holes. The PO obviously kept using it after it began to fail as there was quite a bit of damage. I took care of the splashwell by removing it and putting in a new splashwell and deck. I'm still in the process of restoring but you can get ideas for your rear deck from my thread. I have the same boat just an 81.
 

PikeHunter431

Petty Officer 2nd Class
Joined
Sep 8, 2015
Messages
171
Thanks for the welcome Candutch. CC, Waterman, et. al., you guys just keep informing me. I can be a bit thick headed sometimes.

I guess I had better plan on just getting on with redoing the transom and at least checking out the knee brace/ some of the back bottom structure.

Is it unrealistic to go down the following path: Take out the transom, splash pan, and back section of the deck. Put in a new transom, repair the knee brace (probably needed) and see what I find in the last 4-6 feet of the hull. If I don't find anything major, put down a temporary piece on the back floor and run it for the 2 different weeks I am looking at, then I can bring it back home and start the complete rework. Or is this probably just hopeful wishing / high risk?

I am guessing that the splash pan/ or decks put in provide some bracing across the back of the boat. That would mean I would need some sort of temporary bracing across the hull on top of the floor, if I were to use the boat and wanted to minimize the potential for more damage.
 

dozerII

Admiral
Joined
Oct 25, 2009
Messages
6,527
:welcome: PikeHunter431, great looking hull you have to start out with. I think your plan is good, but you would have to repair the splash well and reinstall it before using the boat, it provides a lot of structual support for the transom, and stops following seas from swamping you.
 

classiccat

"Captain" + Starmada Splash Of The Year 2020
Joined
Dec 20, 2010
Messages
3,412
Thanks for the welcome Candutch. CC, Waterman, et. al., you guys just keep informing me. I can be a bit thick headed sometimes.

I guess I had better plan on just getting on with redoing the transom and at least checking out the knee brace/ some of the back bottom structure.

Is it unrealistic to go down the following path: Take out the transom, splash pan, and back section of the deck. Put in a new transom, repair the knee brace (probably needed) and see what I find in the last 4-6 feet of the hull. If I don't find anything major, put down a temporary piece on the back floor and run it for the 2 different weeks I am looking at, then I can bring it back home and start the complete rework. Or is this probably just hopeful wishing / high risk?

I am guessing that the splash pan/ or decks put in provide some bracing across the back of the boat. That would mean I would need some sort of temporary bracing across the hull on top of the floor, if I were to use the boat and wanted to minimize the potential for more damage.


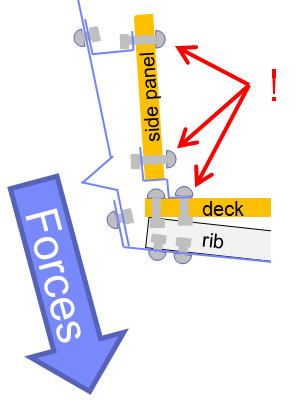
That plan isn't unrealistic at all. And I believe you're correct, the splashwell does supply support (side-to-side & lift).

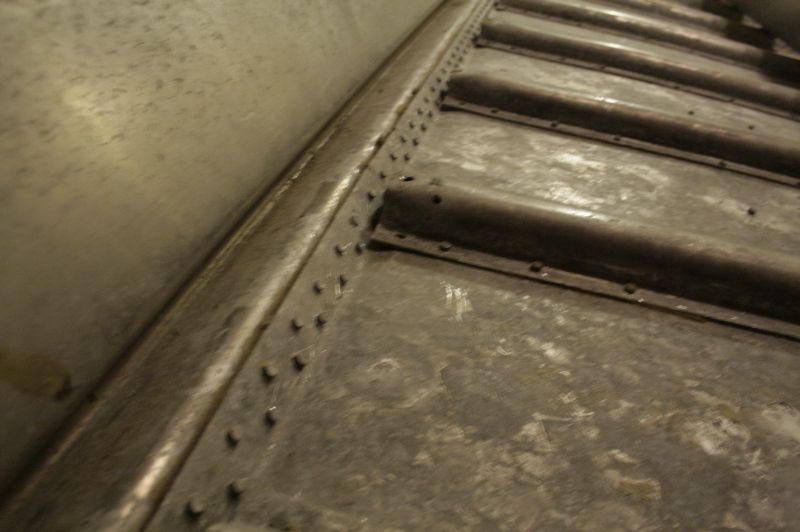
Double-check the deck near where the side panels meet.

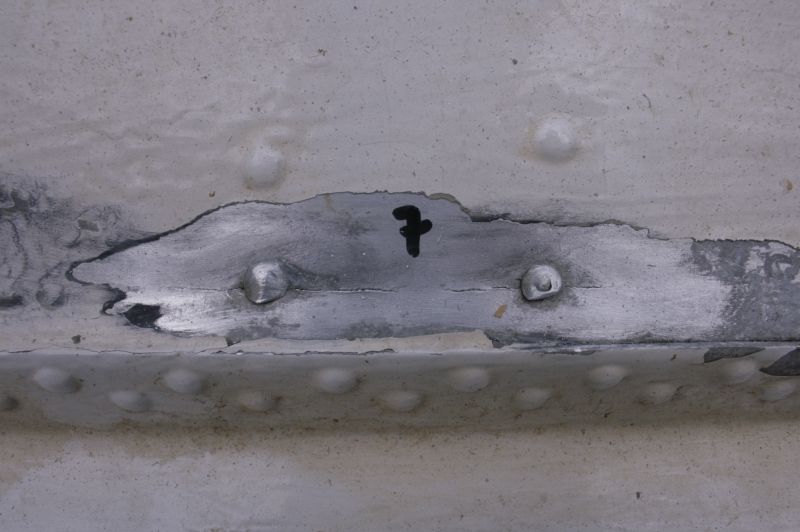
If the deck and/or the side panels (wood &/or fasteners) are compromised, you run the risk of flexing / cracking at the rib-end rivets, outer-shine &/or spray-rail.


Woodonglass

Supreme Mariner
Joined
Dec 29, 2009
Messages
25,927
Thanks WOG for the information.
It looks like the local Home Depot has the plywood. I noticed it said interior use only. I am guessing the sealing process makes it fine for use as boat decking/transom.
On the sealing mixture, what ratio between the three products?
I take that using this mixture takes the place of using the 2 part epoxy coatings?
Hmmm, If it says interior use only then I wouldn't use it. Prolly not the same as we've used in the past. I'd be interested to see any local ads you could post for it. The mix ratio is a 1-2-1 ratio. Yes it's an alternate to epoxy and If you really want it to last a long time I'd follow up with 2-3 coats of Oil Based Paint.
 

PikeHunter431

Petty Officer 2nd Class
Joined
Sep 8, 2015
Messages
171
Hmmm, If it says interior use only then I wouldn't use it. Prolly not the same as we've used in the past. I'd be interested to see any local ads you could post for it. The mix ratio is a 1-2-1 ratio. Yes it's an alternate to epoxy and If you really want it to last a long time I'd follow up with 2-3 coats of Oil Based Paint.

Hi WOG, Here is the Home Depot link I have. The specs in the PDF indicate the 23/32 is 7 piles. I don't always trust what comes up on computer inventory / descriptions. You might be able to tell form the specs if it is the same stuff. OK, As I pasted the link, it says suitable for indoor outdoor applications. If you look on the link page under description, it just says interior use. (my guess is this is the same stuff, what is your take?)
 

PikeHunter431

Petty Officer 2nd Class
Joined
Sep 8, 2015
Messages
171
That plan isn't unrealistic at all. And I believe you're correct, the splashwell does supply support (side-to-side & lift).

Double-check the deck near where the side panels meet.

If the deck and/or the side panels (wood &/or fasteners) are compromised, you run the risk of flexing / cracking at the rib-end rivets, outer-shine &/or spray-rail.


Thanks CC for the diagram/pics and where to look. I couldn't wait any longer. I went and pulled the boat home from it's winter storage area. I need to get second motor stand built before I can pull the motor off. We are suppose to get snow on Wed and Thurs, so probably next weekend at best before I can start pulling things up and see the condition in the spots you indicated. I will let you know (and post some pics).
 

Woodonglass

Supreme Mariner
Joined
Dec 29, 2009
Messages
25,927
Yeah, that's it. If you use the Old Timers on that, and then paint it...and then make sure to always pre-drill and seal any and all holes you poke in it...She'll last as long as you own the boat and even longer!!!!;):D
 

PikeHunter431

Petty Officer 2nd Class
Joined
Sep 8, 2015
Messages
171
Not sure about a catastrophic failure, the boat does't look in that bad of shape. What happens is more damage for you to repair from use with compromised decking and transom. If the splashwell has any cracks then chances are the transom is rotten and the knee brace could also be broken, the two seem to go hand in hand.

I was able to get under the cover today and you were dead on Waterman. The knee brace is indeed broken. From what I have seem in some other threads, it looks like the most common repair method is the use a couple pieces of aluminum angle, drill and attach to knee brace and transom.
 

Watermann

Starmada Splash of the Year 2014
Joined
Jan 12, 2013
Messages
13,787
Yeah it's a pretty straight forward repair, the other thing that goes with the rotten transom is galvanic corrosion on the transom skin from all the moisture.
 

PikeHunter431

Petty Officer 2nd Class
Joined
Sep 8, 2015
Messages
171
No Title

One heavy duty motor stand now constructed. I had to make this one a bit wider than my other stand as the 85 HP Johnson looks to need about 22" between the uprights and braces. I was also able to pull the gas tank out and get the kicker motor jackplate off before sundown.

Tomorrow's task is to get the wiring for the motor disconnected (in an organized way so I can know how to wire it back up again) and the motor over onto the stand.

I do have a question on the new transom. I believe the general approach it to glue to pieces of 3/4" plywood together and then seal them. What glue(s) have you guys used and been happy with?
 

Attachments

  • photo240422.jpg
    photo240422.jpg
    183.6 KB · Views: 1

Watermann

Starmada Splash of the Year 2014
Joined
Jan 12, 2013
Messages
13,787
Titebond III is very popular white glue. I like the Titebond poly glue.
 

Prepmech

Seaman
Joined
Oct 22, 2015
Messages
66
Titebond III brushed on worked great for me. It was very easy to work with.

I tried using the thicker PL stuff on my first transom attempt, put on with a notched trowel. It was too thick. I had a hard time getting all of the bubbles out. The glue seam in that one was very thick, almost looked like another thin ply. I didn't trust it, and it made the overall thickness too much to work with.
 

PikeHunter431

Petty Officer 2nd Class
Joined
Sep 8, 2015
Messages
171
Thanks Waterman and Prepmech.

Another question on adhesive sealants. Besides cost, what is the difference in the 3M (or other brands I suppose) of 4200 vs 5200? Any thoughts (other than time) on the quick dry vs regular?

From what I have seen in some other discussions, it sounds like when I have the new transom made, glued and sealed, then I should:

1) put the transom back in,
2) mark the holes where I will be drilling through for things like the motor mounts, swim ladder, etc,
3) pull the transom out,
4) drill out the holes, oversized
5) make and fill with the special peanut butter made from sawdust and one of the adhesive sealants
6) put the transom back in (after any work is done on the area surrounding the wood transom) and secure
7) redrill the holes with the correct diameter for attaching the motor mounts, swim rail etc.

For any holes in the aluminum back of the boat (don't know if this is also called the transom?) which I am not going to use:
1) fill lightly with JB Weld
2) sand flush.

This certainly feels like a "Star Trek" as I boldly go where this man has never gone before. I am very thankful the Star Fleet Academy is around to advise.
 
Top