Man of Steel Goes Aluminum

PikeHunter431

Petty Officer 2nd Class
Joined
Sep 8, 2015
Messages
171
No Title

May 25th:
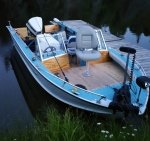
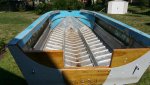
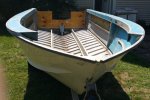
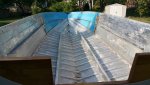
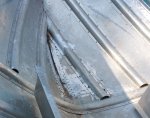
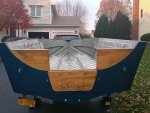
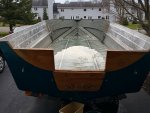
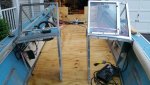
Installed the finished section of flooring under the consols. I installed the floor sections with some coated deck screws I had. The thought is I will be removing them when I finish the rebuild later this summer and the screws are easy to remove. I also believe that after I clean and Gluv-it the hull, I can put the foam back in and place the floors back in with the screws. The holes should be reasonably easy to align back up. My hope is to then take the screws out one by one and replace with rivets. The holes should be aligned and sightly larger than the screw holes. We will see how that works.

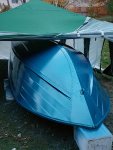
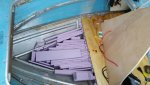
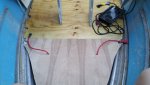
I finished putting foam in the bow section and made a temporary floor piece for the bow. The electric motor is a 24V system. I am placing a battery on each side to balance the weight. This required us to run a wire under the floor to connect the two batteries.

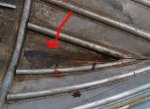
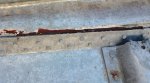
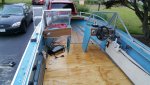
I forgot to put the aluminum cross slat in on the front of the section which goes under the consols. When I screwed the front of it down, the floor sagged a bit in the center. This oversight seemed to work out for now as the consols were then not jacked up too far out of place. I have been replacing the 3/8th plywood previously in the boat with 23/32nds. I like things on the solid side. I will have to move the side mounts up on the consols when I rebuild this summer. In the last picture, if you look at the bottom, you can see the difference in the floor height. The net result was the windshield wasn't too far off to use for a couple weeks. When I go up for the second week, I am going to put some weather stripping on the sides so the middle section doesn't hang on the hinge all the time.
 

Attachments

  • photo245970.jpg
    photo245970.jpg
    158.3 KB · Views: 3
  • photo245971.jpg
    photo245971.jpg
    169 KB · Views: 3
  • photo245972.jpg
    photo245972.jpg
    164.2 KB · Views: 3
  • photo245973.jpg
    photo245973.jpg
    143.7 KB · Views: 3
  • photo245991.jpg
    photo245991.jpg
    141.7 KB · Views: 3
Last edited:

PikeHunter431

Petty Officer 2nd Class
Joined
Sep 8, 2015
Messages
171
May 26, 27 and 28th.
First, I can't believe I didn't take any pictures, but it was a bit of a hustle. So here is what we did.
I made two temporary fronts for the consols, mounted them, put the 4 bank battery charger on the port side under the consol. The front electrical box is mounted on the starboard side under that consol. I made a temporary front raised deck which comes back all the way to the consols. It is two pieces. A wide one, which is screwed down on the starboard side and a loose one of about a foot wide on the port side. This allows access underneath. We also put in the two batteries and wired up the Ultera.

I started working on the back deck and got the angle aluminum cut and installed on the section from the brace to the transom. I didn't have time to cut and finish the two side sections which go in front of the brace. These will have the removable casting seats sitting on them, directly on the casting platform, for high speed travel. I cut the top of the plywood piece for the rear deck, but couldn't utilize it as the front sections were not done.

We remounted the motor and reattached the steering, throttle and shifting control cables, as well as the electrical harness and tilt control wiring. All the bolts, including the remaining transom bolts were installed with generous amounts of 5200. There must be an art to applying this stuff with it looking clean on the inside. So far, I haven't perfected this art. But as this is primarily a fishing boat and most of it is not going to be visible, I am ok with that. I am glad I saw the recommendation to wear gloves when using this stuff. I don't remember who or where, but that was definitely a great bit of advice.

I decided not to mount the gas tank, but just use the removable 6 gallon tanks for the time being.

I reinstalled the driver and passenger seats. I also put in the two original Starcraft floater seats, which are loose, in so I could take more than one passenger with me at a time. I also had purchased a transom saver, which my daughter put together and installed between the motor and the trailer. The trailer bearing buddies didn't have any cover, so I picked up a bras and put them over to cover. But beforehand, I added generous amounts of new grease.

I had purchased 4 fiberglass bows for the top and a couple new brackets to replace the broken one. The bows were easy to cut to size. I still need to make some sort of a strap to more securely keep them in place when traveling.

Put the house battery in the back and finished hooking up the rear wiring.

Put the new NY state registration and ID stickers on.

Loaded the safety equipment and fishing equipment in. (also loaded in a 15' roll of linoleum we took out of our kitchen in to take up and put in a bedroom at the cottage.)

Put the cover on, strapped it tight, attached the trailer to one van, plugged in the lighting and headed north late Saturday afternoon. We were about half a day late leaving.
 

PikeHunter431

Petty Officer 2nd Class
Joined
Sep 8, 2015
Messages
171
May 29th

Last items for this round were finished. Installed the extendable boarding ladder, the kicker motor bracket, the two transducers which came with the boat and the vacuum tube for the speedometer. We ran the discharge hoses for the bilge pumps and also plugged the live well inlet as this setup was not complete. I am sure I am forgetting some things, but I think that covers most of it.
 
Last edited:

PikeHunter431

Petty Officer 2nd Class
Joined
Sep 8, 2015
Messages
171
May 30th
Splashed

It floats and the motor runs - yea!

I had been concerned about the weight, but not a problem. With four of us and our gear, 3 of the four batteries, the trolling motor, double the thickness in plywood: it still drafts in just a few inches of water. It kicked up on plane fast and did about 35 mph on slightly choppy water.

We had one rivet in the back starboard side of the bottom of the hull that worked itself out over the course of a couple days. I pulled the boat, put a quick patch of JB weld on and no other leaks during the week.
 
Last edited:

PikeHunter431

Petty Officer 2nd Class
Joined
Sep 8, 2015
Messages
171
No Title

Our best one-run catch of the week. My crew:son, daughter and pooch to my sides and my hunting/fishing partner on the end.

Although I am only partway done with this rebuild, we were able to use the boat and I have a happy excited crew. Life is good.
 

Attachments

  • photo246026.jpg
    photo246026.jpg
    118 KB · Views: 3

Watermann

Starmada Splash of the Year 2014
Joined
Jan 12, 2013
Messages
13,753
Lots accomplished is such a short period of time, congrats on the splash and fishing trip!
 

Candutch

Chief Petty Officer
Joined
May 8, 2015
Messages
637
Congrats on your splash and fishing trip. That's a fine mess of slew sharks there.
 

PikeHunter431

Petty Officer 2nd Class
Joined
Sep 8, 2015
Messages
171
No Title

Here are a couple pics taken on our July trip.
 

Attachments

  • photo251356.jpg
    photo251356.jpg
    127.4 KB · Views: 5
  • photo251357.jpg
    photo251357.jpg
    112.4 KB · Views: 5

PikeHunter431

Petty Officer 2nd Class
Joined
Sep 8, 2015
Messages
171
No Title

I think I am about done gutting and removing things now. The next two items I see to do are:
1) fill in a number of holes from previously installed hardware that is no more or I am not going to use. The majority of these are on the top of the gunnels. I plan on using JB Weld to do this.
2) I need to remove the adhesive from the original vinyl that was inside the gunnels. Using a blade or putty knife was pretty useless and a heat gun didn't help much here. I am guessing I need to use an chemical adhesive remover. I have some stuff we bought to remove adhesive from linoleum, so that will be my next attempt.

How have others removed this stuff?
 

Attachments

  • photo251358.jpg
    photo251358.jpg
    144.6 KB · Views: 3
  • photo251359.jpg
    photo251359.jpg
    126.8 KB · Views: 3

Watermann

Starmada Splash of the Year 2014
Joined
Jan 12, 2013
Messages
13,753
Yeah I'll see your strips of adhesive and raise you an entire front half of the boat covered with it and the carpet backing.

IMAG2119.jpg


Used Klean strip adhesive remover mixed 50/50 with paint stripper, 3M scrub pad, paint scraper and a pressure washer to blast it off. After 4 application per side.

IMAG2335.jpg
 

PikeHunter431

Petty Officer 2nd Class
Joined
Sep 8, 2015
Messages
171
Now that is squeaky clean.

I have a question about the Gluv-it. Is there a preferred order in whether to apply the Gluv-it before flipping the hull (and then prep/paint) or doing it after?
 

MNhunter1

Ensign
Joined
May 12, 2014
Messages
989
Now that is squeaky clean.

I have a question about the Gluv-it. Is there a preferred order in whether to apply the Gluv-it before flipping the hull (and then prep/paint) or doing it after?


Consensus is to apply it after flipping, painting, etc..after you're right side up again. The stress placed on the hull could pop the adhesive qualities of the Gluvit from the bending, flexing, etc.
 

Watermann

Starmada Splash of the Year 2014
Joined
Jan 12, 2013
Messages
13,753
I normally don't flip the boat after applying the gluvit as it could torque the hull enough to crack the gluvit epoxy. Leak test and mark any leaks do the repairs needed like buck or replace damaged rivets, repair cracks or holes. Then flip, paint bottom, flip back over and do the gluvit job.

If you brace the sides, have the transom wood in and have the gunnels on you could flip the boat and not torque it enough to crack the gluvit but you're taking the chance of it.
 

PikeHunter431

Petty Officer 2nd Class
Joined
Sep 8, 2015
Messages
171
No Title

The Klean strip adhesive remover must be good stuff. Looks like they are not allowed to sell it in NY. I did get some Goof Off which helped to loosen it up. So here is how it looked a couple days ago.
 

Attachments

  • photo252387.jpg
    photo252387.jpg
    55.2 KB · Views: 4
  • photo252388.jpg
    photo252388.jpg
    155.8 KB · Views: 4

PikeHunter431

Petty Officer 2nd Class
Joined
Sep 8, 2015
Messages
171
No Title

Any idea what this black brownish sealer type material was? I have removed most of it. I assumed the Gluv-it would be the replacement for the seam where the bottom meets the sides as well as the rivets themselves.
 

Attachments

  • photo252390.jpg
    photo252390.jpg
    171.6 KB · Views: 3
  • photo252391.jpg
    photo252391.jpg
    126.1 KB · Views: 3
  • photo252392.jpg
    photo252392.jpg
    144.8 KB · Views: 3

Watermann

Starmada Splash of the Year 2014
Joined
Jan 12, 2013
Messages
13,753
That sealer is affectionately called SC smeg and is left alone most times since it's normally well adhered to the seams.
 

PikeHunter431

Petty Officer 2nd Class
Joined
Sep 8, 2015
Messages
171
No Title

I am long overdue to post. By early November I had finished cleaning the inside of the hull, got it flipped, set up my makeshift spray booth, and tried my hand using a spray gun for the first time. I flipped it, winched it up onto the trailer and tucked it into the garage for winter.
 

Attachments

  • photo263429.jpg
    photo263429.jpg
    132.1 KB · Views: 9
  • photo263430.jpg
    photo263430.jpg
    138.7 KB · Views: 2

PikeHunter431

Petty Officer 2nd Class
Joined
Sep 8, 2015
Messages
171
No Title

Finally got warm enough at the beginning of April to Gluv-it. I filled with water above the floor board level and no leaks.
 

Attachments

  • photo263431.jpg
    photo263431.jpg
    124 KB · Views: 2

PikeHunter431

Petty Officer 2nd Class
Joined
Sep 8, 2015
Messages
171
Since then I filled with Marine-Tex what seemed like a thousand holes in the plates that go around the top, on the sides of the gunnels, and the consoles. I can only imagine what must have been attached over the last 40 years. I ground down the Marine Tex, went over everything with a cleaner/degreaser and sanded. Next a wipe down with acetone and off to a local body shop which will spray them for me. I am feeling a bit of a time squeeze to get everything else done before Memorial Day.

I ordered some vinyl samples from Nautolex and MeriDeck. Admiral favors one from MeriDeck, so probably ordering that in the next day or so.
 
Top