Lone Star Medallion II 1966, Oh Scrap!

64osby

Admiral
Joined
Jul 28, 2009
Messages
6,826
Thanks guys, pretty happy, I like the look of the VDO gauges. Based upon the prices I see on them I think they should be good quality.

Glen the jet stream has certainly created a strange winter for the eastern half of North America.

The plus side is I make my living off insurance repairs to homes. Frozen pipes, ice dams, and related damage mean I will have a good year. The fun has just begun.
 

64osby

Admiral
Joined
Jul 28, 2009
Messages
6,826
Spring has Sprung. :D

No updates on boat work, because I haven't done any.:eek:

February was brutal, 4th coldest ever recorded for SW Michigan. The beginning of March was cold.

Just spent a week in Sunny Florida. :joyous:

It is strange, after we left for sunshine I get 4 contacts for buying the donor trailer. Spring fever for boat stuff.

The good news is the trailer is sold. Sure helps the boat budget. My total invested (buying - selling) to date is $125.00. Pretty happy with that.

I have a few bigger purchases coming up. Gluvit, plywood, structural foam, deck paint or Defender vinyl, vinyl for the panels and paint. The budget will not exist soon.

With the warmer weather, (50's) it is time to get back on it. The big goal is to have everything in place to pour the foam when we start hitting 80 degrees. That might be May or August, who knows.:confused:
 

Watermann

Starmada Splash of the Year 2014
Joined
Jan 12, 2013
Messages
13,798
I can see a big shipment of goodies, parts and supplies creating some motivation. At least it does for me ;)
 

64osby

Admiral
Joined
Jul 28, 2009
Messages
6,826
Next will be transom removal, old gunk removal, repairing holes and corrosion, leak test, gluvit, non leak test then new transom.
 

64osby

Admiral
Joined
Jul 28, 2009
Messages
6,826
My boat budget received some help this morning. A friend was helping someone clean up to move. The guy was tossing a bunch of stuff. My friend grabbed a Johnson 28SPL long shaft and dropped it off. Powerhead is locked up, the steering bracket is broken and the cowl is trash. Looks like a good candidate for parting out.
 

64osby

Admiral
Joined
Jul 28, 2009
Messages
6,826
Spent a little time working on cleaning up the hull. Removed the bow eye, was hoping to save it but the threads were trashed and they broke when removing.

Evidence of water leaking at the bow eye.

IMAG08821.jpg

IMAG08831.jpg

The keel is about 1 1/2" deep 1" wide and is exposed from about where your feet would be when in the captains chair.

IMAG08771.jpg

There is foam under each of the plates and there is evidence of water intrusion from foam removed at the keel to hull seams. Black on the foam, a piece of the gasket material also came out.

IMAG08791.jpg

I'm having a hard time coming up with a viable solution to sealing the seam between the keel and the hull. Getting most of it sealed might be possible, but getting it all might be impossible. Especially under the plates. The pic above shows the plate where the hull sheet become continuous, with a small view of foam beneath.

IMAG08841.jpg

Looking to maybe use a small wire brush to try and clean the seam. Getting Gluvit on that seam will be a challenge.

Any great ideas to ensure sealing the entire seam?
 

64osby

Admiral
Joined
Jul 28, 2009
Messages
6,826
While sitting in the hull I was debating the ability to make the hull water tight. If that is not possible it pushes the use of poured in foam out the door. It would also require building a structure to support the hull and floor.

IMAG08881.jpg

One of my thoughts would be to use pieces of the above pictured extruded aluminum to form "stringers". The alum is about 2 1/2" wide, they are 20" long and there are 20 of them.

My plan if this was used would be to run 6 stringers from the transom towards the bow, one every other lap. This would enable it to be flush with the hull by keeping the stringer within one of the laps. They would need to have a bend / twist to follow the contour of the hull. Vertical supports would be attached and another series of extrusions would be placed to support the floor.

By doing this it would allow placement of sheet foam and forming a bilge. Seeing how the boat is assembled I have my doubts on being able to make it 100% leak free. This would also allow service under the sole in the future if needed.
 

Watermann

Starmada Splash of the Year 2014
Joined
Jan 12, 2013
Messages
13,798
A good idea, I agree that foaming the boat for hull structure on your LS isn't a very effective option. With little in the way of hull bracing to work with I guess your in uncharted territory and some might say taking a huge risk.

Since you know what AL boats tend to use for hull bracing and to duplicate it is not impossible. If the sides and the bottom are 2 pieces riveted together then there needs to be structure added to help tie them together. Without ribs you have an engineering issue on your hands. I've seen how the other LS variants use a combination rib/deck support and I would be leaning toward fabricating something similar. It could be something like 2 3/4" pieces of ply on edge to make a 3/4" latitude stringer/monster rib with angle AL used to tie it into the bottom of the hull with solid rivets. Or something similar with sheet AL and angle AL riveted together. You know the issues involved with both materials.

The only way I can see to rid that keel of the foam and seal it properly is to cut the material and re-rivet another piece back on or drill out the rivets and replace the piece when done.
 

64osby

Admiral
Joined
Jul 28, 2009
Messages
6,826
IMG_3249.jpg


Boatnut74 had / has a Medallion. The ribs look substantial and they appear to tie the hull and via the plate on the sides.

The one thing about this hull is it has strakes. With strakes and ribs you end up with a structure that won't bend bow to stern ( I'm sure there is a term for this) and the sides are tied to the ribs giving good lateral support.

My thoughts on installing stringers on the interior would be to try and replicate the exterior strakes purpose.

From there some cross supports that tie to the supports on the sides would provide lateral support.
 

Watermann

Starmada Splash of the Year 2014
Joined
Jan 12, 2013
Messages
13,798
I was thinking the same and to up the ante the LS El Dorado has some serious support going on.

IMG_2607_zps87ad1ca7.jpg
 

dozerII

Admiral
Joined
Oct 25, 2009
Messages
6,527
Looks like serious challenges ahead ahead on this one. I think the only way to get all the foam out from under the keel braces is to remove them, clean out the foam seal with gluvit then re-install them. As discussed above if your not going to use pour in foam I think the best structure would be custom built ribs like in the two pictures you and Rob posted, but they will be a bear to fabricate in the back yard.
 

52FordF2

Petty Officer 1st Class
Joined
May 31, 2013
Messages
372
The plug did come out. Think the PO put some JB Weld on it. :facepalm:

Picked up some new brass fittings which fill the hole and match the size of the hull vent barb.

Also found some thread sealant that is rated for gasoline.

Was thinking about access to the drain hole. Might look at placing a deck plate in the splashwell. Something like this.


If the tank is aluminum, the brass fittings if not separated somehow Teflon, another fitting SSteel, etc, you may get some corrosion. Because of the copper fuel line across the top of my tank I had a line of corroded pits. Just my .02 cent worth. :joyous:
Someone else may be more knowledgable than me, may chime in later on this subject.
 

64osby

Admiral
Joined
Jul 28, 2009
Messages
6,826
52 - Good observation. You inspired a little research. It looks like the best match to aluminum is zinc according to what I seen on line. Most information is related to fasteners.

Zinc rates better then SS and aluminum according to several studies. SS and aluminum are the next best. All the rest show corrosion will occur.

I'll be looking for some new fittings. Thanks.
 

64osby

Admiral
Joined
Jul 28, 2009
Messages
6,826
I'm rescuing my thread from page 8.

I have been working on her but it has been slow going.

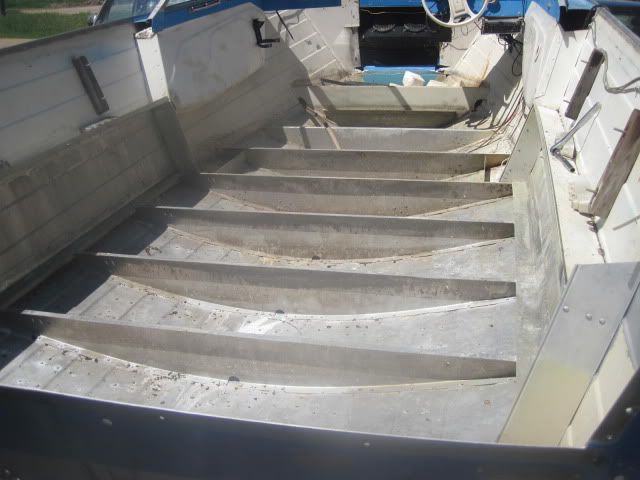
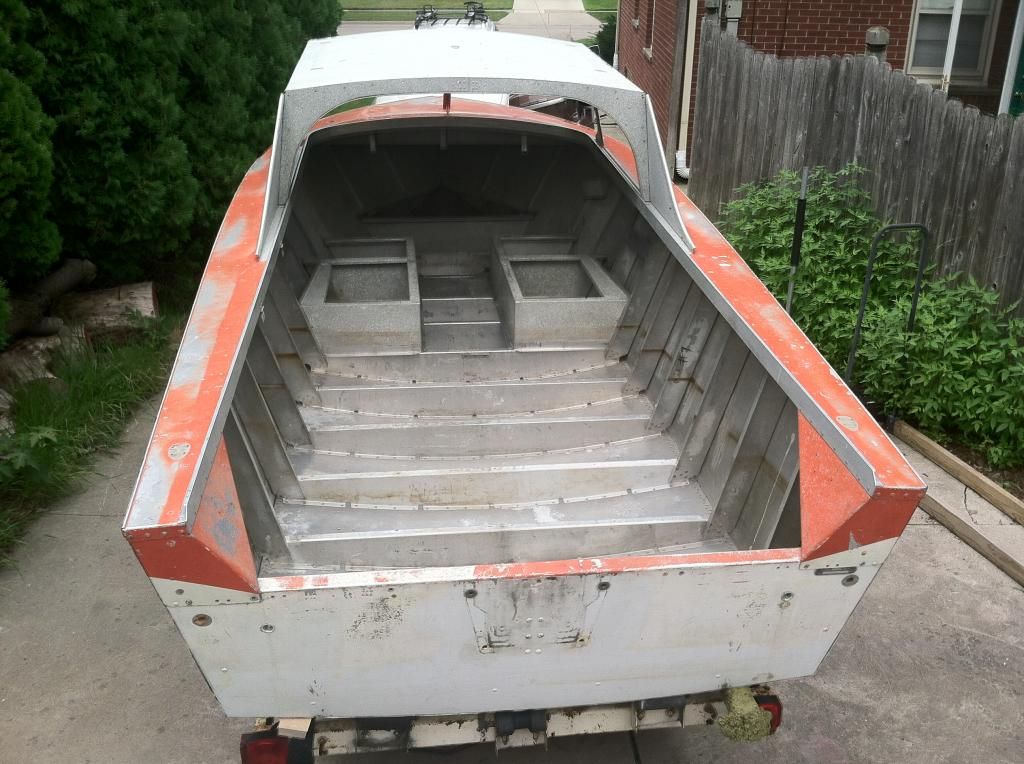
I've removed as much foam as I feel comfortable at this time I have a 3' wide by 7' long section still attached to the hull. At this time I'm leaving it in place as other work is performed. Having no stringers or ribs means the foam provides the support needed to be working on the inside. I can flex some areas of the bottom skin by about a half inch.

The side seams have been a daunting challenge.

IMAG09631.jpg

There is a double row of rivets under there.

From the rear to mid hull there is pour in foam. the next quarter has a mix of what I think is liquid nails, a similar green glue sealant and at points some fiberglass resin.

IMAG09651.jpg

Up front the rivets are covered with fiberglass resin.
IMAG09661.jpg

It takes a while but it does come clean. Also finding small areas of white chalky surface corrosion.

IMAG09641.jpg

As the work progresses it has occurred to me that the hull will need structure installed just to continue removing the foam.

The rib / stringer issue was discussed above. With materials I have on hand a couple stringers have been rough cut and formed.

IMAG09671.jpg

These are 1/8" thick 2 1/2" wide, one side is 1 1/4" tall the other is 2" tall.

My plan would be to make 6 of these. They would fit one every other lapstrike. Thinking that a good coat of 5200 and rivets should keep it in place. The plan would be to install a stringer on each side and then peel out enough foam to install the next on in towards the center.

Part of the reason I have decided on longitudinal stringers is this
manufacturing_1.gif

Found that while doing some research and it makes sense to me.

Also having the material helps.

I'll get back to uncovering the rivets.
 

GA_Boater

Honorary Moderator Emeritus
Joined
May 24, 2011
Messages
49,038
Looks like you're just having tons of fun, 64. The longitudinal stringers have to be stronger than crosswise. A good choice.
 

dozerII

Admiral
Joined
Oct 25, 2009
Messages
6,527
You sure have your work cut out for you on this one 64, it doesn't look like the foam and resin part is a lot of fun.:blue:
 

64osby

Admiral
Joined
Jul 28, 2009
Messages
6,826
Looks like you're just having tons of fun, 64. The longitudinal stringers have to be stronger than crosswise. A good choice.


Oh yeah, tons of fun and way too many hours getting it clean. Time will tell on the stringers, but hoping it is the right choice.
 

64osby

Admiral
Joined
Jul 28, 2009
Messages
6,826
You sure have your work cut out for you on this one 64, it doesn't look like the foam and resin part is a lot of fun.:blue:


Yup, Just having fun here, removing the Armor-Hell. Heat on the liquid nails looking stuff helps some, but leaves a sticky mess.
 
Last edited:

Watermann

Starmada Splash of the Year 2014
Joined
Jan 12, 2013
Messages
13,798
Wow! now those are some serious obstacles that keep coming your way on this LS rebuild. I don't think they ever suspected someone would need to restore one of these by the looks of it. I'm on board with your line of thinking on the stringers with the deck adding the needed lateral strength. Keep up the struggle!
 

64osby

Admiral
Joined
Jul 28, 2009
Messages
6,826
I don't think they ever suspected someone would need to restore one of these by the looks of it.
I'm on board with your line of thinking on the stringers with the deck adding the needed lateral strength. Keep up the struggle!

Or they were thinking know one would ever want to restore one. :facepalm:

The Liquid nails type stuff could be from a PO when the floor was replaced. Maybe it is some of that dried whale snot.:eek:

Lateral support will come from the same stock, attached to the side supports with L stock down to the stringers. At least that's the plan for now. ;)
 
Top