Intex Mariner 4 modifications and Tips

Joined
Apr 10, 2023
Messages
15
Hi, thanks for posting this.
Are you using this floor with the original floor ( on top of it ) or you eliminated the floor that came with the boat?

Thanks
Hi,
did you get an answer to this. I'm building a floor and trying to figure this question out as well. Seems like most put the wood on top of the slated. If possible I'd rather have the wood replace the slated (ditch the extra weight) if it's stable enough. but I've read some about the keel causing the floor to bow. Is it that bad? I don't do a of fishing, so I wont be standing all the time. but I do want to put a couple camp chairs in there, and potentially a small outboard, so having a flat more rigid floor still has benefits for me. Thank you in advance for any advice you can give me! I really appreciate it!
 
Joined
Apr 10, 2023
Messages
15
I got rid of the factory floor completely. My three piece floor fits perfectly flush under the air chambers. There's no give when I walk on it. It's solid. All I do is partly inflate the four air chambers (not the keel), then tuck the three boards in. Then, making sure the keel access hole is centered, then fill the four chambers. The keel is the last thing I inflate. If you do decide to make a floor, make sure you use a wood router/round off and sand off the edges. Keep the non-slip grit at least 3'' away from the edge. Hope this helps. I picked up all of these ideas from everyone on this forum.
Thanks for the info man! I really appreciate it. I am building a floor this weekend and was hoping to just replace the slated floor instead of putting it on top of it (to ditch the weight of the slatted floor). I've read some about the floor bowing from the keel pushing on it when its just the wood floor. Did you run into this issue?

Also, do you remember what width you cut the ply to? When I measure its 34.75" at the middle and 34.5 towards the back. Should I make the width 34.25" or 34" to give a little extra room. I also read that don't want to put too much pressure on the seams, but I don't really see how it would be different from the pressure from the slated floor. I plan on using outdoor carpet on the wood, and potentially some pipe insulation around the edges for peace of mind as well.

Thank you in advance for any advice or wisdom you can share with me! I really appreciate it! this forum is great!
 

nms

Cadet
Joined
Jun 6, 2023
Messages
7
Hello, I'm in need of advice.

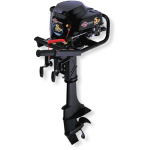
I purchased my Mariner 4 a while back and have a 3HP air cooled motor with it. The thing is the motor pulls the mount down. I have added a 1cm plywood board to the bottom side of the mount and have set the motor to the maximum trim.

It still pushes the mount way down.

Since I need portability I cannot add a custom floor to it now.

What would be your recommendation?

Thank you very much.
 

MarvinW

Cadet
Joined
Jul 13, 2022
Messages
20
Hello, I'm in need of advice.

I purchased my Mariner 4 a while back and have a 3HP air cooled motor with it. The thing is the motor pulls the mount down. I have added a 1cm plywood board to the bottom side of the mount and have set the motor to the maximum trim.

It still pushes the mount way down.

Since I need portability I cannot add a custom floor to it now.

What would be your recommendation?

Thank you very much.

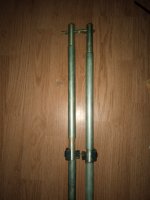
Extend / reinforce the motor mount so it reaches the oars and use those to stabilize the mount. There are pictures of this in this thread.

That and spreading the load on the bottom using some wood as you did should reduce sag of the mount more then enough for a 3hp since it's enough for my 5hp :/

Question though, how much does your 3hp weigh / what brand slash model?
 

nms

Cadet
Joined
Jun 6, 2023
Messages
7
Can you explain how do I do that? WIll I need to remove the oars?

I have this motor, but from a reseller.1693513812244.png
 

MarvinW

Cadet
Joined
Jul 13, 2022
Messages
20
Can you explain how do I do that? WIll I need to remove the oars?

I have this motor, but from a reseller.View attachment 388486


See that image for what I mean with extending the mount to the where you normally attach the oars when not in use. I can still use those oars normally, it's not replacing the oar mounts just the oar locks for storage when not in use.

That's a lot of weight for something air cooled / noisy and no mechanical reverse.

If I needed to buy new I would go for one of those Hankai's. Just as China made as what you got, but it got decent reviews ( not on the link below, couldn't find another seller that quickly so look around ) and you can get spare parts pretty reliably ( again, buy it from a good seller and ask before hand if they can provide spare parts when needed ).

I was lucky enough to find a Tohatsu m5b for cheap, though I kind of wish I went with something a little lighter. Because it's still 20kg my mount extensions are oversized. Literally, in the post I linked to you can see extensions which fit inside the stock alu posts. I have those to. but from rvs, but then I have rvs pipe's which go over those. And they still bend when I try to go on plane with the boat not properly weight loaded, since I also have a stock floor and the rigidity comes from my rvc pipes not the slat floor. The mount goes through the top of the back tube, and due to the two oversized rvs sections this can't move forward or back. Then it connects fixed with my oar mounts, I tie them with a strap since I feel it's more secure as making something with a carabiner or hook. This way, if my engine tries to push my back down, it's not just the back tube getting the load but the side tubes through those extensions.

I would trade my 20kg 5hp for a 4hp 13kg Hangkai all day in practicality, though ofc Tohatsu's don't die on you so there is that..

Anyway, sorry for the long tl:dr -> see image for example, yes you can use your oars still ( the way I do it anyway, I tie my straps through the eyes of the oar mount ), and yes you should be ok with your motor if you do that right. Though again, weight is the enemy if you can't build a solid floor to help your mounting points, just as tube stiffness. Adding a little more pressure will make it perform better... but you might blow a seem while on the water ymmv and I am not responsible for anything you decide to do :)
 
Last edited by a moderator:

nms

Cadet
Joined
Jun 6, 2023
Messages
7
The extension seems easy and effective and aluminum is basically weightless so I will definitely do that.
This motor also has very cheap maintenance, and yes it's noisy and air cooled.

I didn't find any water cooled options remotely within budget. You have to take into account that 2 strokes are forbidden in most lakes in my country so that's a no go for me.

How do you tie the extensions to the oar hooks effectively?
 

MarvinW

Cadet
Joined
Jul 13, 2022
Messages
20
The extension seems easy and effective and aluminum is basically weightless so I will definitely do that.
This motor also has very cheap maintenance, and yes it's noisy and air cooled.

I didn't find any water cooled options remotely within budget. You have to take into account that 2 strokes are forbidden in most lakes in my country so that's a no go for me.

How do you tie the extensions to the oar hooks effectively?

I mentioned it because I have one of the converted weed wackers and I can't stand using it. Mine is only 1.1kw though and 9kg so comparable with my trolling motor.. with much more range, just the noise is unbearable can't even speak with other people on the boat. It's a 4 stroke, for the same reason as you mention there are places where they don't allow 'dirty' two strokes.

Guess they didn't take into account noise pollution 🤣

I found that when using alu for the extension, it's pretty likely going to bend. As I said, I have one rvs tube inside the stock alu one, this slides into the plastic mount, then I slide another rvs tube over the alu one which fits exactly between the plastic insert and the mounting point on the rear tube. The inner rvs goes all the way through, and I have another alu piece which fits over the smaller rvs tube behind the standard mount, all the way to the oar storage mount, just so the inner and outer rvs tubes don't rattle when under throttle. The end of the rvs tubes are welded together with a bolt extending from it also welded in place ( this was when I was still considering carabiners for quick connect ). Since I found there is a lot of bending stress being caught by those extensions, carabiners would just rattle around and create noise. So I use two of those cheap tension straps which I wrap around the bolt and through the eyes of the oar holder, that will hold all day and it's secured tightly so it can't move.

My extensions are heavy, you don't want to get smacked on the head with one. It's 2 rvs pipes welded together with the stock alu parts. But since I've cracked multiple plastic mounting pieces ( both back board and the other part ) I rather have something solid holding the engine up, don't trust the weight limit of the mount ( 20kg is probably fine under static load, but not when you're pushing the engine and there is stress in multiple directions ).
 

nms

Cadet
Joined
Jun 6, 2023
Messages
7
I'm intending on using 2mm thick 2cm diameter aluminum tube. I don't think it will bend that easily, I've used it structurally in what I would think to be more demanding applications. Do you think that's not enough?

Yeah, noise is bad, but cost is good. For now I'm satisfied, plus I have the 55lbs trolling motor for when I need it to be quiet.

The motor passes regulations in EU, and provides a certificate for that, otherwise I wouldn't even be able to register it.
 

MarvinW

Cadet
Joined
Jul 13, 2022
Messages
20
I couldn't source alu piping at affordable cost, so I first only used the inner rvs which I just got from the hardware store ( plumbing rvs pipes ).

That ended up bending on first use, guess having only 1.2mm wall thickness doesn't help. And I think that's both the inner as the outer pipe's wall thickness, so combined it would be 2.4mm rvs. I think it was the 22mm which fits over the stock alu piping, and the 15 slides inside with to much clearance but a layer of tape fixes that.

With that combination it doesn't bend anymore..

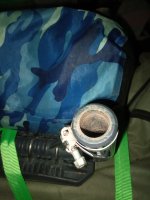
Reason why the bending scared me -> your motor mount where the alu rod goes into the mount, it will explode if the alu rod has to much bending force applied. I added some worm screw clamps around the plastic there so it won't explode as easily even with bending force applied to it.

My box in which I transport most of the boat and which comes onto the boat and acts as a seat, it holds a(n almost) complete spare stock mount which I can swap in *when* needed. Haven't broken anything this year, but I know t's better to be prepared.

If planning on staying below 12km/h I wouldn't worry, or when you know you're going to get it in plane it will be fine once you get there, but there is a lot of stress happening right before you get there.
 

nms

Cadet
Joined
Jun 6, 2023
Messages
7
The original tube has 1.4mm thickness, it is a 20mm diameter.
I will replace the entire original tube with a 20mm 2mm thickness. I don't see it bending very easily as it is around 1m only of tube. I can't bend it easily by hand, so I don't see it being a problem.

Do you think the tube will be enough to prevent sagging? Should I consider raising the motor or something?
 

MarvinW

Cadet
Joined
Jul 13, 2022
Messages
20
You can't use a single thicker piece, it a> won't slide into your plastic motor mount b> won't slide through the backtube mounting hole. Though (b) isn't really that important if you properly secure the ends at the oar holders, you will need to use the stock pipes

IMG_20230901_193645_771.jpg
*what you see are the stock alu pipes, and the 22mm rvs piping which goes around it pretty snug. What you do not see is the 15mm rvs pipe inside which is the full length. This pipe is welded to the bigger pipe on the other ending. This way, I can slide the top loose outer rvs off, push the rods in from front to back till I hit the stop, slide the rvs over the alu and then still can slide the stock alu inside the plastic mounting piece.
IMG_20230901_194222_907.jpg
*this is also one off the more stressed pieces of the plastic mount, so adding some compression force will keep it from breaking apart with a bending force like it did when just using the stock alu rods and 15mm cvs pipe as single extension from the inside of them.

And I still take a complete spare with me :) Cracked multiple back boards, and two side pieces. Though the back boards were user error, and I suddenly thought

As to your question -> thicker walled single alu extensions do sound like the better option as my frankenstein solution. But as to calculating their strength, ask a mechanical engineer or try with some cad program which can calculate stress? If I could have found the same piping in alu I would have tried that, I recon the plumbing piping I'm using isn't exactly a stiff grade of steel. Thing is, you sound like you're on a tight budget and then I would advice to go for overbuild rather then trying to get it just right. Costs of dropping your engine in the water while it's running can be a lot more then what it would cost to make it as strong as you can.

As to having to raise the motor, it depends on your shaft length. Most people drill extra holes in the back plate which will gain you a couple of cm but not much. You can always put a small piece of wood or metal between the engine and the mount in order to raise it some more, but the higher you mount it the more torque your mount will have to compensate for.

Once again, ymmv my sample size is 1 :)
 

nms

Cadet
Joined
Jun 6, 2023
Messages
7
a) It is the same diameter so it should fit. 2cm diameter, 2mm thickness.
b) Same.

A single tube means the strength changes are gradual and consistent. On top of that the tube also acts as a spring, reducing the impact of violent forces. Multiple tubes add a sort of joint, that will result in impact forces being present as there will be additional movement between both parts. These forces could be on more damaging angles.

The backplate tube fittings, where these tubes go in is meant to take forces in a single direction, which is parallel to the tube and I believe a single tube is the best way to keep it that way. If there was for the tube to move or receive sideway impacts, that would not be ideal and that's what I wanted to avoid.

It does seem that the plastic could be a weak point regardless. I'm going to try to make sure that the fitting is perfect and unable to move much and keep it tight and sturdy as possible. Yours seems to be scratched a lot as if the tube was not a perfect fit into the hole, this is something I will keep in mind too.

Thank you very much for all you shared, it's very useful. If you have any further tips I'd love to hear them.
 

MarvinW

Cadet
Joined
Jul 13, 2022
Messages
20
I see. There is no impact force though, since I have spacers ( well, a layer off tape on one, and some heatshrink on the other since I ran out of tape ) the pipes can not rattle around inside each other, this is also why they are welded on one end. . If they could, I would be afraid of fatigue due to vibrations. Again, plumbing piping isn't really meant for structural things I recon. One of them does make more sound as the other, think the layer of heatshrink was the better choice, the rubbery compound will not loose all it's elasticity as quickly as the tape.

Those scratches are from inserting at a slight angle. The consistency of the plastic mould is pretty good, they all have the same low tolerances. With that I mean, sliding the tubes in at an angle doesn't really work.. Due to the angle between the back tube stop, the plastic and the oar lock my extensions aren't straight ( but identical in bend, just mirrored as far as that goes with a tube ). It gets scratched up when you insert them. They always sit at the same depth, that is why there is a bolt through connection right?

*the pin is just for transport, I have the nuts and bolts in my watertight bag.
 

FasterDaddy

Seaman Apprentice
Joined
Oct 12, 2005
Messages
33
Can you explain how do I do that? WIll I need to remove the oars?

I have this motor, but from a reseller.View attachment 388486
BEWARE: Those things are god-awful noisy and short lived. A guy down the lake from me had one on his dinghy for a couple of years. It was a community joke. It could be heard over a strong wind, with surf crashing on the beach, from 5 miles away, even when a strong wind was blowing towards him. It's a cheap Chinese copy of the (fairly well made) inexpensive 5 hp lawn mower engine on a stick, made a few years ago by Briggs and Stratton.
1694560541580.pngHis Chinese version revved higher than the B&S (and died even faster). His Chinese copycat lasted 3 years before it blew up when he turned the boat too hard and the prop came out of the water for a second or so. Spewed oil and gas all over the place. I think we all did a silent applause.
 

nms

Cadet
Joined
Jun 6, 2023
Messages
7
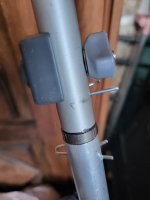
So I managed to do what you suggested. Unfortunately the aluminum pipe I had did not fit into the mount as it was 20mm and the mount is something like 19mm.
The easiest way to me was to just make a connector out of steel, which I machined with tight tolerances so there is no wobble.
20231006_142646.jpg20231006_142713.jpg20231006_142701.jpg
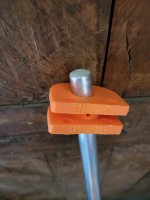
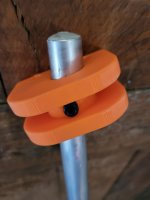
The other end fits into the oar supports with a 3d print I made and can be locked into them by inserting two pins in the bottom two holes.

The mount now is far more solid but even with the motor not going down as much, I still can't get past 3.8 kn.

Do you have any more suggestions? Should I attempt to just tune the engine?

Thanks
 

Tamer

Recruit
Joined
Jan 29, 2024
Messages
2
So I managed to do what you suggested. Unfortunately the aluminum pipe I had did not fit into the mount as it was 20mm and the mount is something like 19mm.
The Pipe's OD (Outer Diameter) is exactly 3/4" (three quarter inch), which is indeed about 19.05mm.

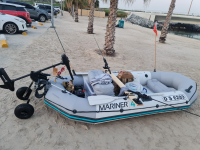
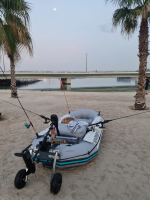
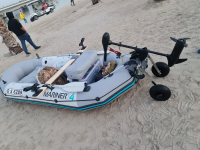
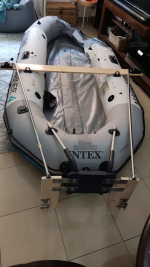
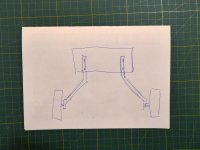
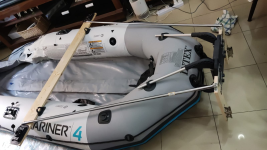
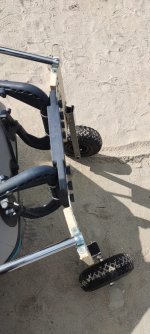
Instead of using only two pipes, I used four: The two original on the back, and two to the middle of the boat, attached to horizontal wood that I strap down in the center of the boat to the locked oars with shearing straps. Note that I also have added two metal connectors to the sides of the transom mount, and to which I attached about 12-13" long pieces of wood to attach the brackets of my detachable/flipping wheels. And so I attached the pipes on the back to the top of these two wooden pieces to have a wider angle and more space inside the boat, so that the pipes do not get in the way.

Here's a picture of the boat with only the horizontal wood in the middle of the boat and the standard transom mount only with the metal connectors and wheels attached, before the above final changes. Please note the boat was not properly fully inflated so there was a bit of excessive bend in the back due to the weight of the 55lbs thrust newport vessels trolling motor and the mighty ~26KG 100Ah Calcium Maintenance-free Deep Cycle Marine Battery (inside the pictured "Minn Kota 1820175 Trolling Motor Marine Battery Power Center"), and I had not expected the wheels to be sitting so low, so.. the modification pictures later illustrate what I've down to counter that.
1706844672284.png

1706844697687.png

1706844796219.png

The wheels are "Davis Instruments 1482 Wheel-A-Weigh Standard 26cm" from: https://www.amazon.ae/gp/product/B01MQYAG8L

And here are the additional final modifications which I described above:
1706844863248.png

1706844896493.png

Will hopefully give it a test tomorrow and let you know how it goes.

P.S. Last weekend here in Dubai, UAE, the water was so rough due to high tidal coefficient and especially when the wind kicked in.. So it was also hard to track straight (boat kept going sideways), and so I ordered also a "Rudder Clamp" as well to help against this happening again:

it will come the following week or so, hopefully.

Cheers
 
Last edited:

Tamer

Recruit
Joined
Jan 29, 2024
Messages
2
Turns out the metal connecting plates where not thick enough, and started to bend upon mounting the wheels and lifting the boat and starting to roll them (picture below). Have to improvise.
 

Attachments

  • WhatsApp Image 2024-02-04 at 12.04.03.jpeg
    WhatsApp Image 2024-02-04 at 12.04.03.jpeg
    201.7 KB · Views: 19

mandja

Recruit
Joined
Jul 15, 2022
Messages
2
Опитайте с втора метална плоча от вътрешната страна на пластмасовата плоча, като поставете дъската между двете плочи. Като начало, бих нагласил дъската плътно към пластмасовата плоча и бих разширил разстоянието между колелата с помощта на огънати стойки за колела.
 

Attachments

  • P1102582.jpg
    P1102582.jpg
    2.2 MB · Views: 2
Last edited:
Top