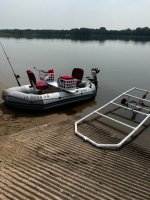
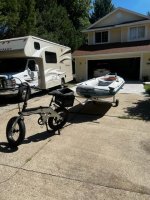
Intex Mariner 4 modifications and Tips

MarvinW

Cadet
Joined
Jul 13, 2022
Messages
20
Ahh I get it now, wanted to add something above but it informs me there is a 60m time limit to edit posts... guess I should f5 more often I reckon I wouldn't have seen the edit button anymore ;)

Anyway, different idea.


IMG_20220720_214739_325.jpg

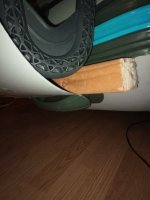
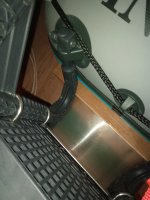
Mount a sheet on the bottom of a 2x4, I'll most likely epoxy them together. Drill 3 holes, one center two on the sides next to the mounting brackets. The hole in the middle, insert a rope tied in an eight so it can't get pulled through. This will be tied to the carrying handle. The two holes on the side will have the rope enter upwards with the knot below, so they can be tied to the mount. I think this will be secure enough.
IMG_20220720_214752_429.jpg

This way the transom won't drag in open water pulling itself down even if the boat is imbalanced. Or, so I'll hope. The only difference between this way and my previous plan is that there is no side wall. I guess if I had a press I could bend a shape which would fit but by hand I am not even going to try.
IMG_20220720_214805_538.jpg

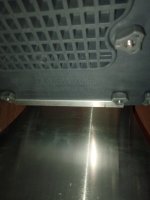
That bottom u piece is just slid on atm, I need to epoxy it and drill two holes through it and the transom so I can mount the sheet. I'll try to fold the sheet over once so there is no sharp edge possible and I have some more material there and drill two holes to match the transom holes so I can bolt them together with some wingnuts.

Also should really consider setup time, it's going up a lot already. Portability is nice but not if people have to wait an hour at the water side ( exaggeration and also, I'm sure I'll get better at it ;) ).

What do you guys think, is this a better idea? Do I even need to bother with the metal? I mean, that transom is acting both like a floating anchor if it hits the water, as well due to the angle it will pull itself under lifting the nose of the boat, so I *think* diverting the water around it would sure lower that drag..?


Will this all eventually come together and make my Mariner 4 'exciting' ( ed: go vroom ) for a 15y old autistic kid who understands I live on the fifth floor of an apartment building and have limited transport capability? That being said, I *have* to not be able to exceed 20km/h or I might get busted since you need a license for anything capable of doing that... but which water officer would assume a Mariner 4 would do that anyway?

Heck I'm not even sure I can't be fined for exceeding safety limits on the engine size...

I'll be happy if I get 15km/h top, it's not like we don't have a 6km speed limit on most waterways anyway.

*edit: just had a scary thought, if I ever have a structural failure of the transom ( or a boat runs into it... ) the sheet metal is a likely danger no matter what I do to connect it. The sturdier I make it, the stronger the force which will be exerted if it fails.

Maybe I shouldn't use metal but fabric. I could even cut up that really cheap inflatable I have in my closet where I lost a valve from and which is actually therefore useless, and use that. It's allot easier to attach and manipulate.

I think that's the way forward.

Also, I'm thinking I don't know exactly which prop is on it but the previous owner did say it was a lot heavier as my inflatable. Will I gain from making sure I'm running the highest pitch prop ( aka the one for the lightest load )? I know high pitch increases top speed at the cost of 'whole shot' ( yes, I have read some things on the internet... that's it though ). How does that translate to the Mariner 4? I mean, I don't think you can plane without a wood floor since it will bend to much with the slat floor? Ofc the steel pipes extending to the oar locks do help but that's only the back of the boat.


That's the 9 pitch prop, according to the manual it fits light loads. At max, with the boat itself and the mods, two kids say 100kg together and me 62kg, 20kg motor + 2.5kg gas ( internal ) + 5kg/10kg Jerrycan with gas and some extra's like inflatable sup boards and lunch/drinks/'toys' say 50kg miscellaneous, that's <~ 300kg.


That would still fall under a light load I think for the engine, but I can't find any explanation or charts what they deem as light/medium/heavy loads. I guess because hull shape has a lot of influence, the Mariner 4 when I row it actually is pretty nimble unlike the Excursion 4 which is just a turd even with a wood floor it handles like crap due to not having a keel.


Last edited:

Andy_Capp

Recruit
Joined
Jul 17, 2022
Messages
4
Ahh I get it now, wanted to add something above but it informs me there is a 60m time limit to edit posts... guess I should f5 more often I reckon I wouldn't have seen the edit button anymore ;)

Anyway, different idea.


View attachment 366087

Mount a sheet on the bottom of a 2x4, I'll most likely epoxy them together. Drill 3 holes, one center two on the sides next to the mounting brackets. The hole in the middle, insert a rope tied in an eight so it can't get pulled through. This will be tied to the carrying handle. The two holes on the side will have the rope enter upwards with the knot below, so they can be tied to the mount. I think this will be secure enough.

View attachment 366088

This way the transom won't drag in open water pulling itself down even if the boat is imbalanced. Or, so I'll hope. The only difference between this way and my previous plan is that there is no side wall. I guess if I had a press I could bend a shape which would fit but by hand I am not even going to try.

View attachment 366089

That bottom u piece is just slid on atm, I need to epoxy it and drill two holes through it and the transom so I can mount the sheet. I'll try to fold the sheet over once so there is no sharp edge possible and I have some more material there and drill two holes to match the transom holes so I can bolt them together with some wingnuts.

Also should really consider setup time, it's going up a lot already. Portability is nice but not if people have to wait an hour at the water side ( exaggeration and also, I'm sure I'll get better at it ;) ).

What do you guys think, is this a better idea? Do I even need to bother with the metal? I mean, that transom is acting both like a floating anchor if it hits the water, as well due to the angle it will pull itself under lifting the nose of the boat, so I *think* diverting the water around it would sure lower that drag..?


Will this all eventually come together and make my Mariner 4 'exciting' ( ed: go vroom ) for a 15y old autistic kid who understands I live on the fifth floor of an apartment building and have limited transport capability? That being said, I *have* to not be able to exceed 20km/h or I might get busted since you need a license for anything capable of doing that... but which water officer would assume a Mariner 4 would do that anyway?

Heck I'm not even sure I can't be fined for exceeding safety limits on the engine size...

I'll be happy if I get 15km/h top, it's not like we don't have a 6km speed limit on most waterways anyway.

*edit: just had a scary thought, if I ever have a structural failure of the transom ( or a boat runs into it... ) the sheet metal is a likely danger no matter what I do to connect it. The sturdier I make it, the stronger the force which will be exerted if it fails.

Maybe I shouldn't use metal but fabric. I could even cut up that really cheap inflatable I have in my closet where I lost a valve from and which is actually therefore useless, and use that. It's allot easier to attach and manipulate.

I think that's the way forward.

Also, I'm thinking I don't know exactly which prop is on it but the previous owner did say it was a lot heavier as my inflatable. Will I gain from making sure I'm running the highest pitch prop ( aka the one for the lightest load )? I know high pitch increases top speed at the cost of 'whole shot' ( yes, I have read some things on the internet... that's it though ). How does that translate to the Mariner 4? I mean, I don't think you can plane without a wood floor since it will bend to much with the slat floor? Ofc the steel pipes extending to the oar locks do help but that's only the back of the boat.


That's the 9 pitch prop, according to the manual it fits light loads. At max, with the boat itself and the mods, two kids say 100kg together and me 62kg, 20kg motor + 2.5kg gas ( internal ) + 5kg/10kg Jerrycan with gas and some extra's like inflatable sup boards and lunch/drinks/'toys' say 50kg miscellaneous, that's <~ 300kg.


That would still fall under a light load I think for the engine, but I can't find any explanation or charts what they deem as light/medium/heavy loads. I guess because hull shape has a lot of influence, the Mariner 4 when I row it actually is pretty nimble unlike the Excursion 4 which is just a turd even with a wood floor it handles like crap due to not having a keel.
Enjoying your posts as you figure out how to add structural integrity to the transom to accommodate your heavier motor. Keep up the good work and let us know how your mods are going.
 

MarvinW

Cadet
Joined
Jul 13, 2022
Messages
20
Took her out today, had a blast!

Cruising at 8-10 km/h at very low rev's is quite relaxing. Hull stays nice and level. If I push past that, the bow comes up and the whole boat starts to bend and weave. It would behave so much better with a solid floor but that's just not portable enough.

When I hit 14km/h sometimes the boat just is so wavy that my prop suddenly pulls in air and I over rev like crazy.

If I position my body weight a bit towards the piece of the boot acting the most like a banana.. it actually get's on plane. I'have multiple runs reaching 18km/h steady, and out of recording I've hit 19.2km/h for a split moment.

I think it might have to do with there being a wake at the end of the boat itself. BEFORE the engine, this and the bendy nature create a large wake which pulls water away from the prop. It sits at a perfect level for going 0-10km/h, but I think it would run a lot better if I lower the transom a couple of cm when I want to go fast.

The rods held up ok. Not great, there is a slight weave in them to so I guess 16mm diameter 3mm thick steel rods aren't enough. Perhaps I will get another length of pipe with an inner diameter of 16mm so I can just slide them over the existing one's after the stop blocks on the back tube all the way to the oarlocks. The first part is the steel and the alu rods which come stock, those are perfectly straight so I don't need to add a lot of strength to the other section either.

I'm a bit worried about my 'partial floor' it's putting quite some strain on the tubes at the back and I'm noticing it's pushing the floor back a bit. Which is, weird enough... exactly the point where the boat settled at top speed. Only the back piece of my floor was in contact with the water. Which just enforces my thoughts that if I had a solid floor the boat would behave a> better b> predictable when getting close to plane. As many no doubt have found out before me, this boat's limits are it's lack of rigidity.

It can be fixed, just make a solid floor. But for me that's not possible I can't transport wider pieces as shown already.

Optionally though, I could get my 3piece hinged floor for my Excursion 4 and cut that up so I have 3x40cm wide section on hinges, cut to the shape of the back of the bout and providing a better surface for the boat to plane on as well as fitting on my bike trailer ( btw, got some comments today about the setup, friendly but they did question my sanity and asked how fast I can pedal it over a bridge.. I said I tend to avoid those :D ).

I'm uploading some video's to my yt channel, two shorts and one couple of minutes one where you can also hear the issue about the prop sucking in air if the boat 'weaves / bends wrong '. That is really scary, I was afraid I'd kill the engine doing that often.

I noticed I had some setting wrong and my content was meant 'for kids' so comments are disabled on the video's.


-> long video. The thumbnail is what I ended up using for bottom transom support, worked fine.


MarvinW

Cadet
Joined
Jul 13, 2022
Messages
20
Enjoying your posts as you figure out how to add structural integrity to the transom to accommodate your heavier motor. Keep up the good work and let us know how your mods are going.

Thing is, it's rather 'easy' if you're going to put the boat on a trailer. A sufficiently thick wood floor both increases handling by tons and tons, as well of offering a way to not tax the tubes themselves with the motor torque by connecting straight to the floor.

But that isn't transportable unless you have a trailer, a big van or a big car ( and then you probably put hinges on it so it folds ).

Thing is, what do you want to do with it? If you plan on cruising 14km/h+ ( which seems to be the point the boat starts to plane ) I think a solid floor is a must . If you're content with 12km/h or less you don't need to. But if you want to go exactly 12km/h, I think because of the resistance at that speed you're burning way more fuel as when pushing past that and going the extra speed.

Then again.. speed limit is 6km/h almost everywhere anyway.
 

MarvinW

Cadet
Joined
Jul 13, 2022
Messages
20
Thank you, if it's meant for me lol.

Don't take anything as say as being 100% right, my experience is extremely limited. I am actually counting on more knowledgeable people to come in and correct or supplement me.

I've found video's with Mariner 4's going way faster, all with wooden frames and for instance one with a 25hp motor going 20mph+. As long as you stiffen up the boat and have a mount which doesn't just hang off the back it seems you can do crazy stuff.

Not sure how long those will last, as the load on the tubes isn't what the factory has rated them for. Wouldn't want to burst a seem at those speeds.
 

msg4bob

Cadet
Joined
May 9, 2023
Messages
26
hello Mariner 4 owners. Can someone shed some light as to why there are two different designs? Is one an older model compared to the other?

e5ax31v.jpg

-The ora locks are different style (I prefer the blue one)
-Oras are different (hard to judge but based on pics and where the ora mounts to the oar lock, it seem the red boat has a longer handle?).
-Fish rod holder are different (removable on the blue one)
-Different design

They seem to be the same but I do prefer the design of the blue boat. I have local sellers offering the Red one for $200 and the Blue one for $300. Is it worth the $100 difference?
 

MarvinW

Cadet
Joined
Jul 13, 2022
Messages
20
Afaik the right one is the old model, other one off course then being the new model.

I have no clue why there is a price difference, seems 'fishy' if you ask me. I have the blue one. Material wise, there shouldn't be much difference except what you pointed out. The spec sheet didn't change at least ( lists the same material and same weight ).

If I could have gotten a 100 buck discount just by getting the older model ( with full warranty ) I probably would have, as I don't really care that much about the design.

Still happy with mine though, since I already paid less then what they are offered at your location it seems.
 

Andy_Capp

Recruit
Joined
Jul 17, 2022
Messages
4
hello Mariner 4 owners. Can someone shed some light as to why there are two different designs? Is one an older model compared to the other?

e5ax31v.jpg

-The ora locks are different style (I prefer the blue one)
-Oras are different (hard to judge but based on pics and where the ora mounts to the oar lock, it seem the red boat has a longer handle?).
-Fish rod holder are different (removable on the blue one)
-Different design

They seem to be the same but I do prefer the design of the blue boat. I have local sellers offering the Red one for $200 and the Blue one for $300. Is it worth the $100 difference?
I concur with Marvin: Red is the older model, Blue is the latest/newest (which I just recently bought off an Amazon deal.)
 

Andy_Capp

Recruit
Joined
Jul 17, 2022
Messages
4
Just starting to mod my new(ish) Mariner 4. Bought it about a year ago but didn't have the tools with me to begin the project.

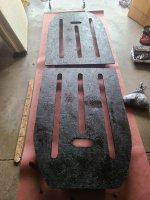
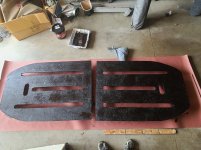
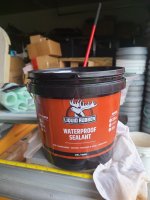
As you can see in the photo's I have cut and painted the new floorboards with rubberized sealant. I used 3/8" OSB because I had 3 full sheets and wanted to use them up.

I essentially cut one in half lengthwise (leaving me with two fairly equal 4' x 4' pieces). I temporarily bound them together with hand-held vices and then made my rip cuts with a jig saw using medium tooth blade to give me my approx width of 34". Using dimensions from other posters on this forum I then shaped the boards to be able to follow the pattern of the slatted flooring that came with the Mariner. Since they will be sitting on top of the Mariner's slatted flooring I cut them about 3/4" shorter on all sides than the slatted flooring to allow for the expected compression of the hull.

Since my plan has always been to use these atop the slatted flooring that came with the Mariner I decided to remove some of the OSB material to make them lighter to carry. And since my cuts would be perpendicular to the Mariner's slatted flooring it shouldn't, in theory, compromise the structural integrity.

I simply used an old bottle top that had a diameter of approx 2.5" and drew six circles. Then, using a 4' level I drew lines to meet up with the corresponding circles drawn. Drilled a hole in the center of the holes large enough to accept the jig saw blade and then cut out the long ovals that you see. The other hole perpendicular to these on each is for inflating the keel (marked with the number 5). Since I had the boards mirror each other with the hand vices I figured that an extra hole on the opposite sheet of OSB wouldn't be a big deal. I have to say that cutting out this excess material made a marked difference in the weight of wood floor.

I will check back in a couple of days from now after I have sealed the boards with 3 coats of rubberized sealant AND carpeted them with grey outdoor carpeting from Lowes.
 

Attachments

  • 20230517_153844.jpg
    20230517_153844.jpg
    470.6 KB · Views: 21
  • 20230517_153915.jpg
    20230517_153915.jpg
    1.4 MB · Views: 20
  • 20230517_154011.jpg
    20230517_154011.jpg
    364.2 KB · Views: 19

msg4bob

Cadet
Joined
May 9, 2023
Messages
26
Assuming you mod and create the necessary flooring and bracing, what is the highest HP outboard motor have folks here used on a Mariner 4? Any issues with park rangers?

Judging by Portuguese comments, guessing this person is in Brazil -little more lawless than Portugal ;) . 15 HP looks like a ball of fun and I can pack it home!


MarvinW

Cadet
Joined
Jul 13, 2022
Messages
20
I seen a 25hp used once in a video but that didn't have a 'a floor' but an entire wooden floor+seat+console+motor mount all connected in one piece.

As to 'park rangers' -> forest rangers around here ( Netherlands... not your neck of the woods ) don't enforce anything except noise laws ( so don't take your gas engine into an area where they are prohibited entirely ). The rest is responsibility of the water police.

I actually contacted them asking if there would be an issue and there wouldn't with them. Since I don't have my fast boat permit they advised me of the 20km/h max speed capability ( yes max, don't have to be caught actually going that fast as long as you can you need to have that permit ), and that their guidelines for a rib is that a 5hp is enough to reach those speeds.

I'm pretty sure that's semi accurate, since I clocked myself at 18-19km/h with my 5hp which is supposed to have a lower pitch prop with more push but a lower top speed.

As long as I pointed out I had a prop swap and that the only reason I went with this 5hp was not speed but having a mechanical reverse, I should be good ( as long as they don't see me going ~20km/h ).

What they DID extensively point out, after I told them that the boat and motor mount themselves list a max weight and hp, that if I would cause an accident I run a high risk of my insurance not covering the expenses. Basically since I operated the boat outside of specs, I had to proof that any damages were not caused because of it. And that's just financial damages.

Imagine you running your boat out of spec and someone get's hurt.

I wonder what the max speed of a 3hp would be compared to mine ( since 3hp is the max under warranty for the stock mount ). Not that I think 3hp would be good with a stock mount, heck my trolling motor will torque the heck out of the stock mount unless you brace the bottom.
 

robpri

Recruit
Joined
May 29, 2023
Messages
3
Very nice write up, thanks . I would love Intex to come up with an aftermarket inflatable floor , that would make it more rigid and a lot lighter. These floors seem to work very well on the TrueKit inflatables
 

korie83

Recruit
Joined
May 11, 2014
Messages
1
Does anyone know a part number for replacement of the keel valve cap? Or a alternative replacement option? I tried calling intex, and they said I need to replace the entire boat, which is ridiculous.

Trying to find a simple solution, which seems to be more difficult than I expected. Extra frustrating since it got lost by a friend who borrowed the boat for literally a couple hours, while I've had the thing for years without losing a single piece.
 

KaptainKurt

Recruit
Joined
Jun 25, 2023
Messages
1
11 years into this thread...I just found it! I too am in the process of reading all 107 pages, shaking my head all the way. I had no idea it had such a following. I actually bought a Mariner 3 after a trip to the Ozarks in my new (to me) RV. I wanted to be out on the water so bad, but I didn't want to buy, maintain or tow a boat behind the RV. I was looking for something portable, that I could carry around in the camper...Eureka, a Intex Mariner! It works great for camping trips, and of course, ever since the day I got it, I've been making improvements...all the same things everybody else has been doing for years! Ha! I thought I engineered all this stuff myself...obviously not! I made a 2 piece plywood floor, mounted swivel seats, beefed up the intex motor mount with some wood, added a table, a canopy, nav lights, fishin' poles, a 52lb Newport Vessels TM, 100AH battery, and then got a 4hp 4stroke weed eater motor from amazon! Like everybody else, I hate the slat floor, but have been using it as an underlay for the 2 piece plywood floor. I'm going to try ditching the slat floor and just using the plywood. Also made a few pvc dollies for various situations. Love this little boat! The only thing I would caution against is using flex paint for a rubberized coating on the plywood. I used some on some planks over the toobes used as tables or seats. The black rubber crud comes off on the boat when it gets hot and is a pain to get off!
 

Attachments

  • IMG_5956.jpg
    IMG_5956.jpg
    73.7 KB · Views: 34
  • IMG_5010.jpg
    IMG_5010.jpg
    91.5 KB · Views: 33
Last edited:

MarvinW

Cadet
Joined
Jul 13, 2022
Messages
20
Very nice write up, thanks . I would love Intex to come up with an aftermarket inflatable floor , that would make it more rigid and a lot lighter. These floors seem to work very well on the TrueKit inflatables
I found some airdecks which seemed to match the shape of the Mariner 4 close enough that they would work, but they all lack a throughhole for the keel valve. And you can't inflate the keel before you inflate the airdeck.

Then I found shorter one's, probably short enough so the keel valve would be accessible.. but then I wouldn't have any floor in the front of the boat at all and I can't imagine that helping with handling.

Would love to hear your feedback on this?

This is the same model airdeck, just smaller. If you're really interested try asking the seller if they still have the 273cm version ( iirc? ).

Does anyone know a part number for replacement of the keel valve cap? Or a alternative replacement option? I tried calling intex, and they said I need to replace the entire boat, which is ridiculous.

Trying to find a simple solution, which seems to be more difficult than I expected. Extra frustrating since it got lost by a friend who borrowed the boat for literally a couple hours, while I've had the thing for years without losing a single piece.

Keel is pretty low pressure, if you have a 3d printer I'm sure you could print a new cap for it ( with an indent for a rubber 0-ring to make sealing easier? ). Otherwise, it's a common system and as far as I can see not an uncommon size so maybe look around for ( cheap ) inflatable toys with the same size cap?

I checked Intex's website for Mariner replacement parts and you're right they don't offer this valve cap ( though ofc it's nonsense to buy a whole new hull for losing a simple cap ).

But, doesn't this look quite close -> https://intexcorp.com/replacement-parts/11576-vacuum-release-valve-cap/

It says vaccuum and it's probably for a totally different sku, but most other search results for 'valve cap' come without images.

Can't hurt to try for couple of bucks... certainly compared with 'buying a new hull'.

Or this one -> https://intexcorp.com/replacement-parts/11538-combo-valve/

Again, doesn't seem to be that painful to just try.

I do feel dissapointed with the level of 'support' from certain companies, it's reminding me of my CN ebike where I wanted to order a new battery months ago and the manufacturer just says : yeah out of stock, sorry we will send an email when new stock comes.. ow and btw, you will void warranty when using 3rd party battery packs...

W T H

..I mean, I know the local bike shop is expensive, but at least you get service you're accustomed to.

edit: I would defo look at that combo valve, it looks like it could work..

1689262382987.png
 
Last edited:

MarvinW

Cadet
Joined
Jul 13, 2022
Messages
20
Adding insult over injury, my CN ebike manufacturer just send me an 'important email'.... announcing why they don't the battery I want in stock..

The proud release of their next model, which ofc comes with different size batteries....

I really hope you can source that cap somewhere, this is the kind of things which kill any brand relationship imo.
 

BammySosek

Recruit
Joined
Jul 18, 2023
Messages
1
Just starting to mod my new(ish) Mariner 4. Bought it about a year ago but didn't have the tools with me to begin the project.

As you can see in the photo's I have cut and painted the new floorboards with rubberized sealant. I used 3/8" OSB because I had 3 full sheets and wanted to use them up.

I essentially cut one in half lengthwise (leaving me with two fairly equal 4' x 4' pieces). I temporarily bound them together with hand-held vices and then made my rip cuts with a jig saw using medium tooth blade to give me my approx width of 34". Using dimensions from other posters on this forum I then shaped the boards to be able to follow the pattern of the slatted flooring that came with the Mariner. Since they will be sitting on top of the Mariner's slatted flooring I cut them about 3/4" shorter on all sides than the slatted flooring to allow for the expected compression of the hull.

Since my plan has always been to use these atop the slatted flooring that came with the Mariner I decided to remove some of the OSB material to make them lighter to carry. And since my cuts would be perpendicular to the Mariner's slatted flooring it shouldn't, in theory, compromise the structural integrity.

I simply used an old bottle top that had a diameter of approx 2.5" and drew six circles. Then, using a 4' level I drew lines to meet up with the corresponding circles drawn. Drilled a hole in the center of the holes large enough to accept the jig saw blade and then cut out the long ovals that you see. The other hole perpendicular to these on each is for inflating the keel (marked with the number 5). Since I had the boards mirror each other with the hand vices I figured that an extra hole on the opposite sheet of OSB wouldn't be a big deal. I have to say that cutting out this excess material made a marked difference in the weight of wood floor.

I will check back in a couple of days from now after I have sealed the boards with 3 coats of rubberized sealant AND carpeted them with grey outdoor carpeting from Lowes.
How did you get the angles for the bow and stern? Somehow my stern angle seems to be off a bit making it a little to tight back there then it should be.
 
Top