I have returned... with a Starcraft this time!

BWR1953

Admiral
Joined
Jan 23, 2009
Messages
6,201
After we got back from picking up dinner I checked the Gluvit. Found a few little, tiny bubbles! I'm figuring that the Gluvit had seeped down into "somewhere" and displaced the air there, moving the bubble to the surface. Nice! So I applied more Gluvit there.

Here's hoping... :joyous:
 

Watermann

Starmada Splash of the Year 2014
Joined
Jan 12, 2013
Messages
13,798
Ah yeah you got this one, there should be a dry bilge. If not well you tried, my SS and Chief both have water in the bilge at the end of the day but after an entire day there isn't enough to even kick on the bilge pump.
 

nrf414

Chief Petty Officer
Joined
Feb 16, 2008
Messages
573
I always say no better bilge pump than a scared man with a bucket.

I'm sure it will be fine though.
 

BWR1953

Admiral
Joined
Jan 23, 2009
Messages
6,201
I got the metal storage box disassembled today and started stripping. Got the 2 long sides done. Took THREE applications on each side because there were FOUR layers of paint on there! The original Starcraft cream, a layer of brownish orange stuff and two layers of gray. Whew! :cool:

The stripper really worked quickly and started bubbling up within a minute after application. It was 82 degrees outside.
1.jpg

Side two started.
4.jpg

And now on to the bad news. The boat still LEAKS! :mad: :blue: I'll hit it again tomorrow.
8.jpg
 

Attachments

  • 7.jpg
    7.jpg
    409.3 KB · Views: 0
  • 2.jpg
    2.jpg
    698 KB · Views: 0
  • 5.jpg
    5.jpg
    551.3 KB · Views: 0
  • 3.jpg
    3.jpg
    556.6 KB · Views: 0
  • 6.jpg
    6.jpg
    524.7 KB · Views: 0

Watermann

Starmada Splash of the Year 2014
Joined
Jan 12, 2013
Messages
13,798
Looks like it leaks in a different spot too.

fetch
 

Decker83

Commander
Joined
Apr 5, 2011
Messages
2,593
The boat layout looks good.. Nice job on the boat seat box.. Cut it in half, find a couple of pieces of aluminum and make new ends and go with it..
In the last pic it looks like it could use some more Gluvit in the seam.. Hope you get it stopped leaking..
 

BWR1953

Admiral
Joined
Jan 23, 2009
Messages
6,201
Yeah, I'm thinking that I missed part of the leak by not going far enough astern. I'll remedy that tomorrow. I counted the rivets from the stern to the leak location and I'll be sure to get plenty of overlap. And if I can, I'll get a real close up look to see if there are any crooked rivets, etc.

Bugs me that I made a dry boat wet. :yell: :frusty:

In this pic I can see what appears to be a hairline crack in the paint continuing from where the new Gluvit leaves off, which might indicate a problem beneath. There's water covering it and some debris floating over it as well, so it's hard to make out. It's in the leaky area too. :mmph:

The thing is, I can't see it "in person" with my tired old eyeballs. Only when I have a pic that I can zoom in on do I see small stuff like that. :nerd:

Click image for larger version  Name:	9.jpg Views:	1 Size:	626.5 KB ID:	10536719
 

BWR1953

Admiral
Joined
Jan 23, 2009
Messages
6,201
My ol' buddy came over for a visit this morning, so we sat in the garage and chatted while I worked. That was nice, since I am NOT allowed to be left unsupervised! :lol:

The first thing we did was to push the KF out the back door of the garage so that it could be drained. No problemo. I also put a tarp down over the sand at the back so that there wouldn't be any erosion problems.

1.jpg

And when we got back from HF and lunch, this happened. Gonna be a couple days before the KF is dry again. :rolleyes:
 

Attachments

  • 2.jpg
    2.jpg
    481.8 KB · Views: 1
  • 3.jpg
    3.jpg
    241.1 KB · Views: 1
  • 4.jpg
    4.jpg
    337.3 KB · Views: 1
  • 6.jpg
    6.jpg
    349.3 KB · Views: 1
  • 7.jpg
    7.jpg
    1,020.4 KB · Views: 1
  • 5.jpg
    5.jpg
    992.4 KB · Views: 1

Watermann

Starmada Splash of the Year 2014
Joined
Jan 12, 2013
Messages
13,798
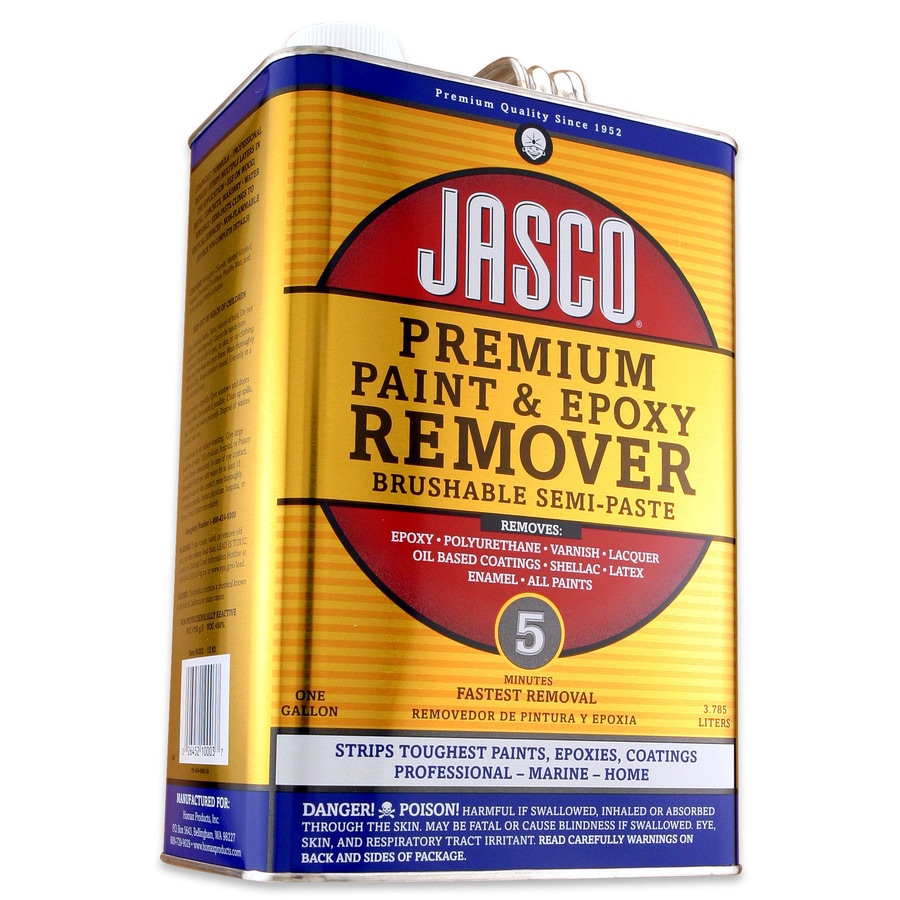
To go back a dozen or so pages I couldn't figure out why you had such difficulty using the Jasco stripper and then I found out why.

fetch


You got the wrong type, see yours says 15 min, well the stuff should be the 5 min. Maybe I stole the wrong pic before to show it but, it should be this one.

026452100037.jpg
 

BWR1953

Admiral
Joined
Jan 23, 2009
Messages
6,201
BTW - while at HF this afternoon, I told the clerk about the walnut blast media failing to work on the Mercury hood and asked what could be done since it didn't perform as advertised. She gave me a phone number for Customer Service and told me that nothing could be done at the store level. Fine. I'll eat it this time. :rolleyes:

But once the hood is fully stripped, I'll try the walnut media on the hood again to see if it will at least clean the residue.
 

Monmouth00

Petty Officer 2nd Class
Joined
Nov 26, 2017
Messages
198
I love the new seat layout!

I should have thought of that!

Too late for me, unfortunately. I can't change plans now!

Can't wait to see it finished!
 

BWR1953

Admiral
Joined
Jan 23, 2009
Messages
6,201
This afternoon the boy and I pushed the KF back into the garage. Thunderstorms forecast for tomorrow. Winter's over! :smow: Dangit. :blue:

I finished stripping the other end of the storage box. Am now thinking about the best way to cut it in half. Sawzall may not be precise enough. I don't want to booger it up.

Suggestions?

Storage box stripped and ready for final cleanup.
8.jpg
 

Decker83

Commander
Joined
Apr 5, 2011
Messages
2,593
I have used a jig saw with a metal cutting blade and that works well for me.. I have also used a circle saw and a band saw with the non-ferrous blades.. Just take it easy and you can get a good result..
Watermann used a table saw for some of his work..
 

Decker83

Commander
Joined
Apr 5, 2011
Messages
2,593
Is the cowl made of fiberglass? Could the black coating be gel coat instead of paint? Just a thought..
 

nrf414

Chief Petty Officer
Joined
Feb 16, 2008
Messages
573
This afternoon the boy and I pushed the KF back into the garage. Thunderstorms forecast for tomorrow. Winter's over! :smow: Dangit. :blue:

I finished stripping the other end of the storage box. Am now thinking about the best way to cut it in half. Sawzall may not be precise enough. I don't want to booger it up.

Suggestions?

Storage box stripped and ready for final cleanup.

Looking good BWR1953 . Nothing like the look of some bare aluminum šŸ˜Š

I have no experience with cutting metal like your storage box but if that was the next project on my list, I'd use the jig saw with a metal blade. Seems to go pretty easy. I used a sawzall and metal blade on the small piece of aluminum over the transom wings. Worked great.
 
Last edited:

BWR1953

Admiral
Joined
Jan 23, 2009
Messages
6,201
Well guys, I did figure out a solution for the logo situation. I'll address it later as there are a bunch of different options available in the solution set and I need to choose the one I want to use.

But I'll be "correcting" the "reversed" logo when I get the KF done. And y'all are gonna love it! :D

Click image for larger version  Name:	Starcraft Logo Pairf.jpg Views:	1 Size:	20.3 KB ID:	10537258
 
Last edited:
Top