I have returned... with a Starcraft this time!

GA_Boater

Honorary Moderator Emeritus
Joined
May 24, 2011
Messages
49,038
Yes, inside the hull.

But I know that I'll need to tilt and maneuver the hull into odd positions in order to get the Gluvit to flow to the correct spaces. Doing that off the trailer should be easier, plus I'll be able to do some touch-up work on the trailer while the Gluvit sets up.

Good - I started to think, very dangerous - I know, that you were going to apply on the outside.

Are any rivets loose in the dripping video area? The bottom of the hull is one piece and when it was formed the bow section is folded up and the seam is behind the bow plate. That's why all the SC's have a pile of factory goop over that bow seam/crevice.
 

classiccat

"Captain" + Starmada Splash Of The Year 2020
Joined
Dec 20, 2010
Messages
3,412
I recommend rebucking leaky rivets since you have everything apart.
 

BWR1953

Admiral
Joined
Jan 23, 2009
Messages
6,201
Sooo... we cleaned up all the tools, etc. this morning and put everything away before coming inside earlier. Left the boat uncovered so that it could dry. Grabbed a shower and sat down for lunch, whereupon a t-storm rolled in and the boat is all wet inside now. Dang. The yard is also wet but the sun is back out again. Maybe later if the yard dries out enough I'll go out and check for loose rivets.

IF I find loose rivets, I'm just not sure that I can rebuck them. I don't have a lot of equipment and not much help either. My stepson is good for some things but using a big sledge hammer as an anvil while I TRY to crawl around under the boat whacking a rivet may not work. Being upside down is very tough for me and most times I can't do it at all. (Hence my slow repairs on my tractor!)

But I'll check it out for sure. ;)
 

BWR1953

Admiral
Joined
Jan 23, 2009
Messages
6,201
No work on the boat today but I did get the grass cut this morning! :lol:

T-storms this afternoon and I've only been out to the boat to take some measurements. Been doing some math and some photo editing to calculate some flotation with side panel options while it's been thundering outside.

Am considering using Coroplast corrugated twin wall plastic sheeting for the side panels. Cheap, fairly strong, waterproof and easy to work. Local big box store has 72' x 36" sheets for like 13 bucks. No heavy structural loading on them; would just be used to keep the flotation foam locked in place.

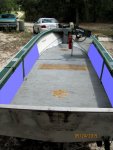
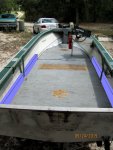
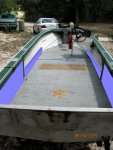
Side panel options are shown in blue.

The hi-boy gives the most flotation but nothing else.
The low-boy version gives the least flotation but does provide room to add storage above the panel.
The mixed panel splits the difference.

Hi-boy side panels yield about 322 lbs. of flotation
Low-boy side panels yield about 110 lbs. of flotation
Hi and low mixed panels yield about 195 lbs. of flotation

Thoughts please! :joyous:


Flotation panel concept7.jpgFlotation panel concept8.jpg Flotation panel concept6a.jpg coroplast sheets.jpg
 

Attachments

  • coroplast sheets.jpg
    coroplast sheets.jpg
    22.9 KB · Views: 10

Watermann

Starmada Splash of the Year 2014
Joined
Jan 12, 2013
Messages
13,797
Most of the SC boats use the side panels as structure for the boat, with the ply adding needed strength to the sides and limiting some of the flex at the spray rail area of the boat. Although they're equipped with the side 'shelves' for lack of a better word which your model doesn't have. Unless a PO took them out which I doubt then it wasn't equipped with the side shelf supports for the panels to rivet to just the 2 vertical supports. Guess I would have to say your model never had any side panels unless they were attached to the gunnels? Using ply would only strengthen the boat and of course make it heavier too. My problem with the plastic would be impact damage and of course we know what plastic does with age along with sunlight.

fetch
 

BWR1953

Admiral
Joined
Jan 23, 2009
Messages
6,201
Note to self: Be sure boat is covered while cutting the grass! :facepalm:

Sooo.... we pressure washed the boat again this morning. :lol:

Okay - somebody tell me how to check for loose rivets. I've never done it before. Do I just get my BFH and start whanging on the hull and listening for rattles? Or do I need to pry on each rivet with a screwdriver? Or something else?


Most of the SC boats use the side panels as structure for the boat, with the ply adding needed strength to the sides and limiting some of the flex at the spray rail area of the boat. Although they're equipped with the side 'shelves' for lack of a better word which your model doesn't have. Unless a PO took them out which I doubt then it wasn't equipped with the side shelf supports for the panels to rivet to just the 2 vertical supports. Guess I would have to say your model never had any side panels unless they were attached to the gunnels? Using ply would only strengthen the boat and of course make it heavier too. My problem with the plastic would be impact damage and of course we know what plastic does with age along with sunlight.
Nope, doesn't look like this boat had original side panels. It does look like it had front and rear benches though. The marks where they were are clearly visible fore and aft. Dunno how much that will affect lateral strength with those gone. Guess I'll find out.

T-storms here pretty much all day today. They've been "around" the area but have moved close enough to where it's not safe to be outside. So I'll sit here and watch the bluebirds and other feathered friends outside while researching Starcraft boat stuff online. :joyous:
 
Last edited:

Watermann

Starmada Splash of the Year 2014
Joined
Jan 12, 2013
Messages
13,797
Yeah NO, don't go beating, prying, poking or anything like that. If the rivet is loose it would've been identified as a leaker during your tests and you would have marked them with that new sharpie or yours. :joyous: If the solid rivet doesn't have any damage to the head or missing a bucktail then it can be re-bucked but you would need the correct tools to do so. If the rivet is in any way damaged then it should just be replaced.
 

BWR1953

Admiral
Joined
Jan 23, 2009
Messages
6,201
Yeah NO, don't go beating, prying, poking or anything like that. If the rivet is loose it would've been identified as a leaker during your tests and you would have marked them with that new sharpie or yours. :joyous: If the solid rivet doesn't have any damage to the head or missing a bucktail then it can be re-bucked but you would need the correct tools to do so. If the rivet is in any way damaged then it should just be replaced.
Correct tools? You mean my BFH and a claw hammer? Cuz that's all I have at the moment.
 

jbcurt00

Moderator
Staff member
Joined
Oct 25, 2011
Messages
25,052
BFH can act as the anvil (held against the bucktail) and the claw hammer strikes the rivet head.

Just try to hit the rivit head 'square' to the shaft of the rivit... helps keep hull strikes to a minimum..
 

Watermann

Starmada Splash of the Year 2014
Joined
Jan 12, 2013
Messages
13,797
Correct tools? You mean my BFH and a claw hammer? Cuz that's all I have at the moment.

Not exactly, I was thinking an air hammer with a rivet set and bucking bar which can be a BFH, that is if it's able to fit into the area of the bucktail. Although if there's a seam nearby you can be 90% right and assume it's the source of the leaking and roll the dice that the gluvit takes care if it. That's what I did and ended up with some water in my bilge at the end of day on the water. It's not enough water to even flow out the bilge drain plug but still it's a leak that ticks me off. Your call and if there are any rivets that have a dark circle around them then pay very close attention to those.
 

BWR1953

Admiral
Joined
Jan 23, 2009
Messages
6,201
BFH can act as the anvil (held against the bucktail) and the claw hammer strikes the rivet head.

Just try to hit the rivit head 'square' to the shaft of the rivit... helps keep hull strikes to a minimum..
I was never any good at hitting nails straight on. Guess that's why I didn't go into that line of work, LOL. And with the meds I'm on, my hands shake a LOT nowadays. Hmmm...
 

BWR1953

Admiral
Joined
Jan 23, 2009
Messages
6,201
Not exactly, I was thinking an air hammer with a rivet set and bucking bar which can be a BFH, that is if it's able to fit into the area of the bucktail. Although if there's a seam nearby you can be 90% right and assume it's the source of the leaking and roll the dice that the gluvit takes care if it. That's what I did and ended up with some water in my bilge at the end of day on the water. It's not enough water to even flow out the bilge drain plug but still it's a leak that ticks me off. Your call and if there are any rivets that have a dark circle around them then pay very close attention to those.
I don't have an air hammer or riveter although I do have a compressor. Just looked up air hammer on HF and they have cheap ones but an air/hydraulic powered riveter ranges from $40 to $60. Ouch. A bit steep for a one time use item.

I may be able to rebuck the rivets in the flats but am dubious about the ones on the seams. Will need to examine things closely the next time I'm out there.

In the meantime, the boat is in "drying out" mode.
 

classiccat

"Captain" + Starmada Splash Of The Year 2020
Joined
Dec 20, 2010
Messages
3,412
I don't have an air hammer or riveter although I do have a compressor. Just looked up air hammer on HF and they have cheap ones but an air/hydraulic powered riveter ranges from $40 to $60. Ouch. A bit steep for a one time use item.

Air hammers actually come-in pretty handy around the garage: chiseling off rusty bolts, separating suspension parts, forming metal (I recently used it to fix a dented pulley), Installing welch-plugs in carbs...

... and of course making a tinnie water-tight! :thumb:
 

BWR1953

Admiral
Joined
Jan 23, 2009
Messages
6,201
Air hammers actually come-in pretty handy around the garage: chiseling off rusty bolts, separating suspension parts, forming metal (I recently used it to fix a dented pulley), Installing welch-plugs in carbs...

... and of course making a tinnie water-tight! :thumb:
I don't do any of those things and... I don't even have a garage! :lol:

That's why I'm having to work on the boat outside in the yard. And once this boat is done, that's it for me. Not going to try such a task again.
 

BWR1953

Admiral
Joined
Jan 23, 2009
Messages
6,201
Okay, I think I've finally figured out what you guys are talking about with regard to rebucking the existing rivets on my hull. Had to research the different rivet types and installation methods. The solid rivets in my hull require an air hammer and bucking tools even if I drill them out and replace them. Got it. Have sent a text to a buddy to see if he has tools I can borrow.

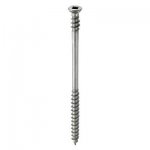
Meanwhile, I'm now looking at deck screws. And I'm looking for thoughts on using actual stainless deck screws as shown below. I like the idea of the 1 5/8" DoubleLok type which screws into the aluminum below as well as the wood above. Would the square drive bit type be okay? Looks pretty strong.

The original screws are shown in the pic below. The PO used 2" drywall screws into the ribs and 1.5" self tapping machine screws where they went into the center stringer. My plywood decking is 1/2" thick and those screws were way too long. Fortunately they didn't pierce through the hull after going into the stringers.

stainless DoubleLok deck screws.jpgdeck screws.jpg
 
Last edited:

g0nef1sshn

Lieutenant
Joined
Feb 24, 2015
Messages
1,291
Im going with large 1" flange pop rivets for the deck. Some do use screws but im not sure sure which are prefered. other than stainless steel ones ofcourse.
 

BWR1953

Admiral
Joined
Jan 23, 2009
Messages
6,201
Well, my buddy doesn't have a rivet gun or bucking tool. Dangit. :blue:

I'm not interested in spending a couple hundred bucks to buy that stuff either. Dunno if Home Depot or Lowes or other places rent that kind of gear but I guess I'll have to check.

Have been reading to see if just buying the rivet tool and hitting it with a hammer might work. No luck finding anything so far.
 

g0nef1sshn

Lieutenant
Joined
Feb 24, 2015
Messages
1,291
Well, my buddy doesn't have a rivet gun or bucking tool. Dangit. :blue:

I'm not interested in spending a couple hundred bucks to buy that stuff either. Dunno if Home Depot or Lowes or other places rent that kind of gear but I guess I'll have to check.

Have been reading to see if just buying the rivet tool and hitting it with a hammer might work. No luck finding anything so far.

The large flange rivets I mentioned are pop rivets not solid rivets.

Pop rivets are inexpensive and so are the pop rivet gun to use them, total for rivets and gun can run maybe 50$ total unless your in canada maybe from what I hear. Its not like the solid rivets where you need an air hammer, compressor and bucking bar type thing. I guess there are pro's and con's to each.
 
Last edited:

BWR1953

Admiral
Joined
Jan 23, 2009
Messages
6,201
The large flange rivets I mentioned are pop rivets not solid rivets.

Pop rivets are inexpensive and so are the pop rivet gun to use them, total for rivets and gun can run maybe 50$ total unless your in canada maybe from what I hear. Its not like the solid rivets where you need an air hammer, compressor and bucking bar type thing. I guess there are pro's and con's to each.
The solid plain round head rivets are the ones that are already in the hull and need rebucking. That's where my leaks are coming from as shown in the video in Post #99. I'd really like to rebuck them before applying the Gluvit. A dry boat is the goal! :joyous:

At the moment I'm at a complete standstill working on the boat until I get the rebucking options sorted out. Been doing a lot of reading online today.

Deck and side panel fasteners could be ordinary pop rivets or the stainless screws. A pop rivet gun and rivets are quite inexpensive, just as you say. I've seen them at HF for cheap. I do like the idea of using my cordless drill for the stainless screws though. Quick and easy. Time will tell on which option I choose for those.

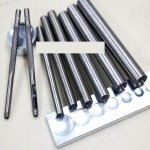
Did find some manual round dome rivet setting tools online. But it could take as much as 2 months for them to get here! :eek:

rivet setting tools.JPG
 

g0nef1sshn

Lieutenant
Joined
Feb 24, 2015
Messages
1,291
Took me a bit to find the pic of my rivets for the deck but here they are....


image_220651.jpg


As for that leak up front, I had the same thing. But I didnt mess with the bucking up there. My didnt drip that fast but I just put a good layer of glovit on the inside and I had that outside line grinded pretty clean as well so I put the glovit near my leak marks on the outside also for added comfort. There wasnt a real clear way to tell which rivet it might have been letting the water seep through the seal and I didnt want to buck them all! The following leak test after gluvit was a success and once primed and painted it "should" still be just as water tight.

Every boat is different though especially when 30+ years old!
 
Top