First rebuild - '89 Campion Allante 185 - Stringers, Deck, Transom

Chris51280

Ensign
Joined
Jan 24, 2018
Messages
911
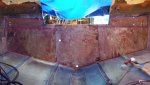
I just installed my transom. What I noticed is that the clamps aren't really that important. The clamps will ooze out the PB and hold it in place for a couple minutes. It will stick either way. If you clamp on the inside and the outside will be pressed by the pressure created by the wood tension, I think you will be ok. It is more that you start displacing the PB and get most air pockets out. The tabbing with the 1708 will seal the deal
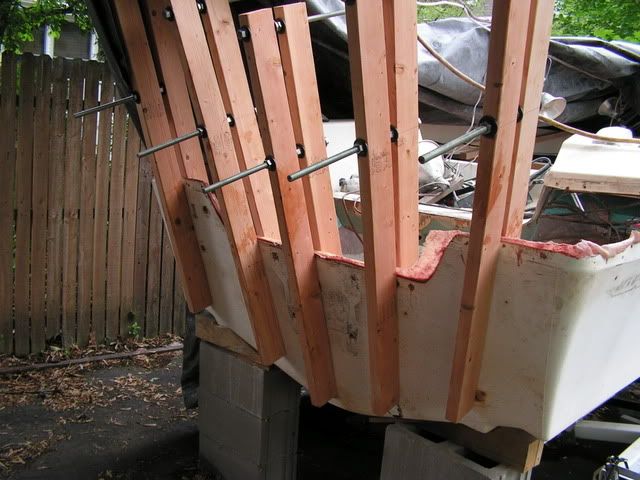
 

froggy1150

Master Chief Petty Officer
Joined
Nov 3, 2017
Messages
803
Porta power is a real handy tool. It's a pump on a hose to a little ram with a bunch of extensions in the kit. I got a cheapie from harbor freight for a buck 20..... I use it for a lot....
 

kcassells

Fleet Admiral
Joined
Oct 16, 2012
Messages
8,600
Now I see it. They split it in 3 sections. It looks like you will have to fill a lot with PB under the first layer.

The first pc. will be the critical pc. After that it 1,2,3,.....
I'd take my time, clamp the crap out of pc. 1 and let it set up completely.
Looking at the original pic of the transom are you able to determine if a po did the transom. Looks like the center pc. is @2" short on either side and the wings then are too long. Hence all that pb void area.
 

steve_h7

Chief Petty Officer
Joined
Sep 16, 2018
Messages
401
The first pc. will be the critical pc. After that it 1,2,3,.....
I'd take my time, clamp the crap out of pc. 1 and let it set up completely.
Looking at the original pic of the transom are you able to determine if a po did the transom. Looks like the center pc. is @2" short on either side and the wings then are too long. Hence all that pb void area.

I'm sorry, I'm afraid I'm not following you. The transom hasn't ever been redone from what I can tell. I'm pretty sure it came from the factory this way. Here's another picture of the transom before it was removed. It was made up of 5 different pieces but I was going to try and combine the lower 3 into one large piece and then use 2 - 3/4" plywood glued together for the upper pieces for the swim ladder bolts and the transom tie down U bolts, since that area isn't curved. I thought I could probably tab it in all together at the same time when I glass it over so all 3 pieces would be covered as one. Does that sound like it would work, or am I going at this the wrong way?
 

Attachments

  • photo307644.jpg
    photo307644.jpg
    193.9 KB · Views: 2

kcassells

Fleet Admiral
Joined
Oct 16, 2012
Messages
8,600
I'm sorry, I'm afraid I'm not following you. The transom hasn't ever been redone from what I can tell. I'm pretty sure it came from the factory this way. Here's another picture of the transom before it was removed. It was made up of 5 different pieces but I was going to try and combine the lower 3 into one large piece and then use 2 - 3/4" plywood glued together for the upper pieces for the swim ladder bolts and the transom tie down U bolts, since that area isn't curved. I thought I could probably tab it in all together at the same time when I glass it over so all 3 pieces would be covered as one. Does that sound like it would work, or am I going at this the wrong way?

Ok then that said the center of the transom for the motor is flat/straight from all I see. The others are there just to hang stuff on like your ladder in addition to adding some beef.
So your transom is not curved. Their is no reason to attempt making it 1 pc. as curved. You will have more headaches and it's not designed that way.
I would extend the center transom over to the edge as I mentioned and pb that all by itself then do the other pcs.
All welcome to comment.
 

Chris51280

Ensign
Joined
Jan 24, 2018
Messages
911
It may work being curved. I'm no outboard specialist. Depends on if the motor can attach to a slightly curved transom. The outside sure is curved. The reason they did it this way is because,... time. They have to quickly build these and not fiddle around with making it nice and curved with 6 different layers. It's up to you, either way will be stiff enough. Question is, does the motor work with the curvature.
 

steve_h7

Chief Petty Officer
Joined
Sep 16, 2018
Messages
401
Thank you to you both for taking the time to weigh in! Doing it in pieces does go against what I was told in the beginning, i.e., to build it curved in one piece, but like a lot of things I guess, there's more than one way to get to the finish line! :) The outboard is a big 150 Merc so I think it can use all the strength it can get... so I'd like to give the single piece a try if I can. I've done trials of clamping the first piece on and it sure seems pretty straight forward. It seems to clamp down well and the straight piece in the center will have 2 clamps like WOG shows on his sticky thread to hold it flat and then another 2 clamps on the outer wings. There is a slight bow in the opposite direction to how it'll be clamped to the stern so it seems like it'll make good contact. If it doesn't go well I'll be the first to admit it! :)
 

Chris51280

Ensign
Joined
Jan 24, 2018
Messages
911
I think a single piece will be better too for stiffness. If you need a flat surface inside, you can still lay 1708 in layers down. 3"-5"-7"-9" .... to make a flat face or close to it. In the end, as long as it is encased and dry it will be ok. Since there is a heavy motor hanging on it, make sure the blue pieces are tabbed and PB'ed in very good, otherwise you get a lot of stress on the upper edge. Just think about where it will be pulling and where it will be pushing. Newtons law, every action has a reaction. forces need to go somewhere.
 

kcassells

Fleet Admiral
Joined
Oct 16, 2012
Messages
8,600
Hey you have a 3 pc. transom. All I gots to say. Your boat do what you want.
It was put in the first time wrong or second time by someone,, under cut and compensated with blobs of glue. :joyous:
Chris51280
I just installed my transom. What I noticed is that the clamps aren't really that important.
Way off but hey. Clamps don't do much?
Good luck guys.
 

Chris51280

Ensign
Joined
Jan 24, 2018
Messages
911
kcassells
My shell was rather thin to the top (.4" bottom and .2 on top with voids in the center) and if I would have clamped too tight it would have distorted my outside since the wood will not give any. Therefore I did not clamp down too much. rather to hold it in place. I hand pressed and that was enough to squeeze out the PB.
With Steves since he has a curved Transom, clamps in the center to distribute pressure to the outer areas is a given I would say
 

kcassells

Fleet Admiral
Joined
Oct 16, 2012
Messages
8,600
kcassells
My shell was rather thin to the top (.4" bottom and .2 on top with voids in the center) and if I would have clamped too tight it would have distorted my outside since the wood will not give any. Therefore I did not clamp down too much. rather to hold it in place. I hand pressed and that was enough to squeeze out the PB.
With Steves since he has a curved Transom, clamps in the center to distribute pressure to the outer areas is a given I would say

Chris,
HE DOES NOT HAVE A CURVED TRANSOM. The center is square and flat The rest is messed up.
 

kcassells

Fleet Admiral
Joined
Oct 16, 2012
Messages
8,600
He does NOT have a curved transom where the motor mounts. The rest is nada.
This is stupid now. How can't anyone you see the center section of the transom is flat and square. ???????????
 
Last edited:

steve_h7

Chief Petty Officer
Joined
Sep 16, 2018
Messages
401
Aye, nothing like a forum with a little passion! :)
But whatever we call it, it needs a new one... that I think we all can agree. The poly gods are with us and the supplies have arrived... so it will soon be time to give this peanut butter mixing a try. :rockon:
 

Chris51280

Ensign
Joined
Jan 24, 2018
Messages
911
Re: 21.5' 1990 Campion Fishing machine transom and stringer restore

GUYS!

You can Laminate that Curved transom, using 1/4" ply, resin, mat and transom clamps. Cost you about $50 bucks (10 bucks each) to make em, but they come in real handy. I showed em to a guy last summer and he used em on his boat. Here's a pic. I have since changed the design a bit so now you just use large bolts instead of All Thread. You might have enug scrap wood and bolts to make em for nuthin.:eek: Work great!!


PICT00185.jpg

I would say woodonglass has it right. It is curved ;)
 

kcassells

Fleet Admiral
Joined
Oct 16, 2012
Messages
8,600
YUP;
Good link there. JK Bison is awesome.
Re: 21.5' 1990 Campion Fishing machine transom and stringer restore


Originally posted by mcgyver View Post
OOPS....I just checked the cap for being flat across the transom and it's not! There is about a 2-3" curve to the transom needed. If i was to install the 2 - 3/4" ply flat when i go to drop the cap back on it wouldn't fit.. how do i deal with this? It looks as if they used 2 - 5/8" and 1 - 1/2" when it was built. I wouldn't think that 5/8" ply would bend THAT much....I'm really confused at this point on how to proceed. This project just keeps getting worse and worse.


You deal with this the same way my Bayliner is done. You make the transom wood out of 3 pieces. The center portion that the motor is mounted to needs to be set to the stringers. Check out the link in my signature for pics on how mine was done by the factory. You will need to round the wood abit. Also you will need to make a fixture of the curvature of the cap you are trying to match. For two reasons, 1-to use a clamp board when you glue in the wood. and 2-as a guide when you are fitting the ply into the transom. DO NOT TRY TO BEND THE PLY it will not work! The fiberglass will flaten out.
J Bisson
biggrin.gif

___________________________

1991 Bayliner Trophy 2002 W/A

Past Projects
https://forums.iboats.com/showthread.php?t=521563https://forums.iboats.com/showthread.php?t=443915
https://forums.iboats.com/showthread.php?t=457212

Past Boats
1971 Starcraft Chieftan 21
1981 Lund Utility
 
Top