Finnish fishing boat overhaul [Splashed 2017]

Pusher

Lieutenant
Joined
Sep 2, 2014
Messages
1,273
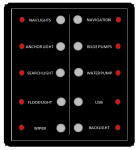
And you're thinking of having a matched black panel of the same dimensions on the other side?

I kind of feel that the standard steel toggle switches would look too small on a board that large. They usually look best 3/4" - 1" apart IMO which would leave a lot of empty space. You could do three rows; top center and bottom. The time consuming decisions are the best.

I'll leave it to those more experienced, but I see why you want the antique look for the switches. Those gauges look awesome!

Stupid question but have you tested the gauges in case you are making plans around them?
 

Red Herring

Chief Petty Officer
Joined
Oct 1, 2012
Messages
536
I've opened the gauges up and cleaned them, but a proper test hasn't been possible as of yet. There are same size replacements available in case these end up not working.


You guys the think the different switch setups sound reasonable? (Grouping all navigation on one, all wipers on one etc..)
 

gm280

Supreme Mariner
Joined
Jun 26, 2011
Messages
14,604
Red, Here are a few panels I made. Not that you want the same setup, but just showing what is possible for your ideas.
Plates - (8).JPG
This is a panel I made for the passenger area.
Plates - (1).JPG
Here is the panel for the trolling motor area.
Plates - (13).JPG
Here is the one at the helm area with the key switch.
Plates - (17).JPG
And this is a panel for the few gauges I will have.

I realize yours will be a lot different with more switches, gauges and such. But I was only trying to show you what can be made once you get your ideas figured out.
 

Mikeopsycho

Senior Chief Petty Officer
Joined
Feb 6, 2014
Messages
738
I'd have a separate switch for each wiper. That boat of yours is looking awesome, by the way.
 

Red Herring

Chief Petty Officer
Joined
Oct 1, 2012
Messages
536
Amazing panels!!! They look really good. How'd you do the etching (laser?) I'm fairly confident that I can install the switches and wires but the text would require acids and all sorts of fooling around, or lots of dineros.

I'll think about the wiper switch, I'd like to keep it all down to a minimum but I see your point as well.

The panel is 18.5cm wide (7.28 inches x 5.7 inches) and about 3mm thick black painted aluminium. I'll start sketching and see what comes out of it.
 

gm280

Supreme Mariner
Joined
Jun 26, 2011
Messages
14,604
Amazing panels!!! They look really good. How'd you do the etching (laser?) I'm fairly confident that I can install the switches and wires but the text would require acids and all sorts of fooling around, or lots of dineros.

I'll think about the wiper switch, I'd like to keep it all down to a minimum but I see your point as well.

The panel is 18.5cm wide (7.28 inches x 5.7 inches) and about 3mm thick black painted aluminium. I'll start sketching and see what comes out of it.

Red, we actually have a LASER engraver that we use to make such panels. And there are tons of places that can do the same for you also...I guess. Most trophy shops do those type things. So once you have your ideas sketched out, or even a rough drawing, they can make something that will work. And the colors and labeling can be just about any sequence you can think of as well. I just posted those panels that I made for our little tiny fishing hull. If I were doing something as grand as your project, I would certainly upgrade to more sophisticated panels as well. JMHO
 

Red Herring

Chief Petty Officer
Joined
Oct 1, 2012
Messages
536
Gm, on the contrary. I'm after some super simple panels that can't match your designs by far. I'm no good at cad and scribbled this in GIMP, it took some hours to get right. Any thoughts?

I'll have to find a laser engraver!


Red Herring

Chief Petty Officer
Joined
Oct 1, 2012
Messages
536
Hmm, it could be tighter now that I look at it.

The grey oval is supposed to represent the toggle switch, and the yellow circle a led.
 

Red Herring

Chief Petty Officer
Joined
Oct 1, 2012
Messages
536


Better one, and now I made sure the Carling switches actually fit underneath the panel and the grouping seems more logical.
 

gm280

Supreme Mariner
Joined
Jun 26, 2011
Messages
14,604


Better one, and now I made sure the Carling switches actually fit underneath the panel and the grouping seems more logical.

Red, are you using actual toggle switches? And if so, what manufacture? And what color and panel types do you want the LEDs to be. I ask because I can design something to fit those options and post it for you to see, if you want me to. :noidea:

I will also need the dimensions of the panel. So let me know.
 

Red Herring

Chief Petty Officer
Joined
Oct 1, 2012
Messages
536
Updated the image with all the drill-outs in scale etc. It's 18.5cm x 14.5cm x 3mm anodised matte aluminium and I've planned to use Carlings St series switches:

http://www.mouser.com/ds/2/65/st-series_datasheet-1021231-1065110.pdf

Still need to find some amber leds though with a maximum bezel circumference of 8mm.


Asked for a quote from a local laser engraver, and apparently the drawing I made ought to work since it's in scale, but please feel free to play with it if you feel like it! I've got it in the gimp xcf format, can see if I can export in some other layer based format.
 

kcassells

Fleet Admiral
Joined
Oct 16, 2012
Messages
8,707
Oh you guys, stop it now.....
b23ab87211a70f5f8a73a90cd3824e3c.jpg

are the Best! You go GM!
 

gm280

Supreme Mariner
Joined
Jun 26, 2011
Messages
14,604
Okay Red, give me a day and I will post a panel back. And if you want, you can take the posted panel to any trophy shop and they can duplicate it from the print. I can even PM you a true scaled copy that will work on any LASER engraver. So let's see what I can design.
 

gm280

Supreme Mariner
Joined
Jun 26, 2011
Messages
14,604
Okay Red, here is a plate designed from your specs. First, I'd like to say that your panel is very tight. And that is because with the Carling's ST series toggle switches you are going to use, they have to be laid out in a horizontal fashion so the will fit on the panel size you stated. The switch takes a lot of space behind the panel and this is the only way they will fit on that size panel. I can post a transparency for you to see what I am talking about if you want. The LEDs I placed on the panel are 8mm size as well. See what you think and I won't be offended, either way, if you don't like it at all. Just trying to help.

Red's Boat Panel.jpg

Of course this isn't to true size but it is scaled proportionally.
 

Pusher

Lieutenant
Joined
Sep 2, 2014
Messages
1,273
I see great progress is being made. That border really brings things together GM! This might be stupid but what if you did the toggle switches in the center columns, the text in the middle and the LEDs on the outside borders?

A second stupid question: would you paint the panel and let the laser etchers cut in the bare border?
 

Pusher

Lieutenant
Joined
Sep 2, 2014
Messages
1,273
Btw, if you have any more panels to make you might try microsoft excel. You can fill the boxes for the panel shape, then "Insert" shapes for the toggles. Just a thought. I have an idea for the etched border but am googling for it still.
 

Red Herring

Chief Petty Officer
Joined
Oct 1, 2012
Messages
536
I owe you one Gm, it's perfect! The border does wonders. I thought I had the switches juuust far enough from each other for them to fit, but I was doing pixel-length conversions on the fly while drawing guides and borders.

I'm in no way determined on the Carlings St switches, they just seemed like a good starting point since I had nothing to compare to. Waterproof and military specced etc is probably overkill, but I guess it can't hurt?

Thanks!!
 

Pusher

Lieutenant
Joined
Sep 2, 2014
Messages
1,273
You could put these corners on pretty simple if you drilled them before trimming out the panel.

Here's the switches on the inside column and LEDs on the outside. (Sorry, on my Android so I can't fullsize them).

You could do LED push buttons but I think the old school look you're doing will be great with your interior.
 

Attachments

  • Capture.PNG
    Capture.PNG
    16.6 KB · Views: 0

Red Herring

Chief Petty Officer
Joined
Oct 1, 2012
Messages
536
Pusher, I tried that same orientation as well, and then decided against it when it became a bit unclear what is the on-orientation and what off.
 

gm280

Supreme Mariner
Joined
Jun 26, 2011
Messages
14,604
Okay guys, I guess you all need to understand there is a back side to any panel. And even though the parts fit easily on the front side, their size precludes them to go in such a fashion on the back side. I went to the switch manufacture and got their true dimensions so I could lay them out on the back side to fit. That is why they can't be fitted in a standard vertical setup. Their behind the panel sizes won't allow it. And then can be fitting in the middle, but again their sizes will still have to be in a horizontal setup. Here is a see through panel for you all to see.
Red's Boat Panel See through.jpg
Now you can see how those switches dictate where and how they will fit. The left side of the panel may even have to have the switches moved in some more to allow it to fit into the console opening. IDK.

If you were to move these switches into the center area, they would still need to be separated far enough to allow them to mount. And that would look different on the front side. JMHO

I have designed many many equipment panels for a lot of different public companies and the even the Air Force in my days using these same procedures and you have to accommodate how parts literally mount behind the panel for them to both look good and actually fit from the front. JMHO

Once you size the border dimensions, you are fixed in what you can do from there.
 
Top