Custom Fiberglass Extended Swim Platform

AShipShow

Lieutenant Commander
Joined
Jul 8, 2016
Messages
1,802
I disagree... I think 2 layers of CSM *plus* a layer of cloth is necessary. CSM isn't going to do much for you structurally in keeping the mold stable. I think a layer of 1708 will add a lot of rigidity to the mold for not much cost. You could also just use 10oz or 17oz cloth as you won't need the CSM binder layer.

I "DO" agree that bracing is also critical, but doesn't need to be complex.

Key point is this is a one-off mold so as long as it gets the job done once you are okay, but at the same time, you don't want to take any shortcuts and end up disappointed in the end product because you save 20 bucks on glass and resin and your mold warped/cracked.

Just my $0.02, im not a mold designer so take it for what its worth lol
 

tpenfield

Moderator
Staff member
Joined
Jul 18, 2011
Messages
18,085
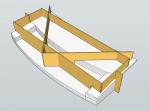
Thanks for the input, guys. I had been thinking about some supporting structure for the mold, but your comments got me to thinking about a sufficient amount of structure. Through the miracles of computer modeling, here is what I have come up with . . .
.
MoldStructure1.png
.
I think 1/4" plywood tabbed to the mold exterior should do the trick and still keep things fairly light.

As far as the mold thickness, perhaps I'll go with 3 layers of CSM and call it good. If I use vacuum bagging and resin infusion (which ought to be a real trick :rolleyes: ) then I won't have to fiddle with forming things in and around corners.

My goal is to finish off the plug by early January, make the mold by end of February, and the platform itself in March/early April. That should leave enough time for boat prep work in April-May.
 

tpenfield

Moderator
Staff member
Joined
Jul 18, 2011
Messages
18,085
Just looking at my budget for this project. I had originally planned on about $1,200, but . . . it is looking more like $2K ish. Maybe a tad under. Some due to changes that I have made along the way, but mostly due to things costing a bit more than I expected. The epoxy & fairing compound supplies are good examples . . . about $335 total in those 2 things.

In total, I am about $750 into it already. My big ticket items ahead are the fiberglass materials and the rub rail. Un-daunted by the $$$, I forge ahead :)

The Admiral is like . . . "what is going on here?". Me . . . " :noidea: . . . you wanted a swim platform . . . in the end you'll love it " :)
 

AShipShow

Lieutenant Commander
Joined
Jul 8, 2016
Messages
1,802
Yup, supports look good to me too! I don't even think I'd bother with the two little outer supports on each end. I think the key is to support it the most in areas that have to fit up to other stuff to make sure it doesn't warp or twist in critical spots... If the rest of it bows or warps a little, no one will ever know.
 

sphelps

Supreme Mariner
Joined
Nov 16, 2011
Messages
11,468
Well I doubt you could have one custom made for less than that .. And you will have the satisfaction of knowing you had all the fun instead of someone else ! :joyous:
 

tpenfield

Moderator
Staff member
Joined
Jul 18, 2011
Messages
18,085
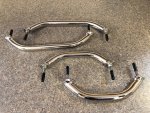
I received the grab handles today . . . qty 2 12" and qty 2 8". They a flanged base, which is nice and should be quite secure once installed on the hatches and the pylons.
.
IMG_1831.jpg
.
I plan on raising the contour of the hatches in the area where the handles fasten. This is so I'll have adequate clearance for the fastening hardware that goes underneath the hatch.

I am thinking that I will not be able to do any more work on the plug until the weekend after Christmas. I'll probably work on it both the weekend after Christmas and after New Year's :)
 

tpenfield

Moderator
Staff member
Joined
Jul 18, 2011
Messages
18,085
Quick Update . . .

I figured that I should use the proper vacuum resin transfer supplies . . . at least as much as I understand it.

I ordered:

Peel Ply
Flow Media
Breather Cloth
Bagging Film

$75 ish + shipping

I was concerned if I just used plastic drop cloth as the bagging material and nothing else, things may not go as desired when I try to infuse the resin.

Also, many of the videos that I have watched about 'Vacuum Assisted Resin Transfer Molding' (VARTM) shows the resin being injected at a low part in the mold and then drawn upwards by the vacuum to the top of the mold. Often the resin bucket(s) are at a lower point than the mold.

Not sure why they do this :noidea:

Since my mold is going to be fairly flat, my plan is to introduce the resin in the center areas of the mold(plug) and 'draw' it out in all directions to the perimeter of the mold with the vacuum. Therefore I'll have a vacuum line servicing the entire perimeter of the mold and the resin line(s) running along the center of the platform near the step-down and along the pylons.

Additionally, I was thinking to have the resin bucket elevated above the height of the mold . . . maybe by a couple of feet to assist in the resin flow.

Not sure if there are any folks on the forum familiar with VARTM that could comment. Thoughts? :noidea:
 

Scott Danforth

Grumpy Vintage Moderator still playing with boats
Staff member
Joined
Jul 23, 2011
Messages
49,847
I can reach out to our carbon and FG guy that makes our shrouds and swim ladders at work. let me call him tomorrow
 

tpenfield

Moderator
Staff member
Joined
Jul 18, 2011
Messages
18,085
Thanks, Scott. Any words of wisdom on the process would be great.
 

AShipShow

Lieutenant Commander
Joined
Jul 8, 2016
Messages
1,802
I'm no expert, but in the videos I've seen before, it seems like it's pretty standard to do the opposite of your plan lol. I usually see multiple resin inputs around the perimeter with a single vacuum point towards the middle. Thinking it's would probably be faster with lots of resin inputs since it's pretty viscous compared to air.

again, I'm not a vacuum resin expert, but I did stay ay a holiday inn express last night...
 

tpenfield

Moderator
Staff member
Joined
Jul 18, 2011
Messages
18,085
Considering that you stayed at a Holiday Inn Express . . .

I have seen (via YouTube) different approaches to the flow pattern on VARTM. Some going across from one side to another on a flat piece, as well, as some going from a keel of a hull up to the rubrail, and even the opposite for a mold that was oriented upside down.

I would imagine that there is no right vs. wrong, just a matter of what works for the type and size of piece that is being molded, Several resin input locations and vacuum taps as well as 'runners' seem to be the norm for larger pieces.

I'm thinking I should have about 3 resin input locations and at least 2 vacuum locations, all with runners beneath the bagging material.
 

tpenfield

Moderator
Staff member
Joined
Jul 18, 2011
Messages
18,085
I did come across a series of videos about a process called "Light RTM" where the resin is fed from all around the perimeter towards the center of the part. The vacuum is taken from the center of the part, as Mad Props had mentioned. The benefit of this process is that it tends to force any air pockets out, since the resin is coming in from all sides.

Scott Danforth - thank you for the advice from your colleague, very helpful. :thumb:

My game plan for resin infusion will be to run a plastic coil all around the perimeter of the plug/mold to act as a runner for the resin, then feed the runner from 4 places around the perimeter. I'll also have a runner in the center of the part, right at the step-down area connected to a single vacuum line, so the resin will (hopefully) feed towards that area.

Making the mold will serve as a trial run of the infusion process to see how well things go in practice vs. theory :)
 
Top