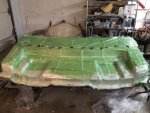
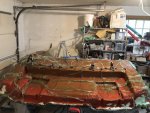
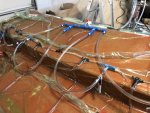
Custom Fiberglass Extended Swim Platform

tpenfield

Moderator
Staff member
Joined
Jul 18, 2011
Messages
18,085
There is a Harbor Freight Tools about 20 mins away. I didn’t think of HF. I’ll see what I can do.
 

Ciera2450

Lieutenant Junior Grade
Joined
Apr 8, 2011
Messages
1,049
I commend your skills sir! I cant nor couldn’t put this type of skill and precision into my platform build. I’m gonna foam mold, ply core and hand layup glass. Hoping it’ll hold humans. :joyous:
 

zool

Captain
Joined
Aug 19, 2012
Messages
3,432
The HF vacuum pump works fine, Ive been using one to evacuate auto ac for a while now. Its a little weak, but does the job.
 

tpenfield

Moderator
Staff member
Joined
Jul 18, 2011
Messages
18,085
$100 later, Back in business, hopefully . . .

IMG_2269.jpg

The other pump had the rotary vanes stuck from ingesting resin. I got one of the vanes freed up , but the other one is still stuck. The original pump may be fixable, but probably won't be 100%.

So, this new one will have to do.
 

Grub54891

Admiral
Joined
Jun 17, 2012
Messages
6,097
The vacuum pump I have ate some resin also. The new pump was thrown in the trash because the po was mad he did that. I fished it out, disassembled it and soaked it in acetone. Some bronze wool to clean it up and now it works perfectly.
 

tpenfield

Moderator
Staff member
Joined
Jul 18, 2011
Messages
18,085
The vacuum pump I have ate some resin also. The new pump was thrown in the trash because the po was mad he did that. I fished it out, disassembled it and soaked it in acetone. Some bronze wool to clean it up and now it works perfectly.

Yes, I currently have the rotor/vane assembly soaking in acetone. One of the vanes loosened up after being soaked overnight, but the other one is still stuck. Maybe by this afternoon it will free up.
 

tpenfield

Moderator
Staff member
Joined
Jul 18, 2011
Messages
18,085
Quick update . . .

I had trouble getting a good seal on the bagging material, so I could not get the glass tight to the contour of the plug.

Ran out of time this weekend, so the glassing will have to wait until another weekend.
 

tpenfield

Moderator
Staff member
Joined
Jul 18, 2011
Messages
18,085
Making some progress . . .

I have the glass and infusion materials laid out as well as the vacuum bag in place.

IMG_2285.jpg

I had to make a complete bag to fully seal things.

I have run a vacuum test and made sure the runners are lined up where they should go. The little HF pump takes a while to pull the air out of the bag, but it does the job.

Next steps are to hook up the resin plumbing, then onto infusion.
 

Scott Danforth

Grumpy Vintage Moderator still playing with boats
Staff member
Joined
Jul 23, 2011
Messages
49,852
Ted, have you had a chance to pull the other pump apart? two pumps on-hand would aid in success in the event you suck up resin again
 

tpenfield

Moderator
Staff member
Joined
Jul 18, 2011
Messages
18,085
Ted, have you had a chance to pull the other pump apart? two pumps on-hand would aid in success in the event you suck up resin again

Yes, I got it all apart, cleaned, and back together, but it does not seem to pull any pressure. I consider it a work in progress, but low priority. The little one will have to do
 

tpenfield

Moderator
Staff member
Joined
Jul 18, 2011
Messages
18,085
THE BIG INFUSION Update . . .

I got everything all set on Friday (March 22, 2019) so that I could do the resin infusion Saturday AM.

3 gallons of Polyester resin
13 oz of styrene thinner
1.3 oz of 10% TBC inhibitor solution (to get ~ 300 ppm)
7 oz of MEKP (1.9%)
Resin & plug temperature = 59-60˚ F

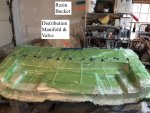
Here is my setup. . .

Click image for larger version  Name:	IMG_2286.jpg Views:	1 Size:	204.5 KB ID:	10715898 .
After all of the discussion about resin flow, working time, etc. I decided on an elevated resin pot with a 3/4" ID tube, leading to a distribution manifold connecting to 4 1/2" feed tubes, and the runner system that you see in the picture above.

I mixed the resin and additives, then activated it with the MEKP and poured it into the resin pot. I managed to put the resin pot up on the top shelf of the rack in the background without incident. Then started the resin flow . . .

Click image for larger version  Name:	IMG_2290.jpg Views:	1 Size:	204.7 KB ID:	10715901 .
I let as much resin as I possible could get into the runner system before shutting of the feed valve and then clamping the individual tubes.
.
Click image for larger version  Name:	IMG_2294.jpg Views:	1 Size:	215.2 KB ID:	10715902
.
Now I am continuing to run the vacuum and am monitoring the heat of the resin/mold to see when it starts to kick.
 

Attachments

  • IMG_2291.jpg
    IMG_2291.jpg
    200.8 KB · Views: 2
  • IMG_2290.jpg
    IMG_2290.jpg
    204.7 KB · Views: 2
Top