Chrysler 75hp, need direction.

Tapphouse

Petty Officer 3rd Class
Joined
Sep 8, 2021
Messages
86
Surprised me the compression is that good being 45 year old outboard. I don’t remember it being that high when I first checked it.
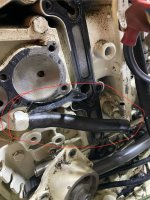
NO I’m not sure at all if top cyl is running lean or not. Just using flashlight and moving it in/out you can see it’s not as good a shape as the other two. it’s brown and dry. I tried to get a pic but it’s way too difficult. I don’t want to pull the cover to see pistons, but I will if need be. Looks like everything is original on this motor. Honestly I’d like to keep it running strong and use it, hence the efforts and questions.
 

Nordin

Commander
Joined
Jun 12, 2010
Messages
2,540
If I was you I would check the carbs by clean them, set the float levels and set the air/fuel mixture screws them start it up and run.
The floats should be level with the carb casting edge when turned the carb up side down.
Air/fuel mixture screws should be 1 1/8-1 1/4 turned out from lightly seated.
It is a starting point, then you maybe have to fine tune them.
You can pull the head to look at the pistons and cylinder wall but be careful when unscrew the head bolts.
If the head bolts are hard to loose you maybe snap some them.
When putting the head back you have to torque the bolts in three steps to right value and in a circular pattern.
 

Tapphouse

Petty Officer 3rd Class
Joined
Sep 8, 2021
Messages
86
Hey guys,
Lil update….. been awhile but pulled the dog bone and found the screens were plugged up with carbon and fine metal shavings. Cleaned everything up just waiting on gaskets to put back together.

Took fuel pump apart, didn’t see anything, waiting on diaphragm and gaskets to put back together.

Pulled the 3 carbs and went thru them, they are clean, and floats are set properly. Should be good. The valve/ hose in bottom carb from air horn was plugged off solid with debris, not sure what that valve does…..
Quick visual at the reeds seem to be good. Super clean and smooth, nothing cracked, chipped or broken.

Other thing I noticed is all my vac hoses didn’t have a clamp, so possibly/ probably pulling in air. Waiting on new hose and clamps to replace.

Anything else to check while I have it all apart? Appreciate it, thanks!
 

topgun3690

Lieutenant Junior Grade
Joined
May 7, 2019
Messages
1,028
Other thing I noticed is all my vac hoses didn’t have a clamp, so possibly/ probably pulling in air.
These engines do not have a vacuum system like your car has.....those are not vacuum hoses. Maybe post a pic of what you are talking about.....
 

Tapphouse

Petty Officer 3rd Class
Joined
Sep 8, 2021
Messages
86
Hello TopGun!
I was under the impression these black 1/4” hoses ran of vacuum from the crankcase, there’s one from the fuel pump to the block, one from the dog bone to the top of carbs, and there’s one from air horn to behind bottom carb…. This one I’m confused about, and what it does.

IMG_0281.jpeg
 

Attachments

  • IMG_0280.jpeg
    IMG_0280.jpeg
    796.1 KB · Views: 8

topgun3690

Lieutenant Junior Grade
Joined
May 7, 2019
Messages
1,028
The air box has a hose that runs to the bottom of the intake behind the bottom carb......some fuel gets spit out the front of the carbs during operation, runs down to the bottom of the air box and is routed to the intake by that hose to be run through again......
 

Tapphouse

Petty Officer 3rd Class
Joined
Sep 8, 2021
Messages
86
Ok. What about the one from the fuel pump to the block (2nd pic)? Wht does that one do?
Should I have clamps on these hoses, since they are not under pressure?
 

Nordin

Commander
Joined
Jun 12, 2010
Messages
2,540
The fuel pump works from over pressure and under pressure (you can call it vaccum/over pressure pulses from the crankcase).
The hose is for this function.
When you have the pump apart check the check valves in the pump.
From my experience they do not go bad, they last almost forever.
When assembled the pump with new diaphragm check it by blowing and sucking with you mouth through the intake line.
You should be able to blow but not suck.
Do the same with the output line and it should be reversed.
Sucking okey, blowing no.
All these hoses to fuel pump, recirculation system and bottom crank case to intake cover did not have any clamps from factory.
You can check these from cracks and if no cracks do not change them.
I would suggest you just to start the engine and run it and see how it performs if you do not want to pull the head and check the pistons.
If it not has been running in salt water or been less time in salt water the head bolts should not be to hard to remove.
The compression is pretty good and equal and with new fuel pump diaphragm and clean carbs it would start and run.
Set the air/fuel mixture screws at 1 1/4 turn out from seated, it would start and run.
Then you maybe have to fine tune the carbs.
 

Tapphouse

Petty Officer 3rd Class
Joined
Sep 8, 2021
Messages
86
Very cool, thanks for the info. Hopefully after this stuff is completed it will run decent.
 

Tapphouse

Petty Officer 3rd Class
Joined
Sep 8, 2021
Messages
86
Afternoon everybody,
Last left off I was waiting for gaskets. I installed the gaskets and the fuel pump rebuild kit.
I read Frank’s link & sync about a dozen times and I believe I have things Close. Just need to get it on the water for the last section.
Here’s my confusion…….
When I roll the throttle forward and shine light into the 3 carbs the inner plates don’t seem to move until almost the very end of throttle lever travel, then roll open. Is this normal? In my mind it would slowly open equally to the advancement of the throttle lever no? Open -close is approximately the last 3”or so of travel at the end of forward throttle.
Maybe that’s how it is, but seems like a fair bit of mid throttle action not being used?
Appreciate any insight as always! Thanks.
 

topgun3690

Lieutenant Junior Grade
Joined
May 7, 2019
Messages
1,028
Maybe that’s how it is, but seems like a fair bit of mid throttle action not being used?
That's pretty much how it is......they open late. But if you watch the distributor it is advancing the whole time before the throttle plates open fully at WOT......it's like ....magic! Lol.
 

Nordin

Commander
Joined
Jun 12, 2010
Messages
2,540
Look at the throttle cam curve and you see how it is shaped.
As topgun says, that is pretty much how it is.
 

Tapphouse

Petty Officer 3rd Class
Joined
Sep 8, 2021
Messages
86
Hello again all,
Took the boat out again to try and figure out this “rich bog” issue. Compression test with plugs out is 120-130 on all 3 cylinders. I have spark at all 3 grounded plugs, carbs are synced, timing looks right but not sure about distributor or what the top screw does.
Starts up first crank every time. Low throttle and mid throttle is rough and cleans up as you hit full throttle.
I’m redoing the carbs AGAIN, and I’m looking at the reeds inside…… but not sure what to look for. They look shiny and straight.
Rebuilt the fuel pump and dog bone. What am I missing here?!
The friend I got it from said it ran perfect across the lake, then on way back it started to bog and never could get rid of it.
Appreciate your help as always. Thank you!!
 

Nordin

Commander
Joined
Jun 12, 2010
Messages
2,540
I suppose you have the Motorola Magna Power I ignition system as we have talk about the preamp in the distributor earlier in the thread.
Do you have surface gap plugs or regular plugs with a bent electrode?
This system should have surface gap plugs.
Have you set the timing at 28-30 dgr BTDC at WOT?
With this battery driven system it is very easy to set the timing.
Set the key in ON position, advance the carbs and distributor to WOT.
With the plugs out the top plug should spark at 28-30 drg BTDC.
If not adjust it by the screw and lock nut at the timing rod at the distributor.
How are the air/fuel mixture screw set at the carbs?
As you describe it runs rough at low and mid throttle and cleans up WOT.
That sounds like the carbs are set a bit rich.
My experience is that running at low RPMs for avail will richen the plugs and it will clean up when hit the throttle.
Try to set them at 1-1 1/8 turn out from seated.
The reeds has to be pretty close but they can have some gap (0,003-0,004 in at a maximum).
 

Tapphouse

Petty Officer 3rd Class
Joined
Sep 8, 2021
Messages
86
Hi Nordin,
Yes magnapower ignition.
New L20v surface gap plugs.
I checked TDC with top cyl and flywheel and distributor marks line up. BUT I haven’t set it to 28-30* yet. That stuff makes me nervous, but I’ll try it.
Air/fuel screws started at 1.5 and went down to 3/4 but moved back up to about 1 turn out. I still need to play with this. When in just in gear I have RPM set to about 750, but in idle it goes up to 850-1000 ish. Franks instructions say to set to 750 in gear, put in idle and set screws, then set RPM again…….set again at idle or in gear like before??
I noticed with hood on it seems run more rich, is it getting enough air under the hood? Do I adjust carbs with hood off and leave it off for test run or put hood on each time?
Also I have spark, seems decent but do I need to “test” the spark? Or is that a thing? Spark is spark.
Thanks again!!
 

Nordin

Commander
Joined
Jun 12, 2010
Messages
2,540
Set idle in gear to 700-800 RPM. Idle out of gear about 1000 RPM.
Setting the timing is simple.
You do not need to have it running.
Pull the plugs, set carbs at WOT if you have the throttle rod connected then distributor is set at WOT too.
Turn the key to ON and turn the flywheel in CW direction.
The top plug should spark at 28-30 dgr.
If not adjust the screw with the lock nut until it spark at right time.
Do not know right now in which direction depending on if you have to advance or retard the timing.
If the RPM goes up with the hood of you have to check if you have exhaust leakage.
First check the rubber boot at the lower cover at the back of the engine.
 
Last edited:

Nordin

Commander
Joined
Jun 12, 2010
Messages
2,540
You can also set the timing with the throttle rod disconnected.
Pull the rod off, be careful not braking the plastic connector.
Turn the distributor/timing plate CW to full advance and check with the key in ON position by turning the flywheel CW and the top plug grounded when it sparks.
Timing at WOT should be 28-30 dgr BTDC, adjust as said before with the screw at timing rod/timing tower.
With correct adjustment you should se the top plug spark each time you push in with a finger at the timing belt.
 

Tapphouse

Petty Officer 3rd Class
Joined
Sep 8, 2021
Messages
86
The sticker on the flywheel says 32* and TDC. how do I know where 28*-30* is? Is it so many teeth back/forward?
I have the carbs completely apart, what is the thin brass tube running vertically thru middle of carbs? How do I remove or clean that piece? So far everything looks very clean. I’ll use air to finish cleaning.
Thanks.
 

racerone

Supreme Mariner
Joined
Dec 28, 2013
Messages
37,480
You likely should not remove that tube.----An ultrasonic cleaner is a good tool to get all the dirt out.
 

Nordin

Commander
Joined
Jun 12, 2010
Messages
2,540
Do you have the timing plate bolted at the block or/and do you have a sticker at flywheel with a 0-line and four other lines, +4,+2 and -4, -2?
Otherwise you can count the teeth at the flywheel, divide it with 360 and you know how many teeth 1 dgr is. Multiply with 28, 29 or 30 and you know how many teeth to the left of the zero mark at the flywheel the top plug should spark.
As racerone says do not try to remove the brass tube in the main high speed circuit.
Try with a ultrasonic cleaner if you have one or use a thin copper wire strand from an electrice wire to clean out that tube.
 
Top