Building a '93 Caravelle 1750 Classic Bowrider

Reserector_

Chief Petty Officer" & 2021 Splash of the Year Win
Joined
Oct 15, 2019
Messages
592
What about laminating two thinner (1/4"?) pieces together, bent and clamped in place with resin and CSM between them? They may still spring back some...just throwing out ideas.
Thought of that, but no thin ply around here with exterior rating. Otherwise that would be a great way to curve out on a short amount of time.
 

froggy1150

Master Chief Petty Officer
Joined
Nov 3, 2017
Messages
802
Could also think about kerf cuts deep enough to make wood flexible then glue/epoxy in the right shape...
 

Reserector_

Chief Petty Officer" & 2021 Splash of the Year Win
Joined
Oct 15, 2019
Messages
592
Could also think about kerf cuts deep enough to make wood flexible then glue/epoxy in the right shape...
Thought about kerf cuts with a layer of CSM, but that would get hard to staple to. Was trying to think of a coating that would soak in and dry to hold the curve. You may be onto something.

I'm going to try the traditional method first and go from there.
 

froggy1150

Master Chief Petty Officer
Joined
Nov 3, 2017
Messages
802
Soooo to get past the staple issue....
If the kerfs are on the foam padding side of the seat just glass that side and leave the back bare. If the kerfs are on the other side leave about 2-3" around the perimeter bare for staples and glass the rest. Then treat the bare wood. Thats one o those outsude the box iders
 

Reserector_

Chief Petty Officer" & 2021 Splash of the Year Win
Joined
Oct 15, 2019
Messages
592
Those are great ideas, for sure!
Here's what I did today. After a few hours, I was able to add more spacers. If this doesn't give good results. I'll kerf cut the foam side.
 

Attachments

  • 20210113_134547.jpg
    20210113_134547.jpg
    4.3 MB · Views: 17

Reserector_

Chief Petty Officer" & 2021 Splash of the Year Win
Joined
Oct 15, 2019
Messages
592
I got all of my bow plywood made. The two larger seat bottoms are doubled up where the cut-outs are in the fiberglass, making them 3/4" thick in those areas. The rest is 3/8".
Water, pressure and patience finally got the curved pieces extremely close to their final shape. They actually end up with a slight twist as well.
The two main seat bottoms will be attached with piano hinge. Everything else is being attached with Beau Clips. One reason being that I cannot get behind those mounting surfaces to install the washers and nuts originally used. Another reason is that I want the option of removing the sections for cleaning or repair if I want to.
These clips also hold the panel off of the surface about 1/8", which can allow some drainage and airflow.
At four screws per individual piece, it takes a while to install twenty eight of these things. That's 56 pieces and 224 screws driven by hand because they are too small for a power tool. The cat wasn't helping, either.

I rewetted the curved parts before popping them in place. I will let them set (at least) until next weekend to let them accept their new form.
These are ready for upholstery.
I may go back and finish up the engine enclosure first depending on the weather. I still have steps, a seat base, side bulkheads and insulation to finish. But if it is bitter cold, at least I have the option of doing upholstery indoors. Progress is progress at this point.
 

Attachments

  • 20210116_171320.jpg
    20210116_171320.jpg
    2.9 MB · Views: 23
  • 20210116_180423.jpg
    20210116_180423.jpg
    2.7 MB · Views: 22
  • 20210116_180426.jpg
    20210116_180426.jpg
    2.9 MB · Views: 20
  • 20210116_180456.jpg
    20210116_180456.jpg
    2.5 MB · Views: 18
  • 20210116_184537.jpg
    20210116_184537.jpg
    3.4 MB · Views: 19
  • 20210117_155011.jpg
    20210117_155011.jpg
    1.9 MB · Views: 25
  • 20210117_170629.jpg
    20210117_170629.jpg
    3.5 MB · Views: 24
  • 20210117_170647.jpg
    20210117_170647.jpg
    3.4 MB · Views: 25

PC on the Bayou

Petty Officer 1st Class
Joined
Apr 27, 2020
Messages
234
Looking nice.

I like the way you did your engine enclosure where it opens completely out of the way. I'm rattling ideas around in my head on how to accomplish something similar so that I can easily get to the engine for mechanical work.

I'm leaning toward more of a two-piece design where the bottom half is removable and the top half opens hood style.
 

Reserector_

Chief Petty Officer" & 2021 Splash of the Year Win
Joined
Oct 15, 2019
Messages
592
If you leave a section removable, that means it has to go somewhere while you work on the engine. If that happens while you are out on the water, it will likely be in the way. I learned that from owning vans for years and having to take the doghouse out to work on it.

I think one could do a similar setup with a bench/sundeck by making the bench base flip forward, and the rest flip rearward.
 
Last edited:

buxmj

Petty Officer 1st Class
Joined
Jun 9, 2018
Messages
294
Great work Reserector! Keep the updates and pics coming as best you can!
 

Reserector_

Chief Petty Officer" & 2021 Splash of the Year Win
Joined
Oct 15, 2019
Messages
592
Those clips are pretty cool.
Videos | Beauclip
They're perfect for upholstered panels.
Installation: In a nutshell, you line up your panel and drill a Ø1/2" hole through the panel and the mounting surface in each clip location. The clips have a pilot that fits in the holes. Attach each one with four small screws, and that's it. They hold quite strongly. Usually requires a screwdriver or clip tool between the halves to pop them apart. Very durable, too. Not cheap, however.
I could put hidden compartments behind panels like that. Hide my emergency rations or something. :)
 

Reserector_

Chief Petty Officer" & 2021 Splash of the Year Win
Joined
Oct 15, 2019
Messages
592
I painted the seat bottoms that will hinge up and be visible.
20210123_154517.jpg
I built all of the parts for the boarding steps, but I need some more PVC strip to put it all together with.
20210124_183715.jpg
I added some white hydem gimp to the places where the red and blue carpet meet. It looked a little too "Spidernam" to me without it.
20210123_154608.jpg
I made a cardboard template for the sides to close off the engine enclosure. These will be plywood with carpet on the facing side. This will control air flow as well as block off engine noise. I will leave them about an inch from the bottom so rain can route to the bilge. This is also where I will put the battery switch.
20210124_183300.jpg20210124_184933.jpg
 

Reserector_

Chief Petty Officer" & 2021 Splash of the Year Win
Joined
Oct 15, 2019
Messages
592
I went on to the next step. Installation of the steps. This may well be the first easy-to-board ski boat. No need to climb over seats to get in and out. The goal is to have the boat I want yet still have it family-friendly. Best of both worlds, I hope.
20210130_144425.jpg
20210130_153836.jpg

The steps are attached to the enclosure, therefore they are also out of the way when accessing the mechanical stuff.
20210130_154020.jpg
20210130_154036.jpg

I added the side bulkheads in the rear. These are an inch above the sole to allow rainwater to drain to the bilge. Their main purposes are to clean up the appearance, force the intake air to channel past the ski locker and fuel tank, as well as the raceways on the sides, and to block the engine noise from the interior.
20210130_154101.jpg
20210130_163721.jpg
20210130_190835.jpg
20210130_171046.jpg
20210130_190854.jpg
20210130_191109.jpg
While I had the side panels off, I installed a fire extinguisher and another USB port. Both will be accessible from the helm or the rear seat. (Tuffer is not impressed.)
20210130_190554.jpg
20210130_190808.jpg
20210130_190813.jpg
 

kcassells

Fleet Admiral
Joined
Oct 16, 2012
Messages
8,598
It is a good idea. I might havr to go ADA considering my timing for build lol!
Could be a tax break.
 

Reserector_

Chief Petty Officer" & 2021 Splash of the Year Win
Joined
Oct 15, 2019
Messages
592
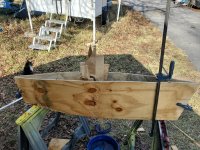
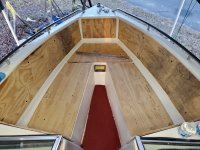
My pass-through trimming looked like it had been done by a rabid beaver.
20210206_135927.jpg20210206_135930.jpg20210206_135934.jpg

Both sides were different. Made it tricky to come up with a pattern that would work on both sides and not be huge. Happy with the end result, though.
20210206_124704.jpg20210206_124737.jpg20210206_124809.jpg20210206_134716.jpg
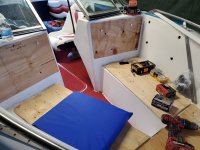
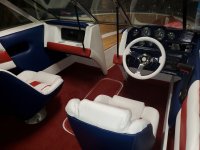
PVC corner molding caps off the raw fiberglass edges nicely. The dash pads made both sides look like they are aligned.
20210206_154850.jpg20210206_154839.jpg20210206_154936.jpg20210206_154950.jpg


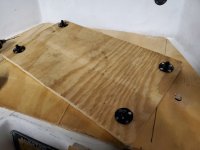
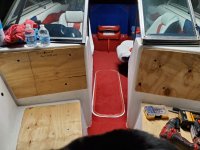
I finally go to the bow seating and worked into the evening to complete the most difficult one. It is bowed wood, with wavey stitching, at three different foam thicknesses. I dare say I bit off a little more than I could chew, but I'm rolling on with it. The opposite side is already sewn, so at least they will match.
20210207_183504.jpg20210207_221308.jpg20210207_222057.jpg20210207_222117.jpg20210207_222155.jpg20210207_222254.jpg

The wavey lines cause me the most trouble. If you don't get the seam allowance right, and you don't keep the seams mated accurately as you go, you get weird wrinkles that you cannot get out.
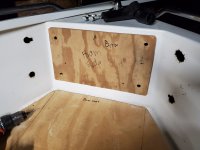
With my impaired vision, but excellent hind sight, I should have gone with a simpler design and method. But over time, vinyl will shrink and the fit will improve. I hope. :)
 

Attachments

  • 20210206_202412.jpg
    20210206_202412.jpg
    3 MB · Views: 2

Reserector_

Chief Petty Officer" & 2021 Splash of the Year Win
Joined
Oct 15, 2019
Messages
592
It looks good by the end of your first season. They look perfect to you.
Meaning that over time I will forget all about the imperfections that almost no one else will care about?
When I really took time to look at the factory bucket seat upholstery, I began to see more and more mistakes. After a while, I realiazed that mine was at least as good as the factory workmanship. Now I'm good with it.
 
Top