Building a '93 Caravelle 1750 Classic Bowrider

Baylinerchuck

Commander
Joined
Jul 29, 2016
Messages
2,726
You might try the Works toilet bowl cleaner. It does wonders on stains on the hull. Don’t get it on concrete of galvanized metal. It’s pretty potent stuff. It’s really cheap, so if it doesn’t work, no major loss.....you can always clean toilets, lol.
 

Reserector_

Chief Petty Officer" & 2021 Splash of the Year Win
Joined
Oct 15, 2019
Messages
595
Not much time for boat stuff this weekend, but I spent a little time on it this afternoon just to get my head back on straight. Like I've said before, the boat project is therapy.
I cut and painted the last two sections of raceway/bracing (braceway? Lol)
I installed the bow light and fished the wiring for it.

20200913_175151.jpg


20200913_163748.jpg
 

Attachments

  • photo339809.jpg
    photo339809.jpg
    1.2 MB · Views: 1

Reserector_

Chief Petty Officer" & 2021 Splash of the Year Win
Joined
Oct 15, 2019
Messages
595
Got a break in the weather this weekend. I finished the braceway on both sides, installed a stern light, routed and connected cables, and worked on wiring.

The stern light that I found online matched the original holes exactly, so I think this may be what the factory supplied. I had the stalk, but not the base.
I just had to remake the hole in the new glass and wood.

Wiring ate up a lot of time, but the weather was so nice that I didn't care. I replaced and added several Molex connectors. Built a fuse block. Added silicone dielectric grease, etc. Tedious, but rewarding.

It was exciting to see the nav lights working. :)

20200920_194504.jpg

20200920_194155.jpg

20200920_194132.jpg

20200920_194126.jpg

20200920_193918.jpg

20200920_193903.jpg

20200920_182100.jpg

20200919_200521.jpg

20200919_185346.jpg

20200919_120222.jpg

20200919_120212.jpg

20200919_120128.jpg

20200919_114426.jpg

20200919_114410.jpg

20200919_114400.jpg

20200919_114352.jpg

20200919_114334.jpg
 

Reserector_

Chief Petty Officer" & 2021 Splash of the Year Win
Joined
Oct 15, 2019
Messages
595
When the lights came on, it made me think of a patient who has been in a coma for many years, and finally opened their eyes. Then I pulled the plug again because it was dinner time.
 

Reserector_

Chief Petty Officer" & 2021 Splash of the Year Win
Joined
Oct 15, 2019
Messages
595
I've been trying to source the hose that comes out of the bottom of the flywheel housing with no luck.
What does it do?
Do I need it?
I attached a photo of one (not mine). I think it has a molded end that pops into the hole in the housing.
 

Attachments

  • photo340462.png
    photo340462.png
    755.5 KB · Views: 7

Baylinerchuck

Commander
Joined
Jul 29, 2016
Messages
2,726
Not really familiar with the OMC, but it looks like this is a sealed coupler to the engine that is offset from the starter gear, unlike mercruiser setups that are directly bolted to the gear.

Is that housing filled with lube, or is this a breather tube? Either way, it looks like you could use a rubber fuel line as long as it’s routed correctly so as not to kink. I couldn’t imagine what someone would charge for that hose, even if you can find it. Hence the major problem with OMC stern drives.

0AFF5663-714D-4F47-867F-38D3C024BF16.jpeg
 

Reserector_

Chief Petty Officer" & 2021 Splash of the Year Win
Joined
Oct 15, 2019
Messages
595
The housing, on the inside, looks like it is designed to deflect water or oil that gets into the housing. I think this is a drain possibly for oil coming from the main seal? I really don't know.
I assume that the open end lays in the bilge.
I found one on eBay for twenty bucks, but hesitated and lost out.
The one in the pic that I posted is Mercruiser, but looks identical to my OMC.
You guys probably have it and never noticed.
 

Reserector_

Chief Petty Officer" & 2021 Splash of the Year Win
Joined
Oct 15, 2019
Messages
595
Lots of progress in the form of wiring, but not much to look at. I mean; it's wiring. What's to look at?

The good news is that everything is wired and working except for the bilge pump and blowers, which I just ordered.

The trim and fuel gauges work now.

I successfully integrated an Evirude trim relay box to replace the destroyed original OMC unit that, while still available, lists for $300.00. The Evinrude box was $42 (used) on eBay and uses standard cube relays.

All I really need now is a lower unit rebuild, and seat restoration. Then I can test drive it.

20200927_134821.jpg


20200927_134653.jpg


https://youtu.be/nn20zzz3V3A

https://youtu.be/187rGV0zRGs
 

Baylinerchuck

Commander
Joined
Jul 29, 2016
Messages
2,726
The housing, on the inside, looks like it is designed to deflect water or oil that gets into the housing. I think this is a drain possibly for oil coming from the main seal? I really don't know.
I assume that the open end lays in the bilge.
I found one on eBay for twenty bucks, but hesitated and lost out.
The one in the pic that I posted is Mercruiser, but looks identical to my OMC.
You guys probably have it and never noticed.

IT appears to be a breather of some sort for the flywheel housing. See image below. Obviously this is not available. Like I said, just use regular rubber tubing, or nothing at all. This is definitely not in an alpha drive, trust me, we’d know. The starter gear housing on a Mercruiser is not sealed to the motor. I can’t vouch for earlier merc drives.

DF34ECF9-ECE6-4BDF-B2AD-8A8F3113AFF7.png
 

Reserector_

Chief Petty Officer" & 2021 Splash of the Year Win
Joined
Oct 15, 2019
Messages
595
The screenshot you posted shows the lip in the casting just below the starter that I had mentioned. The hose snaps in under that.
I don't think it's a breather because there is a gap between the drive coupler and the housing.
The lower half of the housing has a gasket, and there is a foam seal of sorts to seal the starter drive to the opening. It seems that the lower portion is intended to keep bilge water out. (Away from the starter drive?)
Maybe it is designed to use the flywheel teeth to fling water into that cavity below the starter and push it out through the hose. IDK. It's a puzzle. Not losing any sleep over it, but I love solving mysteries.

The engine in the pic that I posted was black, so I assumed it was a Merc. Prejudice, I suppose. :rolleyes:
 

Baylinerchuck

Commander
Joined
Jul 29, 2016
Messages
2,726
If you have bilge water that high I’d say you have more problems to worry about than a rubber tube, lol. Water should never be close to that housing.....if it is, you better have your life vest on and be ready for a brisk swim. :numbness:
 

skuhleman

Seaman
Joined
May 26, 2011
Messages
60
Progress is looking great. Its funny how different yours is on the inside being just 2 years older. Mine was a good boat. Rode pretty decent. Pulled lots of skiers and wakeboarders with mine. Ran a 17p aluminum for most water sports. Great holeshot and top end about 40mph. Switched to a stainless rapture 17p and got good holeshot and top end up to 45mph. Mine had the 3.0 mercruiser. Had manual steering, I found a used power steering kit off a junk boat for $100 that worked excellent. I highly recommend power steering if you can source it.
 

Reserector_

Chief Petty Officer" & 2021 Splash of the Year Win
Joined
Oct 15, 2019
Messages
595
Progress is looking great. Its funny how different yours is on the inside being just 2 years older. Mine was a good boat. Rode pretty decent. Pulled lots of skiers and wakeboarders with mine. Ran a 17p aluminum for most water sports. Great holeshot and top end about 40mph. Switched to a stainless rapture 17p and got good holeshot and top end up to 45mph. Mine had the 3.0 mercruiser. Had manual steering, I found a used power steering kit off a junk boat for $100 that worked excellent. I highly recommend power steering if you can source it.

That's the kind of info I need! Thank you!
What are the differences that you see between mine and yours?
Mine has manual steering, but I did upgrade to the No Feedback version.
 

Reserector_

Chief Petty Officer" & 2021 Splash of the Year Win
Joined
Oct 15, 2019
Messages
595
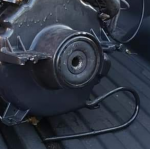
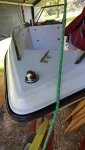
I/O boats like mine require a blower to draw gas fumes out of the bilge. They say to run it for 4 minutes before starting the engine. I decided to install two of them instead.
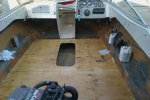
My hull is not designed like factory. My boat will draft air from under the deck, down to the ski locker, around the fuel tank and then into the bilge. Fresh air will come in through the raceways that I just built along the sides. It will move a huge volume of air in a very short period of time. I've been reading the USCG requirements and doing the math. I'm an engineer; that's how I operate. LOL
I also wired the bilge pump and set it in place. The installation isn't quite finished though.

20201002_194124.jpg

20201002_205052.jpg

20201003_122210.jpg

20201003_122102.jpg

20201003_122226.jpg


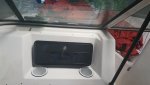
I had to flip my switches around, and replace one with a different type. Almost ready to attach the dash...
But first, I need to make new piping for the edge to give it a finished look. For that, I used upholstery vinyl around foam. (Backer Rod) I neeeded something larger and more compliant than upholstery piping, and the backer rod was nearly perfect.
This is the first time using this new machine. Liking it so far. It's an affordable compromise that I feel will suit my diverse needs in a sewing machine. I couldn't justify a dedicated upholstery machine. This does have a walking foot attachment, however.That should be a huge help.

20201003_135727.jpg

20201003_104539.jpg

20201003_104006.jpg

20201003_122356.jpg

20201003_122532.jpg


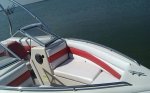
With the dash complete, (Stereo will be a future project) I finished buffing the white gelcoat in that area, and then screwed the panel in place. Turn the page...
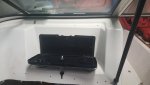
The next chapter will be seat restoration.
I'm lucky to have as much as I do because this stuff is expensive. I had to buy used pedestals and a new plastic pivot bushing. But new seats start at $250.00 each, and the Springfield slider assemblies are pricey as well.
Doing it this way will only require some vinyl and foam. Plus, I can get creative with the look!

The existing vinyl is so brittle that I cannot use it for patterns. The wood is long gone. The foam is too hasty to reuse. The roto-molded frames are good, though. LOL

20201004_154723.jpg

20201004_154738.jpg

20201004_155635.jpg

20201004_162730.jpg

20201004_160939.jpg

20201004_164804.jpg

20201004_170201.jpg
 

JASinIL2006

Vice Admiral
Joined
Feb 10, 2012
Messages
5,600
Can’t argue with a second blower from a safety standpoint, but if the are wired together, that will be loud.
 

skuhleman

Seaman
Joined
May 26, 2011
Messages
60
Mainly the dash is different. But I think our bucket seats were the same design, mine just had different center inserts.

Here's a couple more pics of the interior to show the patterns if you need... and one showing the dash difference. Also shows where I put the front speakers in the pass thru. They worked good there, people up front could hear them and sitting in the buckets.
 

Attachments

  • photo340875.jpg
    photo340875.jpg
    35 KB · Views: 9
  • photo340876.jpg
    photo340876.jpg
    44.6 KB · Views: 9
  • photo340877.jpg
    photo340877.jpg
    24 KB · Views: 8
Top