Building a '93 Caravelle 1750 Classic Bowrider

tpenfield

Moderator
Staff member
Joined
Jul 18, 2011
Messages
17,869
Baylinerchuck . . . if you are going to DIY upholstery, make sure to get an industrial grade sewing machine with a "compound feed walking foot" . . . Also get a servo motor, junk the clutch motor if it has one, and do a gear reduction of about 3:1 using a different set of pulleys, or get a "speed reduction" kit.
 

Reserector_

Chief Petty Officer" & 2021 Splash of the Year Win
Joined
Oct 15, 2019
Messages
595
Very little boat progress lately, but here's what I've got:

I haven't died from over-exposure, and I haven't been stung by any of the wasps that want to move in (even though they haven't contributed one bit.)

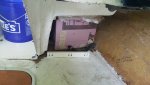
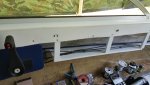
I installed the fuel fill and vent so I could determine how much of the expensive marine hose I need.


a27d24_41acb42b347e4070bd6011f9a99834d2~mv2.webp


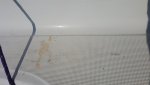
I found a way to keep the mud daubers out of my cooler.


a27d24_764c6aecb6ce4ad2a05930c9b377ab69~mv2.webp


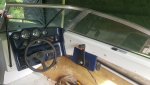
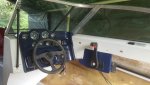
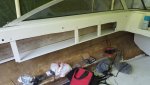
Then I stared catatonically at the engine area trying to imagine how I want to build that out. So many options. It's going to be quite a thing unto itself.


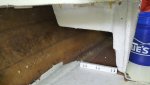
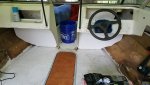
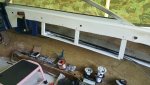
I began the arduous task of aligning the engine this past weekend, but had to stop and regroup. Glad I did.


a27d24_5f4b0c77ef774b1ab49862ebfc417f57~mv2.webp


My alignment bar never slid all the way in no matter how much I adjusted, so I turned to my redneck brethren on YouTube.

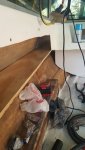
One or two videos suggested that after major refits like mine, it's best to start with a simple 1" rod shoved into the drive coupling. Doing so quickly revealed which way it had to move, and how far.

I was waaaayyyy off! Not only vertically, but sideways as well. Sideways ain't supposed to happen. Lol.


a27d24_14cee8ec779c48838d6e99d66a1264b8~mv2.webp


I loosened a rear mount and gave the front mount a boot, and the sideways problem was gone.


Made a major height adjustment until it was really close

Then, I bolted the front mount in place.


a27d24_a1f0496c88544cdc88fe1d55ccda365a~mv2.webp


From there, my son helped me with the fine tuning, and this milestone is behind me. :)


a27d24_85afa4124c784de382090681586d7da4~mv2.webp


Without this step being accomplished, the sterndrive would never bolt up.
 

Baylinerchuck

Commander
Joined
Jul 29, 2016
Messages
2,726
Shoot man, can’t see any of the pics....

tpenfield . Those walking foot machines are awesome....and pricey. My home machine was ok up to 3 layers of Sunbrella when I did the mooring covers. Then I would have to spin the wheel to get the needle started. I did receive a price from a local Shop on the cost to reupholster everything. It was well into the 2800 to 3200 range depending on the styles of fabric in my 20’ Chap. Better justification for getting a better sewing machine. :laugh:
 

Reserector_

Chief Petty Officer" & 2021 Splash of the Year Win
Joined
Oct 15, 2019
Messages
595
I finally had to finish moving my shelter to the front yard so I can keep working efficiently. I will either turn this into a carport, or buy a carport, but for now the frame and tarp are working well.


a27d24_2a514a9ebf5e45c3865b362f59e1919d~mv2.webp


I finally installed my numbers. I'm all legal now.


a27d24_05432e63903a450d985c213fdb9dda83~mv2.webp


It compliments my new Caravelle logos


a27d24_72d31f3496544681876191bf46267c80~mv2.webp


I went on to install the exhaust flapper and new coupler. It has a slight bit of drag to it, but I think it will move just fine when the water hits it. It just felt like dry rubber against dry rubber. A light tap moved it.


a27d24_dcc0c58173c54befb8319f86ca1c217b~mv2.webp


a27d24_ff43f1910ce24a3d8fbf3ffca157f449~mv2.webp


a27d24_19e811a41ca444d290de2985ad387919~mv2.webp


All of the fuel lines are installed except for the vent line. I ordered 5 ft, but needed 6. 😣

The second hand aluminum tank that I bought to replace my plastic tank has the fuel fill on the wrong side, but as you can see, I found a solution for that. It all slopes downhill nicely. I mounted my trim pump, also.


a27d24_b9cc40446aa447168606e021b77f2275~mv2.webp

Hoping to gain some momentum from this point on.
 

Reserector_

Chief Petty Officer" & 2021 Splash of the Year Win
Joined
Oct 15, 2019
Messages
595
Just checking; Can any of you see the pics in the last two posts?

I posted on the Caravelle forum, then copy/pasted to here. So the photos are hosted on that site and if that side is down for maintenance (as it has been lately) you may not see them. Or maybe your employer's firewall is blocking it. That's why I can't use my own hosting from my work computer.
 

Reserector_

Chief Petty Officer" & 2021 Splash of the Year Win
Joined
Oct 15, 2019
Messages
595
What do you guys wear for shoes at the boat ramp? Looking for something I can wear in the water. Preferably closed toe for protection, and because my toes are gross.
 

Baylinerchuck

Commander
Joined
Jul 29, 2016
Messages
2,726
I use my old pair of Vans....they slip on/off like slippers. I use swim shoes when in the river. You just never know what’s on the bottom.
 

froggy1150

Master Chief Petty Officer
Joined
Nov 3, 2017
Messages
810
My last trip to st lucia i needed some type of water shoes for "all purpose" usage. I went to dicks and found these shoes that look like vans.super comfortable and has holes to shed water. I even used them to hike a stream. I love them. When i get home i will see if they have a brand on them
 

Baylinerchuck

Commander
Joined
Jul 29, 2016
Messages
2,726
BTW, I just upload photos right to the forum from my iPhone. I rarely if at all use a PC. I have to resize them to 1200 x 1600 using the app below. This way I can still have the full size image stored if I ever need it. I haven’t had any issues at all imbedding pictures in my posts after the Photo Bucket fiasco.

ECD4AC40-1C19-4D92-BF4B-4FEF137A1A5D.png

There are others that are free, this one charges $.99 to use it add free. I just ignore the adds. FWIW.
 

froggy1150

Master Chief Petty Officer
Joined
Nov 3, 2017
Messages
810
These are what i was talking about. You can see the holes down the side and on the bottom
 

Attachments

  • photo339199.jpg
    photo339199.jpg
    1.2 MB · Views: 4
  • photo339200.jpg
    photo339200.jpg
    1.4 MB · Views: 4
  • photo339201.jpg
    photo339201.jpg
    1.2 MB · Views: 4

Reserector_

Chief Petty Officer" & 2021 Splash of the Year Win
Joined
Oct 15, 2019
Messages
595
Things are starting to go into place. Kick panels are in. Control is in place. More interior structure yet to fabricate, and then I can run wiring and cables.
Starting to see the light at the end of the tunnel.
 

Attachments

  • photo339427.jpg
    photo339427.jpg
    1.3 MB · Views: 12
  • photo339428.jpg
    photo339428.jpg
    1.2 MB · Views: 12
  • photo339429.jpg
    photo339429.jpg
    1.2 MB · Views: 12
  • photo339430.jpg
    photo339430.jpg
    1.3 MB · Views: 12
  • photo339430.jpg
    photo339430.jpg
    1.3 MB · Views: 12
  • photo339431.jpg
    photo339431.jpg
    1.4 MB · Views: 12
  • photo339431.jpg
    photo339431.jpg
    1.4 MB · Views: 12

Reserector_

Chief Petty Officer" & 2021 Splash of the Year Win
Joined
Oct 15, 2019
Messages
595
I added some structure to reinforce the rub rails, provide a surface to route wires and cables on, and bracing for the interior panels that I haven't made yet.
I don't know how these boats were built originally, but this is how mine is going to be built.
I think I am ready to start connecting cables and electrical.
 

Attachments

  • photo339433.jpg
    photo339433.jpg
    1.2 MB · Views: 11
  • photo339434.jpg
    photo339434.jpg
    1.2 MB · Views: 12
  • photo339435.jpg
    photo339435.jpg
    1.4 MB · Views: 11
  • photo339435.jpg
    photo339435.jpg
    1.4 MB · Views: 11
  • photo339436.jpg
    photo339436.jpg
    1.3 MB · Views: 11
  • photo339436.jpg
    photo339436.jpg
    1.3 MB · Views: 13
  • photo339437.jpg
    photo339437.jpg
    1.5 MB · Views: 12
  • photo339437.jpg
    photo339437.jpg
    1.5 MB · Views: 13

Reserector_

Chief Petty Officer" & 2021 Splash of the Year Win
Joined
Oct 15, 2019
Messages
595
Does anyone have a suggestion for what I can use to clean and polish the traction surface on my swim platform? It has stains in the oxidized gel coat. The rest of the boat responded well to wet sanding followed by compound and a wool buff.
I tried the buffer, but it only got the surface.
Maybe some sort of rotary brush with compound?
 

Attachments

  • photo339438.jpg
    photo339438.jpg
    1.2 MB · Views: 4
  • photo339439.jpg
    photo339439.jpg
    1.5 MB · Views: 4

archbuilder

Vice Admiral
Joined
Sep 12, 2009
Messages
5,697
I like the wiring raceway, I think that is too often overlooked on builds. Great place for a fire to start! By the way I bought a lot of my electrical stuff at delcity wire. I used the heat shrink crimp connectors on everything. A bit more pricey, but I think worth it. I used un-tinned wire, not exactly marine grade, but mine is a fresh water boat and it should work well. Not sure what to tell you on the swim platform.
 

kcassells

Fleet Admiral
Joined
Oct 16, 2012
Messages
8,632
Pressure washer with deck cleaner might pop it out. Let the soap soak.
 

Reserector_

Chief Petty Officer" & 2021 Splash of the Year Win
Joined
Oct 15, 2019
Messages
595
I like the wiring raceway, I think that is too often overlooked on builds. Great place for a fire to start! By the way I bought a lot of my electrical stuff at delcity wire. I used the heat shrink crimp connectors on everything. A bit more pricey, but I think worth it. I used un-tinned wire, not exactly marine grade, but mine is a fresh water boat and it should work well. Not sure what to tell you on the swim platform.

Wiring deserves respect. I've spent countless hours on mine so far, and is not even installed in the boat yet. I'm really anal about that stuff.
The interior panels will be attached with Beau Clips. If something were to go wrong in the raceway, the panel can be snatched off to gain access.
 
Top