Another Maine Starchief

laurentide

Lieutenant Commander
Joined
Jul 24, 2011
Messages
1,869
The HDS 7 is a great multifunction. You're going to love it, especially with the engine data. I keep trying to justify the purchase of one for myself, but I have decent sonar and Navionics on a 7" tablet, and my antique engines have no electronic interface. I'll save it for a repower or the next project (a Tolman jumbo, but it's years away).

Since it's not my money you should just go ahead and get 3g radar and the new Lowrance outboard autopilot...and hydraulic steering of course :cool:!

But, seriously, that's a really great setup you've got and it will serve you very well on the Chieftain for all the stuff you want to do.

I also wonder how I never ran my dad's boats aground in the Great South Bay with no electronics. Oh wait, I did...all the time! But so did he so we're good I guess. As he'd say, "if you haven't run aground, you haven't been around."
 
Last edited:

oldhaven

Chief Petty Officer
Joined
Aug 30, 2015
Messages
576
I don't mind running aground on a sand bar, but with all the ledge in Maine waters, it can get expensive. Luckily most of the time the water is pretty clear, so you can go slowly and pick your route in bony water. the GPS should let me know when to start looking.

I have a question. I am cleaning up all the channels and extrusions for the upper windscreen, Lots of pieces, and it appears that they have been anodized since they are pretty splotchy even after a going over with 600 grit wet and dry. Does anyone know if they are clear anodized? I don't want to get into removing too much surface finish if I don't have to. I see a lot of you have painted the frame, but I would like to keep the aluminum look. I think one of your restorations used an aluminum paint on the hull bottom and it looked very nice. My other option is to use Sharkhide and coat it.

I also just got in the Lexan Margard scratch resistant polycarbonate to replace the fogged and cracked glass. I figure the replacement panels will weigh 8 or 9 pounds rather than the 28 pound tempered panes. I am expecting in some glazing vinyl for the channels and a possible substitute for the base seal. Pictures and details to follow when that gets here if it looks like it might work.
 

laurentide

Lieutenant Commander
Joined
Jul 24, 2011
Messages
1,869
I don't mind running aground on a sand bar, but with all the ledge in Maine waters, it can get expensive. Luckily most of the time the water is pretty clear, so you can go slowly and pick your route in bony water. the GPS should let me know when to start looking.

Yup, running aground on Champlain in a pressed aluminum boat is a recipe for hull replacement. The good thing is that bedrock is pretty much static year to year. Long Island's bays are always shifting, but the whole island is a sandbar.

I can't help with the windshield question, as mine just went back together same as it was.
 

Watermann

Starmada Splash of the Year 2014
Joined
Jan 12, 2013
Messages
13,787
I cleaned, primed and painted my aluminum window frames as they looked pretty bad with odd splotches but they didn't have any coating on them. Yeah I used the aluminum tractor paint.

I don't know about using polycarb for the upper windshield, I used it for the lower but my upper glass was fine.
 

oldhaven

Chief Petty Officer
Joined
Aug 30, 2015
Messages
576
WM, Your upper windshield looks great in the pictures you posted. I'll have to think about that aluminum paint. thanks. I don't know why all the glass in mine was so bad. Most of the restorations here don't seem to have the fogging problem I have with de-laminating glass. the cracked starbd pane settled it anyway.

Ron
 

oldhaven

Chief Petty Officer
Joined
Aug 30, 2015
Messages
576
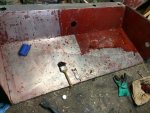
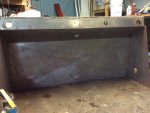
Yesterdays winter progress: I stripped the motor well except for a few small spots, but ran out of stripper. I'll get them later. Also ordered Gluvit, JB Weld, Marine Tex, new fuel tank fill and vent and cable boots that fit in the motor well and enough rivets from JayCee to get the free shipping discount for orders over $75. When they get here I will be doing my first riveting repair on the motor well fwd upper seam where it meets the header. I am pretty sure that is trailering damage from the weak/rotted transom. Note in the pictures that this early style well has some triangulation bends added in the bottom to help with stiffening. My wife commented on the patience it took to do the stripping over the course of about 6 hours since it happens at about 1-2 square inches at a stroke of the razor blade holder. I'm sure some of you don't want to be reminded of this and others like me are groaning about what is left to be done. IMG_0331.JPG
IMG_0334.JPG


Have a nice Saturday

Ron
 
Last edited:

g0nef1sshn

Lieutenant
Joined
Feb 24, 2015
Messages
1,291
this is the fastest way I stripped it all... The 3m disc for flat areas, and orange Nylon one for around rivets. brush the stripper, wait and hit it with the disc. the whole SW took probably about an hour to have shiny. wish it wasnt till near the end of stripping the hull to get this method down.


20150921_150309_resized.jpg 20150921_140755_resized.jpg 20150921_165012_resized.jpg
 

oldhaven

Chief Petty Officer
Joined
Aug 30, 2015
Messages
576
Thanks for the tips on paint stripping. That looks much easier. I guess the cup brush doesn't clog up since the loosened paint gets thrown off? I am going to have to do the bottom of the hull and the cabin in the spring, and I will be able to do it with power tools, cup brushes and pressure washer when the weather breaks. The splash well is down cellar and I don't want to throw or track stripping residue around and maybe into the laundry area or on to the freezer. I am lucky enough to be able to get away with the chemical smell in the house without causing problems I don't need.

What a difference in the shape of the wells. The later ones make a lot more sense for under the well space. Mine also has only 2 1/2 inch holes for the cables. It looks like they went bigger in the later wells. I won't know if mine are big enough until we rig the motor. The two outer holes on the header top are for SS rod holders put in by the most recent PO that I will keep. The smaller 2 inch hole at starboard center is for the fuel fill and below it in the well is the 3/4 vent hole. I will keep those also since the belly tank fittings will be close to them behind sliding doors on the correct side. That just leaves some small mounting holes from who knows what in the well to patch, and solid rivets or closed end blinds should take care of those. Next project is cutting out the upper windshield polycarbonate, finish with the metal channels and frame and reassemble. My first non destructive job.

Ron
 

oldhaven

Chief Petty Officer
Joined
Aug 30, 2015
Messages
576
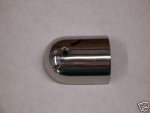
In continuing to do prep work for spring over the winter, I will be getting the rub rail material I need. Can anyone reveal a current source for the Attwood arrow shaped rub rail end caps used on these boats? I have tried all the usual sources and looked all over the interwebs. None in stock anywhere. iBoats does not carry them either, and the old links and sources suggested on the forums are now defunct or out of stock. I could use 4 since I have two missing and two in bad shape. I would think with the number of trashed SC's out there that they would be readily available used, but I have seen none on ebay over the past few weeks. I could spin up the milling machine and make some, but I have other ways to spend project time that would be more productive. PM me if you can point me in a good direction. I would be willing to use alternative types if they look good and fit, but have not seen anything I care to try.

Also, for confirmation, are these the rub rail inserts that work: ????

Inside: tacoV12-0334 BK A50-1 (3/4 x 3/8) 50 feet
Outside: taco V12-4144 BK A50 (1 3/16 x 1/2) 50 feet except I need the 70 foot length to do it all

Both available on iBoats

And an alternative outside insert is WEFCO 0101g Probably the original source, if I am reading things correctly.

Thanks,

Ron
 

GA_Boater

Honorary Moderator Emeritus
Joined
May 24, 2011
Messages
49,038
I thought we found a recent source for the rub rail end caps,- not sure. They are becoming a rarity.
 

dpotter

Petty Officer 2nd Class
Joined
Oct 4, 2015
Messages
191
Nice progress. glad you are having better weather than me. I do plan to go tear out what I ncan. Hey in your last pic you had a can of Papst compound. That stuff really works. :)
 

laurentide

Lieutenant Commander
Joined
Jul 24, 2011
Messages
1,869
Ron, I don't know the dimensions of the rail frame, but I've seen a few of the Taco ones on various marine sites...with unfortunate marine prices. Will these not fit?

tPjGckr.jpg


I know these are plastic but one of them has got to fit if you can't find SS:

ydMQi4Z.jpg
 
Last edited:
Watermann

Starmada Splash of the Year 2014
Joined
Jan 12, 2013
Messages
13,787
Rather than go through the same dilemma I opted for the more sleek updated look of deleting the side rub rails from my Chief. Just saying, there are other options.
 

laurentide

Lieutenant Commander
Joined
Jul 24, 2011
Messages
1,869
Rather than go through the same dilemma I opted for the more sleek updated look of deleting the side rub rails from my Chief. Just saying, there are other options.


That's right, I forgot that you had done that and it's a great alternative.

I can't say that mine is all that useful and the lower rubrail was discontinued in later model years.
 

oldhaven

Chief Petty Officer
Joined
Aug 30, 2015
Messages
576
Hi Andy,

I have seen those SS ends, and others less dear, but all the examples I have found are too wide/tall for the 1 1/4" wide aluminum SC mid rail and would look odd. I can go to nylon if I have to, but will hold out for a metal set if I can scare some up. Machining is looking more attractive all the time.

Hey WM,

Oddly enough I had never noticed that you did not use the rails, though I see it now in the in the sig picture. I could never place why your Chief looked just a bit different. I too like the look, but knowing me I would end up paying for the missing rail with dents or scrub marks. As you say, there are other options and replacement rails of different design are available and would do as well and probably cost less and wear better than the vintage original parts.

Any confirmation help on the part numbers for the inserts I listed would be greatly appreciated. That stuff is too hugely expensive to make a mistake and have the hassle of a return..

Ron
 

oldhaven

Chief Petty Officer
Joined
Aug 30, 2015
Messages
576
Well, I placed an order for 4 of these, so thanks for the suggestion Andy:

s-l500.jpg

They are 1 3/4 wide and 2 1/4 long, SS, and should fit or I can modify them a bit I suppose and fill any gaps with some bedding compound or 3M 4200. Not that expensive either.

I also found an old thread that answers a lot of questions I had about inserts:

http://forums.iboats.com/forum/owne...14425-official-starcraft-rubrail-thread/page4

It looks like the WEFCO 0101G fits best for the outer rails, and I can use the V12 0334 from iBoats for the inner rails.
 

Watermann

Starmada Splash of the Year 2014
Joined
Jan 12, 2013
Messages
13,787
Yeah my end caps were beyond any repair and marine tex was needed to repair the hull.

IMAG0542.jpg
 

oldhaven

Chief Petty Officer
Joined
Aug 30, 2015
Messages
576
Well, right there is an argument not to put the Zamak fittings back on even if they were available. My two remaining ones are not that bad, but if they can do that to a hull, never mind. I used to have access to a 3D printer, and after doing a CAD model these things would have been easy to duplicate in laser sintered Duraform nylon. Spray paint them silver and no one would know and they would last forever.

Ron
 

jbcurt00

Moderator
Staff member
Joined
Oct 25, 2011
Messages
25,034
Yep ^^^

Member MichaelP stopped making aluminum transom caps and makesnthem in urethane now. So if you can 3D print a spear endcap, it'll be a good alternative.

I've seen a fairly radical electric motor (think forklift not teolling motor) fitted w a 3D printed prop.

I know someone on a boating forum that made a woodem transom end cap, painted it and the original w aluminum paint and it ended up pretty good

IIRC it was a fiberglaass SC
 
Top