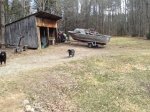
Another Maine Starchief

oldhaven

Chief Petty Officer
Joined
Aug 30, 2015
Messages
576
Thanks WM, I knew it had to be something simple. It looks like you used a new 1 inch internal width channel or something similar at the top to cover the panel and the shim? I may have missed that if you discussed it in your project posts. I wanted to shim out my side mount throttle and shift control anyway, so that should work out. It also looks like you did not re-use the inner rub rail, when I look at your post 1132.

I have to say your work looks better every time I see another picture. I like the light/white interior and cabin bulkheads.

Ron
 

Watermann

Starmada Splash of the Year 2014
Joined
Jan 12, 2013
Messages
13,787
Thanks Ron, yeah I deleted all railings and the side / inside rub rails from my Chief build.

On the side panels I glued the backer shim piece to the panel, then sanded it smooth before sealing it with spar and wrapped it in vinyl. I used machine screws and nylocs to secure them to the gunnels. No channel material was used.
 

oldhaven

Chief Petty Officer
Joined
Aug 30, 2015
Messages
576
In boat progress, I managed to get out in the somewhat warmer weather we are having between cold snaps and removed the Z-brace on the transom skin by drilling out the solid rivets. This will help with cleaning up the corrosion. There was a bit trapped between the brace and the skin, but no apparent corrosion holes under there. The transom knee may come out later this spring, and for sure the side brackets will be removed to help with prep and cleanup.

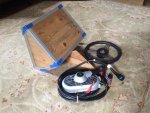
I have also been getting ready for rigging the 4 stroke Merc. I am making a new steering console. The picture below shows it mocked up on scrap plywood so I can cut and fit the aluminum edges and fit it to the boat cabin bulkhead before putting in the nicer panels. I found a nice banjo style steering wheel NOS and have the Merc throttle and shift control that incorporates the ignition and trim. lastly, I sprung for a Baystar hydraulic steering kit. Not cheap, but I couldn't see getting used controls for the new engine. The 3/4 deck material is now here, with enough left over to do the cabin bulkheads this spring. Won't be long until I am out in the boat a lot more, but all this pre work will help.

Ron

IMG_0353.JPG
 

Weep'n Willy

Master Chief Petty Officer
Joined
Jun 12, 2012
Messages
831
You should be very happy with the hydraulic steering. I installed the uflex hydraulic system on my Chief and absolutely love it (and so does the Mrs). When I first considered a hydro system I contacted a highly respected marine dealer in Chicago area and had a good chat with him about the advantages. He informed me of the correct components to use on my I/O. He said once you use it you would never consider a different steering system again. Expensive....yes....but well worth it. Another advantage is that if you ever consider autopilot the hydro steering systems provide more options to integrate into the autopilot.
 

oldhaven

Chief Petty Officer
Joined
Aug 30, 2015
Messages
576
Thanks Willy, that makes me feel a bit better about the cost.

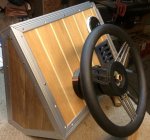
I have done more on the steering console now that I have the wheel and hydro hub, so I fit the good panels and the new parts. I still have to add four 2 inch link gauges that daisy chain off the Mercmonitor to monitor the engine state and fuel. The teak sides and teak and holly ply is from a batch of cutoffs and leftover wood I found on the local CL. I am going to add some teak accent trim around the boat as I go along.
IMG_0354.JPG


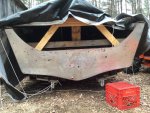
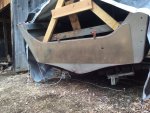
Another big job is started due to the better weather we have been getting. I managed to get the transom skin mostly stripped of the red house paint that was on it. Some of it will have to wait on getting a nylon cup brush, and I have to start on getting the corrosion fixed but it looks better. I will be cleaning it up and using Marine Tex and JB here as has been well documented before so I get a smooth surface. I cut the 1/8 5052 plate that will cover the skin and started fitting it. I am really pleased that it will cover almost all of the extra holes and corrosion that had developed. Nice to see that shiny metal there and it will go nicely with the polished aluminum transom and hull.
IMG_0356.JPG
IMG_0363.JPG


Nice to have spring beginning to develop so I can get out and work on transom and interior of the hull. I expect that we will get a bit more snow, so I can't pull the cover off quite yet.

Ron
 
Last edited:

laurentide

Lieutenant Commander
Joined
Jul 24, 2011
Messages
1,869
The console and transom sheet look great! Nice work so far. I'm loving our early spring.
 

StarTed

Senior Chief Petty Officer
Joined
Jul 14, 2015
Messages
694
Your comment on my stardust prompted me to look at your Starchief. You're doing a great job so far and your planning sound solid to me.

Since I'm putting on a new transom skin as well I'm curious about how you plan to fasten the bottom edge. Are those screws you have in it now for a dry fit? When you sandwich in the 5200 between the aluminum sheets how do you plan to pull the two together at the bottom? It seems to me that screws will do a better job pulling it together but solid rivets should be more durable and leak proof. What are your thoughts?
 

dozerII

Admiral
Joined
Oct 25, 2009
Messages
6,527
Great progress, love the helm, some mighty fine miter joints you did on the aluminum trim.
 

oldhaven

Chief Petty Officer
Joined
Aug 30, 2015
Messages
576
Your comment on my stardust prompted me to look at your Starchief. You're doing a great job so far and your planning sound solid to me.

Since I'm putting on a new transom skin as well I'm curious about how you plan to fasten the bottom edge. Are those screws you have in it now for a dry fit? When you sandwich in the 5200 between the aluminum sheets how do you plan to pull the two together at the bottom? It seems to me that screws will do a better job pulling it together but solid rivets should be more durable and leak proof. What are your thoughts?

The screws were for dry fit, and the plan is to put solid rivets down at the bottom to retain the z channel and the plate. I had to pull it off for corrosion control. I may use temporary bolts and nuts when I put the sealant in and the cover plate on permanently, plus use them for pressure in the predrilled perimeter holes I have yet to drill. I will go back and rivet after things set up. I should be able to get the temporary fixings out. Between those and some in the hardware through bolt holes that should be plenty to pull things together and I won't have to test my rivet skills while covered in 5200. You will likely get there first, so I will watch and learn..
 
Last edited:

oldhaven

Chief Petty Officer
Joined
Aug 30, 2015
Messages
576
Great progress, love the helm, some mighty fine miter joints you did on the aluminum trim.

Thanks Dozer. It is a rather unconventional place to put teak and holly, but I had some pieces of it and it is really nice marine ply. I am toying with the idea of a helm pod of the same material that extends from the blank area above the wheel up and onto the cabin top to surface mount the multifunction display and the compass, rather than just putting them in brackets on the cabin.. The helm console will be mounted nearly flush to the cabin lip coaming. to make this possible. The miter joints were a challenge since a lot of them are compound odd angles, plus the corner extrusions are channel corners for 1/2" material and not just 90 degree L's. It involved a combination of rough cutting with a hacksaw, then many trips back and forth to the milling machine, .re-setting the vise for the different angles and taking a little bit off at a time. Then, after assembling and dry fitting it to the boat and finding it did not quite fit, I had to redo several corners..Luckily I was shortening the aluminum and not adding to it, and the whole thing comes apart easily since it is screwed together.. I see places that the joints aren't so great, and I am not fond of the sharp metal corners in a boat, but it will do. I have so many more basic and necessary jobs to do to get the hull ready for the motor rigging and it took more time than I had thought it would..

Ron
 

oldhaven

Chief Petty Officer
Joined
Aug 30, 2015
Messages
576
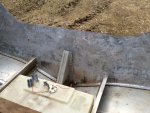
This weekend I pulled the tarp off and commenced some serious work on the interior and hull. I removed the cabin bulkhead and the berth support aluminum, then cleaned up all the rivets ends and stubs that I had drilled out last fall so the interior is less dangerous now. I also spent several hours with a SS wire brush cleaning up the transom corrosion powder in preparation for filling corrosion pits. What are people's opinions on JB Weld vs. Marine Tex for that chore? I have both. Probably not much difference for pitting, but for the hole I was going to embed an aluminum window screen as a lattice for the patch and one may be better than the other for spanning an area. I may use some flashing with mold release spray to sandwich the hole area and to keep sanding later to a minimum After that is done I plan to use POR-15 metal prep and then paint the affected transom areas with black POR-15. Again, any bad experiences with that? Then it is time to apply the outside cover plate.

I can confirm that silicone causes corrosion, since everywhere I had to peel it off I found pitting. The worst though was where waterlogged plywood had kept things wet and eventually caused corrosive fluid to do its work. Still, I see no reason for despair, and I have not seen that corrosion amount anywhere else in the hull. It makes me feel much better about my synthetic non absorbent transom, and I have now coated even that with epoxy for added insurance.

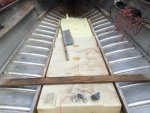
Now that the bulkhead is out I was able to drop the tanks into the bottom to check clearances. The forward tank filler and gauge end will be slightly inside the cabin, which will allow me to place the filler and vent line under a slightly raised cabin sole, with the filler on the port gunwale. I will have to slightly modify the berth support near the cabin door so it fits, but I think I have that figured out. The stringers will be moved about an inch outboard, and will result in a 3/4 inch spacer required on the rib ends to meet the deck. I will probably use 3/4 deep aluminum tube the full length of the deck on either side. This will be riveted to the rib ends and the floor can be riveted to it rather than all the way through the 3/4 deck and the spacer. I don't think rivets that long exist. The aft tank filler will be on the splash well header, where it was before.

Next on the agenda is more hull cleanup, pressure washing, and leak testing, hopefully followed soon after by Gluvit sealing.

Ron

IMG_0368.JPG

IMG_0369.JPG IMG_0377.JPG
 

dpotter

Petty Officer 2nd Class
Joined
Oct 4, 2015
Messages
191
Looking good Ron. Glad the weather is letting you get her out and make more progress. Thanks for posting the photo's.
 

oldhaven

Chief Petty Officer
Joined
Aug 30, 2015
Messages
576
Lots of small things done but the temperatures have not been good enough to do the patching and filling on the transom skin. that is holding me up from leak testing and sealing the hull. Otherwise not much photo worthy except:

Scored a like new bow light on the Bay. It is used but looks almost new, and my old one was really bad. I'll try to take care of this one and wonder if Sharkhyde protects chrome? You can see from my front hatch that it needs some work to straighten it out.
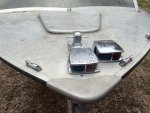
IMG_0378.JPG


And I modified the forward berth aluminum support to allow the front tank fill and gauge to to fit in the cabin. That width was just too small by about an inch. I will be enclosing the area between the berths above the tank at rear deck level, leaving about a 12 inch smaller foot well/sole area in the cabin, but I can live with that, and an access panel will be provided for the connectors and tank wiring. The fill hose and vent will be exiting at the port gunwale next to the cabin. You can see that the original location of the panel that was below the door has been moved about a foot forward. This, plus some added material, will be the new rear end of the foot well. You can also see the 3/4 x 1.5 aluminum tubing I will rivet along the rib ends. That combined with 3/4 instead of 1/2 decking will raise the deck 1 inch above the original level. The black line is the new deck height. The fore and aft stringers will be moved outboard to meet this new height, also providing enough width for the tanks. The flanged channel sitting on the tanks is going to be the forward deck support, bolted to the berth support metal at the right level. I know there is a slightly heated discussion going on elsewhere about raising decks, but this 1 inch should not be a problem. The Jackson Pollack paint in the bow is the result of pressure washing through several peeling layers. My wife was not pleased about the mosaic of paint chips in the gravel drive afterward, but we are resurfacing this spring. I still have to get after that area with stripper, and am not looking forward to it, though it will be covered with something eventually, so I won't get too anal about it.
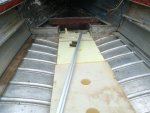
IMG_0379.JPG


And finally, I cut an access panel in the cabin bulkhead behind the steering console. These are both nearly done as far as cutting and fitting. This panel will greatly simplify access to the instruments and wiring, and I stole the idea from Gibbles, who stole it from someone else. The surrounding frame will be attached and painted to match the bulkhead, and the varnished teak panel will either be hinged or removable. The panels have been epoxied, and will be painted, probably some cream or off white color to be determined. The jury is still out for me about the Coosa Bluewater 20 board for this use. It is not porous, so will not absorb water or rot and is very light but the surface is not smooth, requiring some prep work beyond what would be OK for a good plywood panel. I will decide whether the extra cost was worth it later when I weigh the boat and think about the work involved after it is done. Coosa really is intended to be enclosed in a 'glas structure, not exposed.
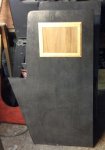
IMG_0381.JPG


Weather next week is back into the sub freezing range, so more inside work.

BTW, do any of you find you are carrying a pocketful of clecos and the pliers around all the time as you are working on the boat? The things are just so handy for design work temporary fastening, and are addictive to use.

Ron
 
Last edited by a moderator:

dozerII

Admiral
Joined
Oct 25, 2009
Messages
6,527
Great progress, despite the unfavorable weather Ron. For your chrome look for a product called Neverdull It works really good, and protects for quite a while.
 

oldhaven

Chief Petty Officer
Joined
Aug 30, 2015
Messages
576
Too late to edit now, but in the last post the tubing at the rib ends is 3/4 x 1.5, not 1 by 1.5.

Mod EDIT: Changed it to 3/4 in the original post​

Nevr-dull brings back memories of my time in the navy polishing belt buckles and brass.
 
Last edited by a moderator:

dozerII

Admiral
Joined
Oct 25, 2009
Messages
6,527
Too late to edit now, but in the last post the tubing at the rib ends is 3/4 x 1.5, not 1 by 1.5.

Nevr-dull brings back memories of my time in the navy polishing belt buckles and brass.


Sooo you know how well it works;)
 
Top