86 Sea Ray Restoration [Splashed Oct 2017]

Goldie627

Lieutenant Junior Grade
Joined
Oct 28, 2013
Messages
1,010
(Raspy Voice) "You Know Brotherrrr!!!......." :D LOL That made my day! I totally wasn't expecting that :) not in a bazillion years! You got me!!! I've been kinda worried about making my outdrive decision and needed a good laugh.

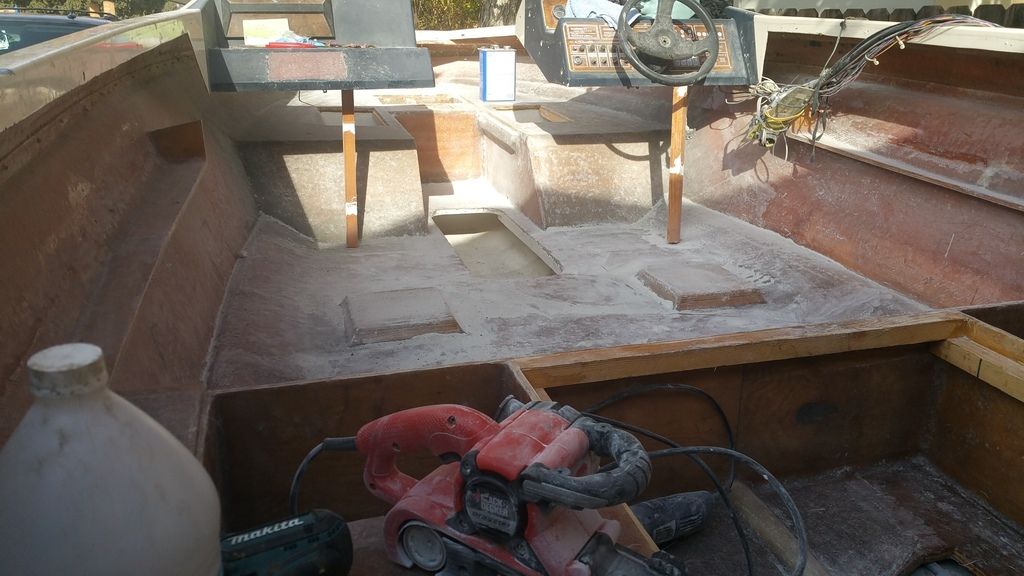
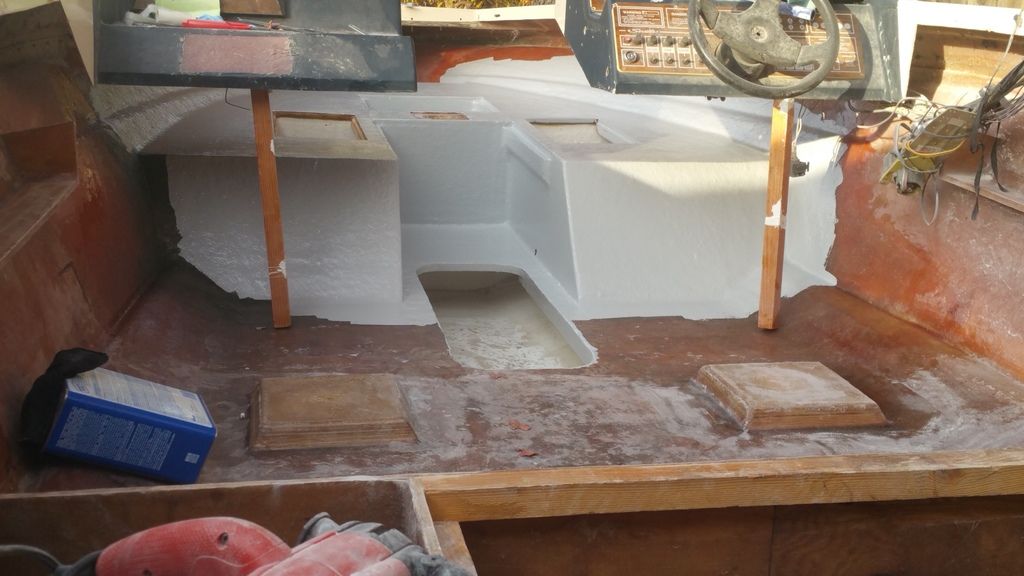
Thanks for that gelcoat tip. I'm thinking... get the 1st coat completed, sand where needed, use the paste as needed, apply second coat with sand and surfacing wax.
 
Last edited:

WOEISMEIGOTTA470

Petty Officer 1st Class
Joined
Aug 31, 2012
Messages
375
Goldie, great seeing your progress! How good does it feel spreading that gel? Really makes all the rebuilding come together and actually look like something resembling a boat again! Sorry if I missed it someplace, but what color gelcoat is that? looks like it has a slight blue tint to it, very nice. Wood is spot on too, I also filled in some blemishes using cabosil thickened gel. And as you may have found out, when it begins to kick, it's not worth trying to use up every last bit of the batch, it gets too sticky and ruins the surface finish. A fresh batch of gel will self-level out real nice and smooth, so goal is to find the right mix of hardener and roll it on quickly! Keep up the good work man, :ranger: checking your progress is my new morning routine!
 

Rick Stephens

Admiral
Joined
Aug 13, 2013
Messages
6,118
My EYES. WOG, @*%&* that hurts. :D

Goldie, having your drive go 18 hours and drop 1 PSI would mean to me it is pretty close to perfect. I would still pull the prop and spray the seal there. Have to watch really close since the bubbles will be tiny and take a long time to develop.

Next, you mentioned oil in the bellows. If you had any water in the bellows, then during use it will mix completely with any grease in there, of which there usually is a lot. What results is a slimy oily looking slurry that the only way you can tell if it is 'oil' or 'water mixed grease' is swipe a finger through it and smell it. Grease has almost no smell, gear oil smells like gear oil. You should be able to tell pretty much immediately. I'm betting no oil, just grease and water. If so, then all you need worry about is making sure your bellows and seals are all perfect.

Big O-ring. You are/were 100% correct. That o-ring was destroyed when the drive was last installed. If anything is leaking that o-ring is supposed to keep the water out of the u-joint bellows. Best way to keep it in place is to use bellows cement and cement it right into the bell housing before installing the drive.

Places you need to look for water: bellows of course, both the u-joint and the shift cable bellows are in that list. Not the exhaust bellows as it has water inside and outside and doesn't prevent water intrusion, just direct exhaust and cooling water into the through propeller exhaust passage keeping the boat a bit quieter.

You will need to also check the seal on the shift shaft bushing in the bell housing. That is a likely source of water intrusion. It is hard to tell in the video, but I think it looks like you have the old style shift shaft bushing in the bell housing, which is more susceptible to exhaust gases heating up and destroying the seal, which then allows water up into the shift linkage area of the bell housing, which is supposed to stay dry. IMHO it is worth replacing the bushing with the new style kit. You can make a bushing driver out of a long 3/8 bolt with a nut and a washer on it to drive the seal. You'll know what I mean when you look at the new bushing.
http://www.iboats.com/Bell-Housing-B...view_id.172463

Rick
 

Goldie627

Lieutenant Junior Grade
Joined
Oct 28, 2013
Messages
1,010
Thanks WOE, it feels great! The colored pigment is gunsmoke grey. My gelcoat is white and its suggested shelf life has expired. Im going to make the determination today to use the rest of my old stuff or get new. Gonna depend on how the old stuff cured. Im heading to the boat so i'll know this morning.

(excellent advise)
"it's not worth trying to use up every last bit of the batch, it gets too sticky and ruins the surface finish"

I was a lil heavy handed with the hardner because of the pigment, I should have it dialed in on the second batch.

A few months ago I made a test piece with sand to gelcoat ratios, trying to see how course I wanted the floor. Hopefully I can find it, its time for a work place clean up :)
 

Goldie627

Lieutenant Junior Grade
Joined
Oct 28, 2013
Messages
1,010
Hey Rick, I was just about to leave and noticed your post. Thank you for all that excellent info! I'll pull the prop this morning.
 

Woodonglass

Supreme Mariner
Joined
Dec 29, 2009
Messages
25,928
Thanks WOE, it feels great! The colored pigment is gunsmoke grey. My gelcoat is white and its suggested shelf life has expired. Im going to make the determination today to use the rest of my old stuff or get new. Gonna depend on how the old stuff cured. Im heading to the boat so i'll know this morning.

(excellent advise)
"it's not worth trying to use up every last bit of the batch, it gets too sticky and ruins the surface finish"

I was a lil heavy handed with the hardner because of the pigment, I should have it dialed in on the second batch.

A few months ago I made a test piece with sand to gelcoat ratios, trying to see how course I wanted the floor. Hopefully I can find it, its time for a work place clean up :)
1% on the MEKP should be fine when rolling. You could even go to .75%. It'll cure just fine with time.
 

WOEISMEIGOTTA470

Petty Officer 1st Class
Joined
Aug 31, 2012
Messages
375
1% on the MEKP should be fine when rolling. You could even go to .75%. It'll cure just fine with time.

Really? I was always told gel needs to be catalyzed twice the amount than poly resin, aka 2% according to my supplier. I catalyzed a bit less than that however (in the range of 1.5-2%) with good results, whatever gave me 15-20 mins. of reasonable working time.
 

Woodonglass

Supreme Mariner
Joined
Dec 29, 2009
Messages
25,928
Actually it's my understanding that using too much MEKP is not as good as using less. If you use to much it can cause the GC to cure to quickly which can cause it to shrink and pull away from the substrate. Trust me I am NOT a Gelcoat GURU by a LONG SHOT soooo I'm ONLY passing on what I've researched and learned here on this forum and others. The hardener and keeping it non exposed to air is what makes it cure since it's basically like any other Polyester based product. Adding more hardener just speeds up the process which may or may not be a good thing. JMHO.
 

WOEISMEIGOTTA470

Petty Officer 1st Class
Joined
Aug 31, 2012
Messages
375
Actually it's my understanding that using too much MEKP is not as good as using less. If you use to much it can cause the GC to cure to quickly which can cause it to shrink and pull away from the substrate. Trust me I am NOT a Gelcoat GURU by a LONG SHOT soooo I'm ONLY passing on what I've researched and learned here on this forum and others. The hardener and keeping it non exposed to air is what makes it cure since it's basically like any other Polyester based product. Adding more hardener just speeds up the process which may or may not be a good thing. JMHO.

I suppose I can see what you mean about the overall bonding strength, if you use too much and the heat can play into it. As long as it still cures as it should then I don't see much harm in using less I guess. Best to mix to your preference, and test it 1st.
 

saginawbayboater

Senior Chief Petty Officer
Joined
Mar 8, 2012
Messages
677
A few more.....

20151122_130750_zps4qsdzi5i.jpg


20151122_153039_zpsdpmpkmsm.jpg

Goldie your fiberglass and Gel looks super!:thumb: Nice pressure test Job also!! It held 10psi while moving things around I'd say is good!
 

Goldie627

Lieutenant Junior Grade
Joined
Oct 28, 2013
Messages
1,010
My EYES. WOG, @*%&* that hurts. :D

Goldie, having your drive go 18 hours and drop 1 PSI would mean to me it is pretty close to perfect. I would still pull the prop and spray the seal there. Have to watch really close since the bubbles will be tiny and take a long time to develop.

Next, you mentioned oil in the bellows. If you had any water in the bellows, then during use it will mix completely with any grease in there, of which there usually is a lot. What results is a slimy oily looking slurry that the only way you can tell if it is 'oil' or 'water mixed grease' is swipe a finger through it and smell it. Grease has almost no smell, gear oil smells like gear oil. You should be able to tell pretty much immediately. I'm betting no oil, just grease and water. If so, then all you need worry about is making sure your bellows and seals are all perfect.

Big O-ring. You are/were 100% correct. That o-ring was destroyed when the drive was last installed. If anything is leaking that o-ring is supposed to keep the water out of the u-joint bellows. Best way to keep it in place is to use bellows cement and cement it right into the bell housing before installing the drive.

Places you need to look for water: bellows of course, both the u-joint and the shift cable bellows are in that list. Not the exhaust bellows as it has water inside and outside and doesn't prevent water intrusion, just direct exhaust and cooling water into the through propeller exhaust passage keeping the boat a bit quieter.

You will need to also check the seal on the shift shaft bushing in the bell housing. That is a likely source of water intrusion. It is hard to tell in the video, but I think it looks like you have the old style shift shaft bushing in the bell housing, which is more susceptible to exhaust gases heating up and destroying the seal, which then allows water up into the shift linkage area of the bell housing, which is supposed to stay dry. IMHO it is worth replacing the bushing with the new style kit. You can make a bushing driver out of a long 3/8 bolt with a nut and a washer on it to drive the seal. You'll know what I mean when you look at the new bushing.
http://www.iboats.com/Bell-Housing-B...view_id.172463

Rick

After two days it was still hanging tough at 9 psi. For commercial vehicles in California the applied air break test is one minute! I'd say its holding pressure :D

When I removed the outdrive two years ago; from the video (post #533 at the 9:30 minute mark) it looked like fresh grease on the screw driver I swiped across the bottom of the bellows. The bellows look good but I'm going to order a set, for my piece of mind if nothing else. I figure if I get my gimbal housing to where I know its 100 percent good, it will make working on the outdrive a lot easier by process of elimination for evaluating problems. So far I've decided to do bellows, that shift shaft bushing you mentioned, trim limit and trim sender, shift cable... not sure yet about the swivel shaft.

If I move the steering arm by hand is that sufficient to feel slop between the gimbal ring and swivel shaft?

In post #533 at the 9:33 minute mark; In the manual they are described as "water passage" O ring and a U-joint bore "rubber gasket" I will replace both. Could the damaged rubber gasket have caused water intrusion?

Thanks for the places to look for water!!!

I found the bell housing bushing kit for 10 bucks! Early Christmas!!!! :D From the pics ive seen it kinda looks like the new style has the rubber seal built into the bushing.

On the prop shaft hunt for escaping air; do i need to go back any further than the (part #28) gear housing cover?

Sequence%2001.Still001_zpskzmcateh.jpg


Thanks Rick, I really appreciate your help.
 

Goldie627

Lieutenant Junior Grade
Joined
Oct 28, 2013
Messages
1,010
1% on the MEKP should be fine when rolling. You could even go to .75%. It'll cure just fine with time.


Heya Woody, on all my resin layups I almost always go 1%, varying from that is situational. However, with gelcoat the manufactures mixing chart includes this line:

(Colored GELCOATS can require upto DOUBLE the amount of hardener shown. When temperatures are above 85, regular ratios should be used.)

So because of the cold ambeint temperature and the added pigment I doubled the mekp (2%). The following batches I lightened up and ended up settling in at 1.5%. Im more worried about the cold than anything else. The day I rolled the gelcoat the temps where between 45 and 65. Im thinking about some kind of floor blower heater as my propane heater is just too tall.
 

Goldie627

Lieutenant Junior Grade
Joined
Oct 28, 2013
Messages
1,010
Really? I was always told gel needs to be catalyzed twice the amount than poly resin, aka 2% according to my supplier. I catalyzed a bit less than that however (in the range of 1.5-2%) with good results, whatever gave me 15-20 mins. of reasonable working time.


Hey WOE, was your gelcoat colored or white? I think it makes a difference in the mekp amounts.

http://www.uscomposites.com/pdf/MEKPDirections.pdf
 

tpenfield

Moderator
Staff member
Joined
Jul 18, 2011
Messages
18,090
I needed to go to 2% MEKP in colder weather (60 F), but that was with VE resin, not Poly resin. Poly does tend to 'kick' quicker with less catalyst (MEKP), but you can always add heat to an area, if it is not curing.
 

Goldie627

Lieutenant Junior Grade
Joined
Oct 28, 2013
Messages
1,010
Great work Goldie!!! glad to see you are back at it!!!

I cant stay away! As always nice to hear from ya :)

Hopefully soon I'll be painting my cap and studying your thread for paint tips. You did an awesome job on your restore! My new goal is to take a picture of my finished boat with the sunset of our camping site in the background!!!
 

Goldie627

Lieutenant Junior Grade
Joined
Oct 28, 2013
Messages
1,010
Goldie your fiberglass and Gel looks super!:thumb: Nice pressure test Job also!! It held 10psi while moving things around I'd say is good!

Thank you! So far so good... on the gelcoat. I may be able to hold off on the SEI and use my mercruiser. The jury is still out though. :D
 

Rick Stephens

Admiral
Joined
Aug 13, 2013
Messages
6,118
After two days it was still hanging tough at 9 psi. For commercial vehicles in California the applied air break test is one minute! I'd say its holding pressure :D

When I removed the outdrive two years ago; from the video (post #533 at the 9:30 minute mark) it looked like fresh grease on the screw driver I swiped across the bottom of the bellows. The bellows look good but I'm going to order a set, for my piece of mind if nothing else. I figure if I get my gimbal housing to where I know its 100 percent good, it will make working on the outdrive a lot easier by process of elimination for evaluating problems. So far I've decided to do bellows, that shift shaft bushing you mentioned, trim limit and trim sender, shift cable... not sure yet about the swivel shaft.

If I move the steering arm by hand is that sufficient to feel slop between the gimbal ring and swivel shaft?

In post #533 at the 9:33 minute mark; In the manual they are described as "water passage" O ring and a U-joint bore "rubber gasket" I will replace both. Could the damaged rubber gasket have caused water intrusion?

Thanks for the places to look for water!!!

I found the bell housing bushing kit for 10 bucks! Early Christmas!!!! :D From the pics ive seen it kinda looks like the new style has the rubber seal built into the bushing.

On the prop shaft hunt for escaping air; do i need to go back any further than the (part #28) gear housing cover?

Sequence%2001.Still001_zpskzmcateh.jpg


Thanks Rick, I really appreciate your help.

See if I can do these in order:

1: Goldie, you are GOLDEN!
Holding the air for a couple days is more than sufficient proof to me that the outdrive seals are decent. Each year, repeat the test when you drain the outdrive oil to winterize. There is no way I would go in and start resealing it. Building that pressure tester really paid off.

2: Pretty easy with the gimbal housing off to push, pull and prod on the gimbal ring and see how much slop is in the upper and lower swivels. Should feel light and easy to turn and no rattling or banging.

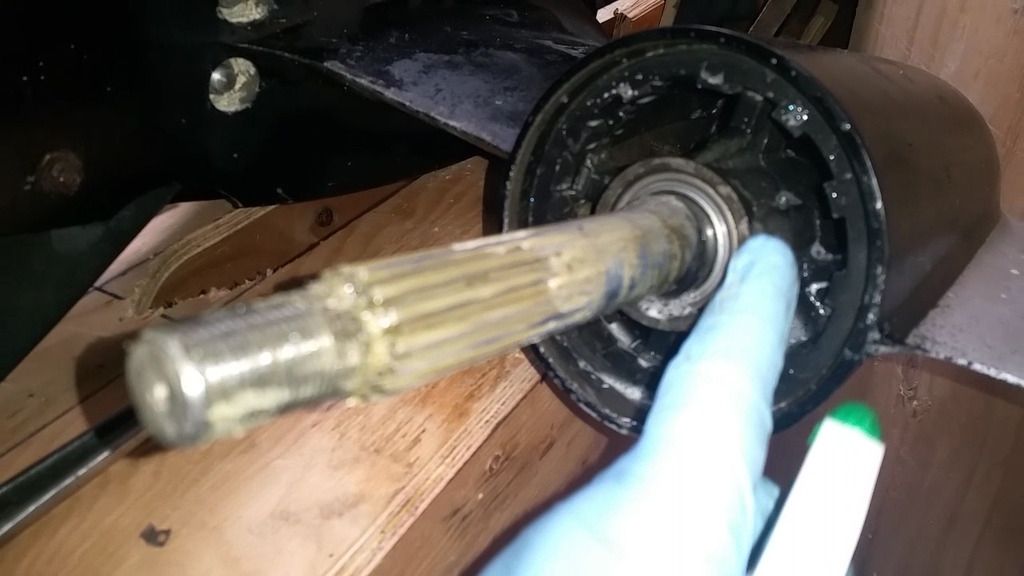
3: your picture of the prop shaft is perfect shot of the seal. Spray a little soapy water on it and turn the prop shaft a bit, see if you can induce any bubbles. I doubt you will after holding air for 2 days.

4: The damaged rubber gasket would not have allowed water to get inside. That gasket prevents water that gets into the shifter linkage area from getting into the u-joint bellows. And it usually isn't all that good at doing that. If you left it out, and everything else was sealed up, there would be no problems. Not recommending that, just saying.

Opinion: use that outdrive till it shows some actual problems. Right now it appears pretty much everything is working fine. When you split the case halves and go for the water pump we can check things out further. We'll get to see condition of parts that can be worn or overheated and even melted.

Conclusion: Your local shop tried to rip you off or don't know what they are talking about.

RIck
 
Last edited:

Goldie627

Lieutenant Junior Grade
Joined
Oct 28, 2013
Messages
1,010
I needed to go to 2% MEKP in colder weather (60 F), but that was with VE resin, not Poly resin. Poly does tend to 'kick' quicker with less catalyst (MEKP), but you can always add heat to an area, if it is not curing.

Heya TP, for a while now I've been using an Iso by Reichold, cant remember the last time I used poly. Originally, I switched because of availability and price. It lays up nice as well. Last winter I tried to heat my substrates before laying up with some success. HF has a floor blower that you can get a heating attachment addon. I may go look at one for black Friday.

That Reichold resin is DION 6631-20 ISO RESIN
 
Top