77' 16ft Starcraftt ss

g0nef1sshn

Lieutenant
Joined
Feb 24, 2015
Messages
1,291
I read back through your pages and unless I missed it I could not see how you covered the plywood on the exterior above the original transom profile where you added the extra height. Did the sheet metal shop come up with a filler plate in addition to the transom cap, and if so, how was it attached? I was considering doing something like this to mount my kicker at the right height though I am now leaning toward a separate fixed bracket.


I havnt covered it yet, or the transom cap. Its on the list of things to do when the admiral reapproves the funding for that part. Its was estimated 120$ish I thinkk. Im thinking it can be my Xmas gift. The shop did intend to make the transom cap one piece that would extend down the outside of the transom and cover/lip over the original transom line.
 

g0nef1sshn

Lieutenant
Joined
Feb 24, 2015
Messages
1,291
Nicely done gonefishin. I am about to start on a similar project with a Kingfisher 14. The hulls are similar (Kingfisher 16 / SS 16) though the SS hull bottom is slightly concave on either side of the keel and the Kingfisher's is not. I noticed that you used gluvit on the ribs; did you have many rib rivets to replace? I've looked at most of the restorations posted here and keep wondering why nobody (including the factory) primed the inside of the hull before installing the deck. It seems like it would help preserve the interior portions of the rivets, particularly if you will be in brackish or salt water and expect to get a little of it in the bilge. Is there a reason that you shouldn't prime the interior of the hull bottom?


I didnt have to replace any rib rivets but I did redo the transom knee brace. When you say primed the inside of the hull, do you mean with paint? No need in priming with paint if you gluvit the seams and rivets and cover it with a deck. If you dont put a wood deck in and use gluvit, then you would want to paint the inside.
 
Last edited:

hayko1971

Starmada Splash of the Year 2015
Joined
May 24, 2013
Messages
448
I'm just catching up on your progress here, I love the splashwell deck! I'm in the same camp as others and would likely leave it mounted all the time. It does cover up your awesome camo job though lol. Nice work sir!
 

g0nef1sshn

Lieutenant
Joined
Feb 24, 2015
Messages
1,291
I'm just catching up on your progress here, I love the splashwell deck! I'm in the same camp as others and would likely leave it mounted all the time. It does cover up your awesome camo job though lol. Nice work sir!


Thanks Hayko, you know I am leaning more towards it being mounted also. The more I sit and stand on it the more it makes sense. I just have to wait till I get the transom cap installed before I do that. Also need to make sure motor stuff will work first. And if it wasnt painted an awesome camo pattern under it, it woulda been ugly where no one would see :laugh:. At this point im working with no real plan, so I find myself undoing stuff and redoing it often lately.
 

g0nef1sshn

Lieutenant
Joined
Feb 24, 2015
Messages
1,291
Last night I played with my bow and stern light making sure they are good. My dad suggested using my battery charger to do this since I didnt have any spare batteries laying around so I did. But before that I tried to see if a 9V would work and it didnt. Initial test didnt work at all. So I tried the battery charger and no luck on all settings. Then I completely disassembled the entire stern light to check for any faults and found nothing noticeable. ot late and I was frustrated then I noticed a sticker on the top of the charger that said this:


20151005_095700_resized.jpg


DOH.....

So after youtube and cleaning some things up find my bow light and stern light are both in good order. and reinstalled them. The little things need attention too. I extended the wiring but havnt fully committed to running the wires until I know my motor plan and more of the layout.
20151005_082704_resized.jpg 20151005_083010_resized.jpg 20151005_083259_resized.jpg 20151005_083257_resized.jpg 20151005_083610_resized.jpg
 

g0nef1sshn

Lieutenant
Joined
Feb 24, 2015
Messages
1,291
instead of drilling splash well holes has anyone considered mounting a bilge pump in the splash well instead of drilling those holes through the transom? just an idea I've been pondering lately.
 

64osby

Admiral
Joined
Jul 28, 2009
Messages
6,816
I like the splash well drains. Rain, snow, motor spray, fishing, climbing up the ladder, or a big wave can all introduce water into the splash well.

Drains allow that water to escape without the need for a powered pump. Think K.I.S.S. principle.
 

Tnstratofam

Commander
Joined
Aug 18, 2013
Messages
2,679
Splash well drains are usually at the lowest point where the transom and the splash well meet allowing for little to no water to remain against the transom wood. A bilge pump may be hard to mount to eliminate any water remaining which could lead to rot problems in the future. Plus drains holes don't need a battery, just gravity.
 

g0nef1sshn

Lieutenant
Joined
Feb 24, 2015
Messages
1,291
both good points guys, looks like I have something to start planning again since I did cover the old holes. But I can make it work.

20150602_115129_resized.jpg
 

g0nef1sshn

Lieutenant
Joined
Feb 24, 2015
Messages
1,291
So when I took the old transom out, the PO redid the SW drains using PVC pipe and capped them with PVC shaved to be flush with the Splashwell. Is there any reason not to do it this way again and not have to do the flange bolt/nut technique trial and errors?

Heres one of the ones from the old transom

20151009_155131_resized.jpg
 

g0nef1sshn

Lieutenant
Joined
Feb 24, 2015
Messages
1,291


that is a option there Wmann. Heres another thought for discussion. There a models out there that under the splash well have aluminum boxes of foam. Im thinking of making my own out of wood (sealed or not). Since I only have foam in the front/center hull/ and now some behind the sidewalls, Id really feel safer if I knew I had it at the stern to cover the motor weight. The fuel tank and batteries can be placed else where. Any thought there on this one Im pondering?
 

Tnstratofam

Commander
Joined
Aug 18, 2013
Messages
2,679
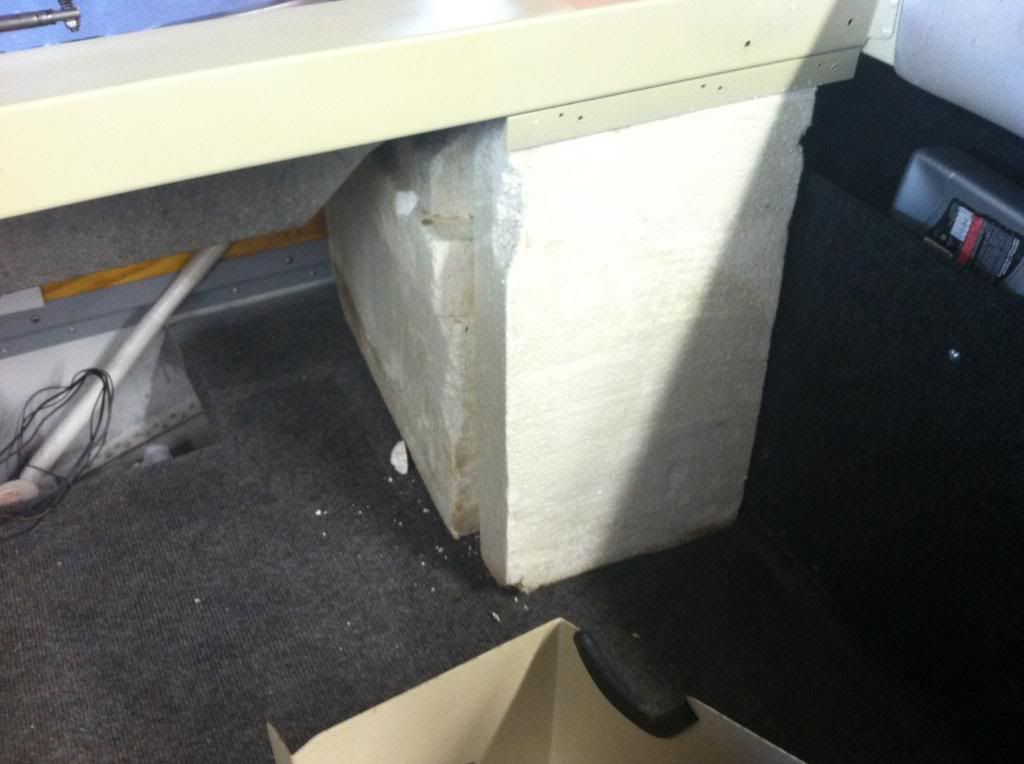
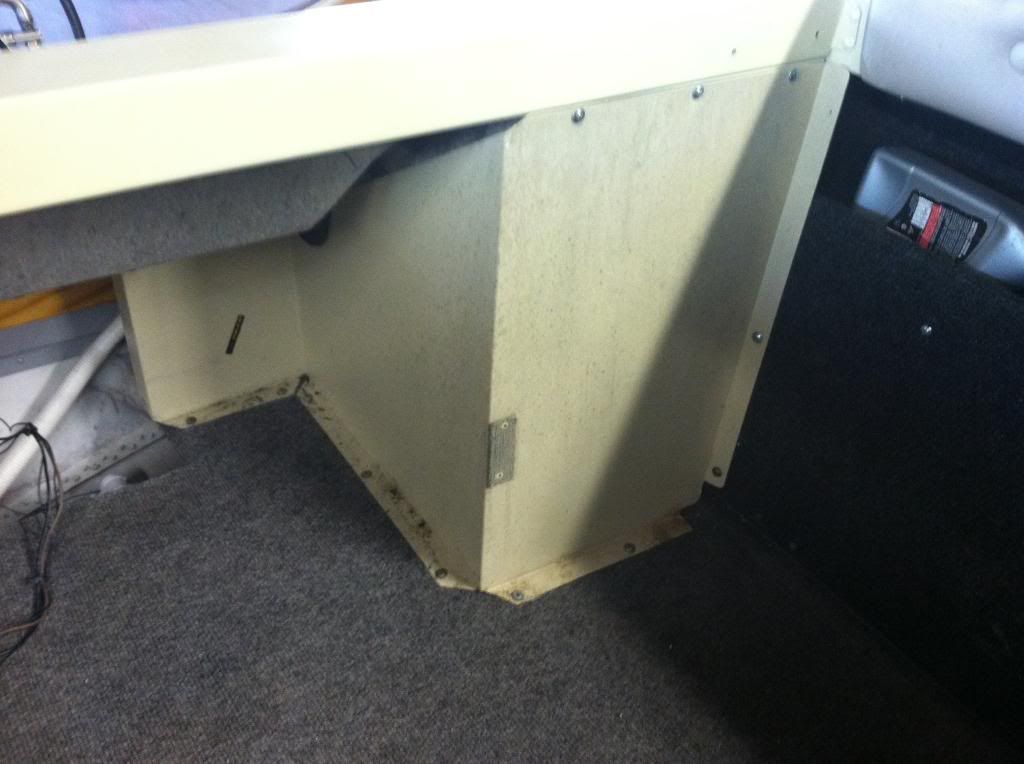
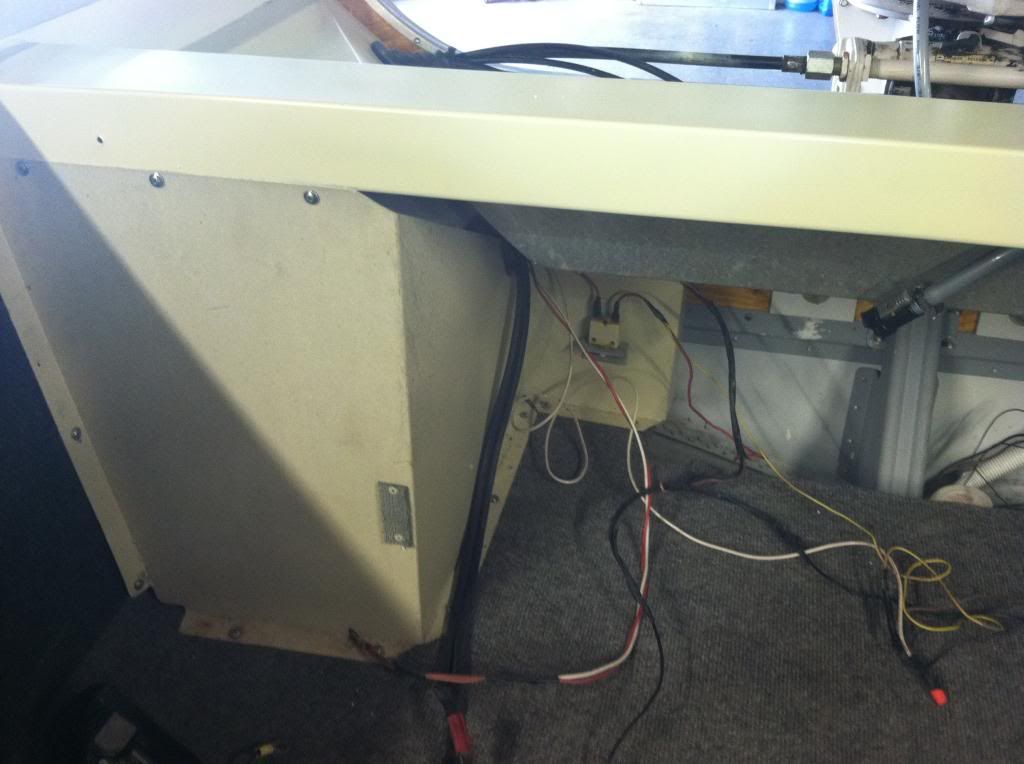
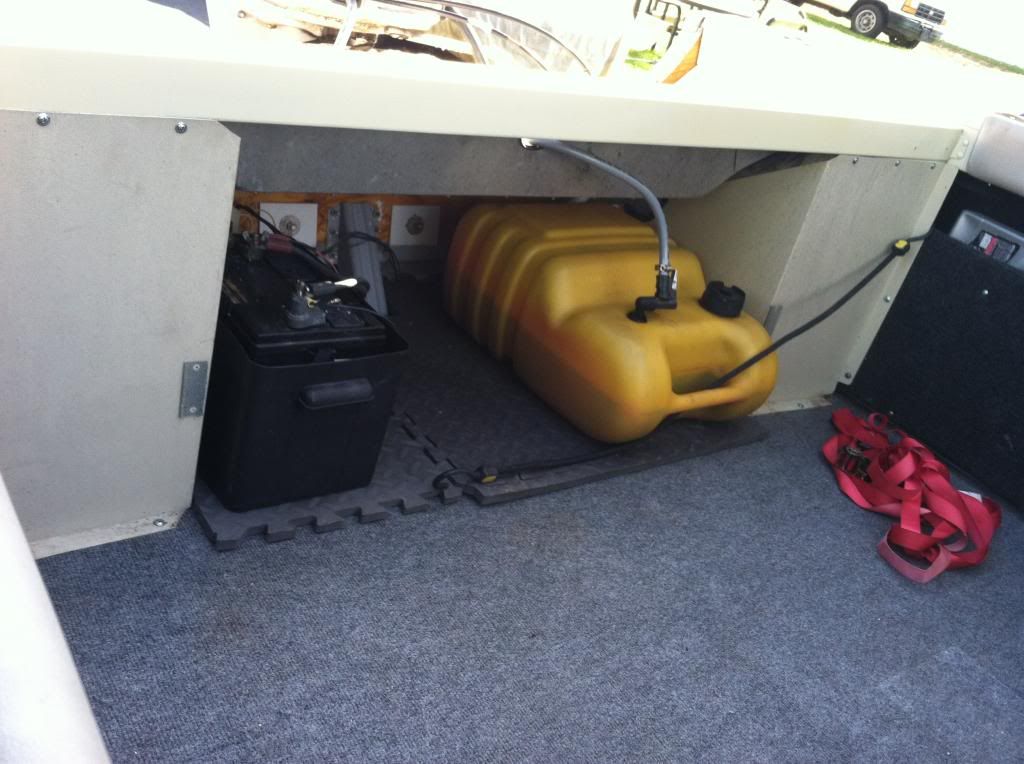
Our SS has the foam on each end of the splash well. When I redid the transom last year I put the foam back as it was in good condition. The up side is more flotation in case of a sudden flooding. The downside is it limits storage space under the splash well. Storage space on our 16SS is fairly limited, and I'm considering adding rod storage to the side panels in ours which could potentially mean eliminating more flotation foam for us. I know that on older model SS's there appears to be much more open space under their splash wells I believe that the newer SS's are the ones that Incorporated the flotation foam like ours under the splash wells. Ours is an 81. Here are some pics of what ours looks like.

The foam blocks. One set on each side.


With a piece of aluminum contoured to hide it.


With the foam under our splash well we still have enough room for our starting battery and two 6 gallon portable fuel tanks.


g0nef1sshn

Lieutenant
Joined
Feb 24, 2015
Messages
1,291
Hey thanks tn, thats excatly what I was mentioning, the pics help me to get out and plan more of a visual on how I can get it done. I do have some aluminum I can maybe bend to get that look.

Planning things is what im getting done most these days. Using what I already have on hand is free and doesnt get the admiral all worked up. Showed her new motors at bass pro the other day so when I start showing her used ones online she will like the "prettier" new ones more :laugh:
 

g0nef1sshn

Lieutenant
Joined
Feb 24, 2015
Messages
1,291
Touched up a little bit on the paint on the splash well. I did all the seams with 5200 and painted those lines too. Also started cutting pieces of foam to fit under the splashwell sides.They are in there good and snug, but im thinking of ways to secure them so they are tight for good. Maybe a long bolt from the sidewall through them, or taping them all together. Its a work in progress.

20151013_230318_resized.jpg


20151013_230336_resized.jpg

my messy office.
20151013_230354_resized.jpg
 

g0nef1sshn

Lieutenant
Joined
Feb 24, 2015
Messages
1,291
Got the rest cut. only thing now is I am back in the tiller vs remote steer topic. I will need to cut more foam for the cables to go through the hole for them. But thats not a real big deal. Just didnt think about it before going with this route of added foam. I can make it work either way. 20151014_110744_resized.jpg
20151014_113533_resized.jpg
20151014_115059_resized.jpg
20151014_113546_resized.jpg
 

GA_Boater

Honorary Moderator Emeritus
Joined
May 24, 2011
Messages
49,038
Ooops!

foam.PNG

I'm laughing with you on this one, g0ne. Only because I have never done such a thing. :rolleyes: LOL Ok, I did. Stuffed a tight mess of foam sheets behind the side panels, buttoned it up and tried to run wiring and cables under the tray. Yeah, I :doh:'ed myself.

If you go tiller all you need is a gas line and battery cable. So the loss of foam won't be much.

I would cover the foam, the cockpit facing side at a minimum. I know me and I would be kicking the foam and destroying it. Probably the inside too, because slinging the portable gas tank in and out will tear the foam up.
 

Tnstratofam

Commander
Joined
Aug 18, 2013
Messages
2,679
The foam on ours isn't secured to the hull at all. The aluminum pieces in front of them hold them in place. Also the foam on ours doesn't go all the way up on the sides which allows for cables/wiring to be routed over them. Your foam looks good by the way.
 

g0nef1sshn

Lieutenant
Joined
Feb 24, 2015
Messages
1,291
lol, thanks GA and TN! The gas tank may/may not be placed there. If I end up with a console I will end up cutting a hole through there and fit a pvc tube to bring the steering in. If i go tiller I will probably cap it off and run the fuel and power line through the front where there is already a box cut out. 20151014_113533_resized.jpg
 
Last edited:

g0nef1sshn

Lieutenant
Joined
Feb 24, 2015
Messages
1,291
The foam on ours isn't secured to the hull at all. The aluminum pieces in front of them hold them in place. Also the foam on ours doesn't go all the way up on the sides which allows for cables/wiring to be routed over them. Your foam looks good by the way.


Im between strapping it in tight, and boxing it in. As Snug tight as it is now with a little foot pressure pressing it in, i dont think i need to tighten it to the walls now. but still need to plan the casing like yours has.
 
Top