77' 16ft Starcraftt ss

g0nef1sshn

Lieutenant
Joined
Feb 24, 2015
Messages
1,291
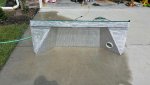
Made quick work of stripping this down. I cant remember if it was solid rivets or pop rivets holding it to the side of the gunnels, Im thinking pop rivets would work fine right?

Tools required...

20150921_140755_resized.jpg


The green came right off. The blue must have been the original. It was on there pretty good and needed more work to get off.
20150919_162215_resized.jpg

20150921_131459_resized.jpg
20150921_150309_resized.jpg
20150921_140714_resized.jpg
20150921_165012_resized.jpg
20150921_173412_resized.jpg
 

Attachments

  • 20150921_150309_resized.jpg
    20150921_150309_resized.jpg
    101.8 KB · Views: 4

Watermann

Starmada Splash of the Year 2014
Joined
Jan 12, 2013
Messages
13,775
Yeah that's nice and clean right there. Blind rivets for sure to reattach the SW.

PBR... makes me think of Clint... "Get off my lawn". :lol:

12torino.large1.jpg
 

hayko1971

Starmada Splash of the Year 2015
Joined
May 24, 2013
Messages
448
Splashwell cleaned up great. It's held on with pop rivets, but you'll need to remove your side panels to get it re installed. Mine turned out strong enough, though I did build a bench seat across the top ledge. I stand on it often, not wholly standing every time... a foot on the transom or gunwale, a foot in the splashwell etc. I do try to not put my full wieght in the splashwell as I'm not a small guy, but I dont really have any worries about climbing back there.
 

g0nef1sshn

Lieutenant
Joined
Feb 24, 2015
Messages
1,291
Splashwell cleaned up great. It's held on with pop rivets, but you'll need to remove your side panels to get it re installed. Mine turned out strong enough, though I did build a bench seat across the top ledge. I stand on it often, not wholly standing every time... a foot on the transom or gunwale, a foot in the splashwell etc. I do try to not put my full wieght in the splashwell as I'm not a small guy, but I dont really have any worries about climbing back there.

Just removed the side walls this morning, washed, primed, and wet sanded painted splash well too. Ill let it set a day or two then prop it in with clecos and get a better idea on what i can do with it. Pics will be up later got some errands to run now.
 
Last edited:

g0nef1sshn

Lieutenant
Joined
Feb 24, 2015
Messages
1,291
And im all out of my tan paint now, I can cover the rest when I do the camo part of it. Time to let it set and dry up. Then onto who knows what. At the moment I have nothing but time to play and plan more. 20150923_121157_resized.jpg
20150923_121211_resized.jpg
 

g0nef1sshn

Lieutenant
Joined
Feb 24, 2015
Messages
1,291
Nice work. :joyous:


thanks its getting there. I ran outa tan and lighter green rattle can that I thought I had, but I placed the splash well in this morning with the clecos and got to playing with what i had, Black and a darker green. I have an awesome plan for my rear deck too now. Kinda hard to explain without doing it, so we will see if I ever get to it. If you can picture it though, it will be a door that covers the front of the splash well, that I can lift and slide back over the top of the slplash well when needed ( with braces) then pull back out when not. Might even have seat supports left/right/center for higher rear deck seating. Its a thought but i think I can make it happen. 20150925_133703_resized.jpg 20150925_133710_resized.jpg 20150925_140351_resized.jpg 20150925_140400_resized.jpg
 

Tnstratofam

Commander
Joined
Aug 18, 2013
Messages
2,679
The splashwell is looking good. I can picture your idea on the rear deck. I think it will work out nice.
 

g0nef1sshn

Lieutenant
Joined
Feb 24, 2015
Messages
1,291
Ok so I get the deck started and I am out of hardware at the moment but here it is.

First piece cut to fit.

20150930_082910_resized.jpg

May need to open more eventually depending on what motor I end up with.

20150930_084057_resized.jpg 20150930_083639_resized.jpg


Here is what it will look like in the stowed position.

20150930_084226_resized.jpg


Running angle across for added strength.

20150930_084917_resized.jpg


Adding more support to the ends.

20150930_084933_resized.jpg


Riveted in place.

20150930_091314_resized.jpg 20150930_091319_resized.jpg


The pieces on top near the transom will be what that end will sit on once I get more hardware to attach them.

20150930_092626_resized.jpg
 

oldhaven

Chief Petty Officer
Joined
Aug 30, 2015
Messages
575
I like this idea for using the space taken up by the big splash wells on these boats. If you took out the middle connection would the two separate decks stow flat under the well?
 

g0nef1sshn

Lieutenant
Joined
Feb 24, 2015
Messages
1,291
I like this idea for using the space taken up by the big splash wells on these boats. If you took out the middle connection would the two separate decks stow flat under the well?


Im pretty sure they would. How you would have to brace the once up would be different though. Most also have their gas tanks and batteries and stuff under there though. On the 16 ft'ers anyhow.
 

64osby

Admiral
Joined
Jul 28, 2009
Messages
6,812
Why would you need to remove it? Just attach it and install some sliding or hinged doors

Might need a center support to the deck if you are going to stand on the middle section of it.
 

g0nef1sshn

Lieutenant
Joined
Feb 24, 2015
Messages
1,291
Why would you need to remove it? Just attach it and install some sliding or hinged doors

Might need a center support to the deck if you are going to stand on the middle section of it.


I probably could attach it, but for now Ill see how the removable option goes. Im thinking about a center beam support too. I just picked up some more stuff to add those reas transom pieces. Might get to it tonight.
 

g0nef1sshn

Lieutenant
Joined
Feb 24, 2015
Messages
1,291
got a few more things done last night and today. I put the transom brackets on with SS lag bolts and washers. put a little 5200 to help keep water from seeping in too. Dabbed some on the back of the brackets to help hold a tight stick also. Then I glued some carpet down on the platform. I didnt seal it though so no telling how long it lasts. It would be easy to rebuild and seal at a later date. Then I added a 2x4 with carpet to the center to help support the weight. That isnt sealed either so I expect to redo it in the future. This thing is solid. Also screwed the million splash well screws in with ss screws and washers. 20151001_101415_resized.jpg 20151001_103902_resized.jpg 20151001_103912_resized.jpg 20151001_101513_resized.jpg 20151001_121616_resized.jpg 20151001_103626_resized.jpg 20151001_123048_resized.jpg 20151001_111455_resized.jpg 20151001_123103_resized.jpg
 

g0nef1sshn

Lieutenant
Joined
Feb 24, 2015
Messages
1,291
here it is all back together. next step is to reverse sides of the walls and recut them to fit back in. But I need more large flange rivets to do that. I might wait to do it to see if I end up with a tiller or console motor again though. that rear deck is a good seat if I can get a tiller now.... 20151001_130835_resized.jpg 20151001_130819_resized.jpg 20151001_130848_resized.jpg
 

InMotion

Commander
Joined
Nov 3, 2011
Messages
2,080
Nice work there g.... while I am all for having splash wells, I cannot for the life of me figure out why they put such a huge splash well. Even with 6 people in mine, backing up into a chop, I have only just barely splashed some water over the back! I can honestly say that I really have never had more than that come over the back! Funny how today, splash wells are tiny...

Anyway, good idea to create some extra space for fishing etc.

Keep up the great work!!

Jim
 

g0nef1sshn

Lieutenant
Joined
Feb 24, 2015
Messages
1,291
Nice work there g.... while I am all for having splash wells, I cannot for the life of me figure out why they put such a huge splash well. Even with 6 people in mine, backing up into a chop, I have only just barely splashed some water over the back! I can honestly say that I really have never had more than that come over the back! Funny how today, splash wells are tiny...

Anyway, good idea to create some extra space for fishing etc.

Keep up the great work!!

Jim


Thanks! Im not sure why its huge either. Only thing I can think of is they tested it out in some extreme conditions, Or they wanted it that big for the support it provides to the back end with out having bench seats back there.
 

oldhaven

Chief Petty Officer
Joined
Aug 30, 2015
Messages
575
Thanks! Im not sure why its huge either. Only thing I can think of is they tested it out in some extreme conditions, Or they wanted it that big for the support it provides to the back end with out having bench seats back there.

I think it was the death throes of tail fins from the late 50's. That silhouette is pretty distinctive.
 

oldhaven

Chief Petty Officer
Joined
Aug 30, 2015
Messages
575
I read back through your pages and unless I missed it I could not see how you covered the plywood on the exterior above the original transom profile where you added the extra height. Did the sheet metal shop come up with a filler plate in addition to the transom cap, and if so, how was it attached? I was considering doing something like this to mount my kicker at the right height though I am now leaning toward a separate fixed bracket.
 
Last edited:

krag

Cadet
Joined
Sep 23, 2015
Messages
7
Nicely done gonefishin. I am about to start on a similar project with a Kingfisher 14. The hulls are similar (Kingfisher 16 / SS 16) though the SS hull bottom is slightly concave on either side of the keel and the Kingfisher's is not. I noticed that you used gluvit on the ribs; did you have many rib rivets to replace? I've looked at most of the restorations posted here and keep wondering why nobody (including the factory) primed the inside of the hull before installing the deck. It seems like it would help preserve the interior portions of the rivets, particularly if you will be in brackish or salt water and expect to get a little of it in the bilge. Is there a reason that you shouldn't prime the interior of the hull bottom?
 
Top