'74 Holiday 18 Restore Mod.... Convert to open bow.

racerone

Supreme Mariner
Joined
Dec 28, 2013
Messages
36,370
Hurry----Run to your local boat shop and see the steering set up common to most boats.-----Then ask for that drag link for the steering.----They might have a box full under the work bench.
 

DLNorth

Chief Petty Officer
Joined
May 26, 2016
Messages
432
We have that bracket/style on our '70 SS 16, it's always been a bit "loose", IMO, if you can upgrade to the newer system you will be ahead.
 

Paulwise

Petty Officer 3rd Class
Joined
Jan 11, 2022
Messages
85
We have that bracket/style on our '70 SS 16, it's always been a bit "loose", IMO, if you can upgrade to the newer system you will be ahead.
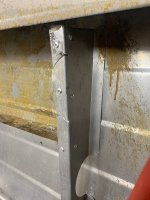
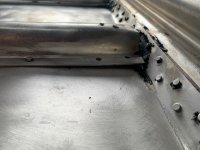
I think i will. I want to avoid reinstalling that stabilizer bracket.
 

Paulwise

Petty Officer 3rd Class
Joined
Jan 11, 2022
Messages
85
Update:
1. Repaired the forward left upright with an 1/16" angle backing (sawed through in 2 spots by PO)
Used cheap harbor freight rivets but its quite strong and i needed to use them up.
2. Replaced all broken or missing rivets on the gunnels. Most were in the bow. Sorry no pic yet of this.
3. Stripped paint and old glue for the rest of the day.
I bought the newish Citristrip "stripping paste", it worked very well but took time to apply evenly with a brush (not too much). The Citristrip paste is stronger than the Citristrip gel IMO although the gel i had was a year old so freezing in the barn may have comprimizing the chemicals/solvants making it less effective. Regardless the past is stronger. THe boat is finally starting to clean up. A little more cleanup and we can start putting her back together.
 

Attachments

  • IMG_4778.jpeg
    IMG_4778.jpeg
    1.4 MB · Views: 21
  • IMG_4782.jpeg
    IMG_4782.jpeg
    3.6 MB · Views: 21
  • IMG_4785.jpeg
    IMG_4785.jpeg
    2.7 MB · Views: 19
  • IMG_4786.jpeg
    IMG_4786.jpeg
    2.4 MB · Views: 21
  • IMG_4787.jpeg
    IMG_4787.jpeg
    3.5 MB · Views: 22

Paulwise

Petty Officer 3rd Class
Joined
Jan 11, 2022
Messages
85
Random Notes:
  • Shes got a name. "Jessi" named after my better half.
  • Tilt tube upgrade will need to happen, Im not drilling holes in my transom if I can help it.
  • The JB Weld Marine that i put on the pits and holes in the transom is crazy strong. Handled innumerable passes with a 3500psi power washer no movement or cracking. Good stuff.
  • Took out a loan and got 2 tubes of 5200
  • Next is hull repair and hull support mods
IMG_4788.jpeg
 

Paulwise

Petty Officer 3rd Class
Joined
Jan 11, 2022
Messages
85
Made a brake. I didnt like Chinese versions i was seeing at the CATS (cheap ass tool store) so i took a couple days and made one. She bends metal like she should.
 

Paulwise

Petty Officer 3rd Class
Joined
Jan 11, 2022
Messages
85
We have that bracket/style on our '70 SS 16, it's always been a bit "loose", IMO, if you can upgrade to the newer system you will be ahead.
Interesting, this one was loose as well. Nothing that scared me but loose never the less
 

Paulwise

Petty Officer 3rd Class
Joined
Jan 11, 2022
Messages
85
New item to think about. My transom cap is in bad shape i would say. I have seen a couple ideas on how to make a new one but thought i would throw it out to the group to see what yall had come up with. shoot me your links/pics/ideas in writing, I want it to be much more substantial than the original that's for sure.
 

g0nef1sshn

Lieutenant
Joined
Feb 24, 2015
Messages
1,291
With angles in my transom I could snip it in instead of bending the channel. In hindsight I liked it because I glued/5200'd the heck out of it and used a few tack nails on the sides to hold it down as it dried. I wasnt to worried about exact angle cuts. It could have been nicer.
 

Attachments

  • Screenshot_20220223-155127_DuckDuckGo.jpg
    Screenshot_20220223-155127_DuckDuckGo.jpg
    133.9 KB · Views: 11

Paulwise

Petty Officer 3rd Class
Joined
Jan 11, 2022
Messages
85
I used a 6' section of aluminum channel that fit 1-5/8". Used the transom and the cut out, along with a little physical persuasion, to bend it into shape. Not perfect, but much better than the trashed original.

View attachment 356294
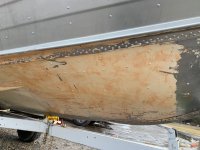
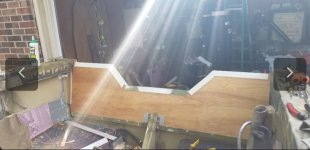
What process did you use to "persuade" it? This is close to my imagined result. Looks really good
 
Last edited:

MNhunter1

Ensign
Joined
May 12, 2014
Messages
989
I made a DIY jig out of scrap to place on the ground and bend it into shape. I used the cut out from the new transom screwed to a sheet of scrap plywood to set the angle against, another scrap piece of ply to give it a lip over the top and keep it in place, then some 2x4's inside the angle to hold it in place and bend it into shape. I didn't use heat, but probably would have went a little easier if I did. From there, I put it on the installed transom to fine tune the bends and cut to length. I doesn't lay perfect, but the screws and 5200 pull it into place.
 

Scott Danforth

Grumpy Vintage Moderator still playing with boats
Staff member
Joined
Jul 23, 2011
Messages
47,609
physical persuasion, to bend it into shape.
also known as percussive manufacturing..... hint - heat the aluminum to about 550 with a heat gun, and use a 2" piece of dowl or bat under the hammer to smooth out the bends a bit
 

Paulwise

Petty Officer 3rd Class
Joined
Jan 11, 2022
Messages
85
Looking to do a final cleaning of the hull this week before rebuild. Ive cleaned most of it with a wire brush on a drill. There was minor corrosion and pitting. I can only assume that there is still corrosion that i cant see under the ribs. So i need a way to stop it from getting worse in places i couldnt get to. I have pump sprayers and im assuming that a couple household products will be good to rinse it out and prevent further problems. What do you recommend?
 

Paulwise

Petty Officer 3rd Class
Joined
Jan 11, 2022
Messages
85
This is what the rib ends look like after flattening the bottom metal with a dead blow and six inch 2x4. They are all about 1/4" off of the deck. Im trying to figure out how to get them flat to the bottom to be able to reinstall rivets. I have CLecos so ill try that first. Not sure how far down they will pull them. Maybe pull down the ribs with a 2x4 and drywall screws with washers then heat them up to reform the bend. Not sure yet....
IMG_4800.jpeg
 

Attachments

  • IMG_4801.jpeg
    IMG_4801.jpeg
    2.2 MB · Views: 10
  • IMG_4799.jpeg
    IMG_4799.jpeg
    2.7 MB · Views: 10
Last edited:

renns

Petty Officer 1st Class
Joined
Dec 20, 2017
Messages
316
I rinsed the inside with a couple gallons of vinegar mixed with the same volume of warm water. That was followed up with pressure washing and rinsing with just warm water. I can't comment on the effectiveness of treating those hidden areas, but I feel better trying something!
 
Top