'74 Holiday 18 Restore Mod.... Convert to open bow.

Paulwise

Petty Officer 3rd Class
Joined
Jan 11, 2022
Messages
85
I see Classiccat has got it covered. I was lucky to not have that problem and I added a reinforcement to ovoid it.
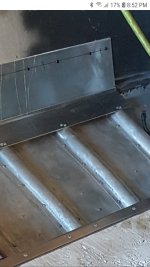
1/8" 5052 aluminum bent to fit the top of the ribs and to the hull sides. All the solid rivets are above the water line and blinds in the rib tops. Bonus of covering the multiple holes from old deck rivets
Can you show me what this reinforcement looked like completed? I see the angle aluminum is attached to the ribs but the other end is not attached to anything yet. Im guessing risers but not sure.
 

Paulwise

Petty Officer 3rd Class
Joined
Jan 11, 2022
Messages
85
With new decking, side panels, transom and new fasteners the risk of further issues goes down. Those areas of the hull have been weakened by work hardening as have the spray rail chines even though the areas haven't suffered a failure by splitting or cracking. That is why I added the braces to my Chief, so I would have no worry about catastrophic failure of the side splitting out.
Your boat can sustain rib some end cracking but if this happens, maybe not.

y4mkWFGzKldL_G5vJE9Wi_a2vqde2yBZ0JYt21piAqKEXKE_LggFyxNOldasrtn6ach9JdeT7366EHBmUSzoP_3obpesoJ4JbJhVCh-PZmxQ0Zm2xvUlNJuynJh4XCaLddT6eXwjr3RA1jLsu7gi5CnyXXm2RDZnCV1Q5DM9v3QpXmkwH_GaxJSnCd31-P3Mz6c
Im doing the floor and transom and side panels. Im not close to this situation but I am going to do preventative work as well as time consuming as it will be. Can you show me pics of your braces? And did you do risers and rib top plates as well?
 

Paulwise

Petty Officer 3rd Class
Joined
Jan 11, 2022
Messages
85
What is the best way you remove old rivets? I have seen a few videos and threads but I have had a bit walk around in the holes which i know is not good. Rookie mistakes a plenty from this guy.
 

MNhunter1

Lieutenant Junior Grade
Joined
May 12, 2014
Messages
1,058
What is the best way you remove old rivets? I have seen a few videos and threads but I have had a bit walk around in the holes which i know is not good. Rookie mistakes a plenty from this guy.
I use a center punch to dimple the head first and reduce the risk of the drill bit wandering. Once you have them drilled out a bit, you can use a chisel to easily knock off the head. Use a punch to drive out the tail.
 

BOYS & TOYS

Petty Officer 2nd Class
Joined
Mar 1, 2008
Messages
149
I zoomed in on the picture I posted earlier. The black dots are solid rivets with black 3m5200 applied during setting. Two 3/16" all aluminum blind rivets in each rib.
I can draw a picture if necessary as long as I can find my crayons 🤣
Slow and careful with the drill half way through the rivet ,then pin punch it out.
 

Attachments

  • Screenshot_20220210-205249_Chrome.jpg
    Screenshot_20220210-205249_Chrome.jpg
    835.3 KB · Views: 26

Watermann

Starmada Splash of the Year 2014
Joined
Jan 12, 2013
Messages
13,794
Im doing the floor and transom and side panels. Im not close to this situation but I am going to do preventative work as well as time consuming as it will be. Can you show me pics of your braces? And did you do risers and rib top plates as well?

This is how I added the braces to my Chief.
y4mQmoREx4phr4yKnOVyCP1v78cMbOR6UNfVkD7ku_d3rEPKUVLN-bMAscK8HNtGO-oYHpPXBcqICAoW0lm9GP9DoHKzyRMHVe0vqI8Up-Ku8h-qxfR5YXB9CNiIJguJZ_wPjZHZ8LAEXg8VxeUKM4lv1uAa3D6G6_b4pp-8gznfI_j27Wb-4N-VMch-OLjvSJY
 

Paulwise

Petty Officer 3rd Class
Joined
Jan 11, 2022
Messages
85
This is how I added the braces to my Chief.
Wow that is really clean, great work! I guess thats what peace of mind looks like. Not sure what elements of all of this structural support i need to add to my hull but i have some time to think about it. Im going to do the rib ends first. Got a couple tubes of 5200 yesterday and can start getting my patches prepped. Rivets should arrive today from Aircraft spruce.
 
Last edited:

Paulwise

Petty Officer 3rd Class
Joined
Jan 11, 2022
Messages
85
I zoomed in on the picture I posted earlier. The black dots are solid rivets with black 3m5200 applied during setting. Two 3/16" all aluminum blind rivets in each rib.
Looks like you went straight to the hull with no risers..... still deciding what elements of the extra hull support i will do. There are several different options here that all look good. I am a fan of your option because you can avoid extra holes in the bottom of the hull. How is she holding up?
 

BOYS & TOYS

Petty Officer 2nd Class
Joined
Mar 1, 2008
Messages
149
Looks like you went straight to the hull with no risers..... still deciding what elements of the extra hull support i will do. There are several different options here that all look good. I am a fan of your option because you can avoid extra holes in the bottom of the hull. How is she holding up?
I think my reinforcement will stop further cracking and has been working okay. It's got around 2000 miles on the gps since I put it together and I don't always have the gps on.
The other repairs look good for strength but my design adds no extra holes under the water line. Also don't have to disturb the double riveted seam.
I'm not an engineer but the guys that designed it were and they crack.
In 10 years I can give you a better durability report.
 

Paulwise

Petty Officer 3rd Class
Joined
Jan 11, 2022
Messages
85
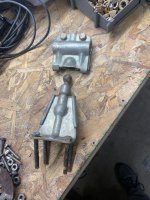
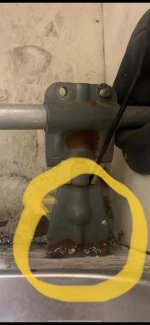
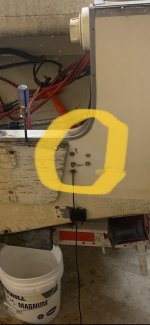
Anyone have experience with this steering cable/linkage support? If i can avoid putting the holes through the new transom i will. Would love to just fill those old holes in. Will it be strong enough if i install this with stainless lag screws from the inside instead of bolts that go all the way through?
 

Attachments

  • IMG_4719.jpeg
    IMG_4719.jpeg
    2.6 MB · Views: 9
  • IMG_4713.jpeg
    IMG_4713.jpeg
    301.4 KB · Views: 9
  • IMG_4712.jpeg
    IMG_4712.jpeg
    335.9 KB · Views: 9

Paulwise

Petty Officer 3rd Class
Joined
Jan 11, 2022
Messages
85
I think my reinforcement will stop further cracking and has been working okay. It's got around 2000 miles on the gps since I put it together and I don't always have the gps on.
The other repairs look good for strength but my design adds no extra holes under the water line. Also don't have to disturb the double riveted seam.
I'm not an engineer but the guys that designed it were and they crack.
In 10 years I can give you a better durability report.
2000 + miles is a pretty good test.
 

BOYS & TOYS

Petty Officer 2nd Class
Joined
Mar 1, 2008
Messages
149
Anyone have experience with this steering cable/linkage support? If i can avoid putting the holes through the new transom i will. Would love to just fill those old holes in. Will it be strong enough if i install this with stainless lag screws from the inside instead of bolts that go all the way through?
Steering through the tilt tube is my preference.
Your style would be unsafe if the transom bracket came loose at high speed. Lag bolts may not stay tight.
Is this outboard missing a tilt tube or is the cable too short? Curious why this style was used.
 

BWR1953

Admiral
Joined
Jan 23, 2009
Messages
6,195
Anyone have experience with this steering cable/linkage support? If i can avoid putting the holes through the new transom i will. Would love to just fill those old holes in. Will it be strong enough if i install this with stainless lag screws from the inside instead of bolts that go all the way through?
I had that same setup on my Kingfisher for the old style pulley and cable steering system. I trashed that and switched to the modern setup. Filled the old holes and moved on.
 

racerone

Supreme Mariner
Joined
Dec 28, 2013
Messages
37,972
The steering on a 1974 model Evinrude hooks up to the tilt tube.--------There should be no need for that adapter bracket,-------That bracket was used for Evinrude motors 1972 and older !
 

Paulwise

Petty Officer 3rd Class
Joined
Jan 11, 2022
Messages
85
The steering on a 1974 model Evinrude hooks up to the tilt tube.--------There should be no need for that adapter bracket,-------That bracket was used for Evinrude motors 1972 and older !
Now thats something! Im pretty sure mine is a 74. Ill take a better look and get back to you. This would be great news if i can just forgo reinstalling it.
 

Paulwise

Petty Officer 3rd Class
Joined
Jan 11, 2022
Messages
85
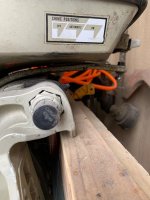
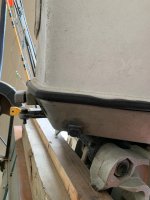
The cowling / decals on the motor in the pictures indicate a 1974 model.
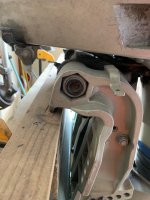
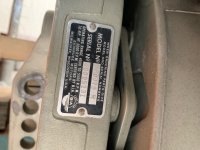
Here is what ive found. The steering was connected to an arm in front of the engine with a bolt. Ive also attached the model plate which im assuming has a date indicator number on it.
 

Attachments

  • IMG_4763.jpeg
    IMG_4763.jpeg
    1.7 MB · Views: 13
  • IMG_4764.jpeg
    IMG_4764.jpeg
    2 MB · Views: 13
  • IMG_4765.jpeg
    IMG_4765.jpeg
    2 MB · Views: 15
  • IMG_4766.jpeg
    IMG_4766.jpeg
    1.4 MB · Views: 15
  • IMG_4767.jpeg
    IMG_4767.jpeg
    3 MB · Views: 15
  • IMG_4768.jpeg
    IMG_4768.jpeg
    2.9 MB · Views: 14

BOYS & TOYS

Petty Officer 2nd Class
Joined
Mar 1, 2008
Messages
149
Your old cable has extra pieces on the end to be removed. Then make sure the cable is long enough to thread in the tilt tube.
If that all works out you need a rod to connect the cable to the hole in front of the motor.
 
Top