68 Offshore restoration

Sharpie223

Petty Officer 2nd Class
Joined
May 24, 2021
Messages
165
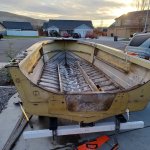
Got a 68 offshore back in March, officially starting the restoration now that the floor is out. Luckily there is no rib/chine cracking, but I do have a beat up portion of the spray rail that I will need to beat back into shape and reinforce. Very little in the way of corrosion, I think this was a freshwater only boat. Previous owner indicated that there was some leakage, about a gallon per trip, however long that equates to, unfortunately his fix was to "seal it up real good with silicone". I will be looking for any loose rivets and plan to seal with gluvit on one side and coat-it on the other, haven't decided which side is which, if anyone has some thoughts on that?

I am about ready to start rib/chine/spray rail reinforcement, does anyone have thoughts about where in the boat cracking is most likely to occur? I figure I can give extra reinforcement there. Main reinforcement will be tabs between ribs plus 1.5 or 2" angle spanning the ribs and connected to each plate to tie ribs to interrib spans. Rivets used for the tabs will be closed end pop rivets, aluminum in new locations, 18-8 stainless if used to replace an existing rivet location. The stainless specs show being stronger than aluminum solid rivets and finding help with bucking could be difficult for me, hence the closed end pop rivets.

This will be a fishing/family boat. Major mods planned are to shorten the splashwell, add folding jumpseats or a bench seat to the back and make the open bow more like a modern fish/ski boat without the walkway.

Engine is a 97' suzuki 75hp, got me alone going ~37 mph until it trimmed to far and started alarming, it runs great but I might work on attempting greater speed once the boat is restored, mostly playing with prop selection but I might try a low water pickup to accommodate higher trim.
20221228_152657.jpg
 

2TinSoldiers

Recruit
Joined
Jun 29, 2022
Messages
2
My project looks a lot like yours, from the standpoint of it being stripped down and near ready to be reworked. Mine is a 16' 1967 Neptune that had a Peugeot/Merc I/O that I recently removed. The motor is shot. I'm now trying to decide whether to rework the transom to accommodate an outboard or maybe leave it more or less as-is and go with a bracket-type set up for an outboard. Nothing will happen fast and I'll start a new thread to discuss it all when the time comes. In the meantime, I will watch your build with interest.
 

Sharpie223

Petty Officer 2nd Class
Joined
May 24, 2021
Messages
165
I'll try to keep my build interesting then, haha. I like the looks of the outboard/offshore brackets added to the back of an i/o, seems like it would make for an easy step/swim platform when needed, too. I bet something like that on a 16' would get you about the same space as an 18' since you don't need the splashwell.
 

SHSU

Lieutenant Junior+Starmada Splash Of The Year 2019
Joined
Mar 8, 2017
Messages
1,725
Welcome to the party!!! Will be fun to watch this project take form. Any more info on model of hull: Super Sport, 16ft, 18ft, etc.... ?

SHSU
 

Sharpie223

Petty Officer 2nd Class
Joined
May 24, 2021
Messages
165
It's an 18' Offshore. Only difference between the offshore and the supersport I can find is the offshore has a factory bilge pump. Seems like a funny reason to create a new model. Almost like they were implying that you shouldn't take a supersport far from shore, interesting marketing strategy...

This is my second starcraft, first was a 14' sea scamp that I built up. I wasn't totally green at that time but my knowledge of coatings and wrenching have improved since then, I think this one will turn out better. Last year I decided that a boat is useless if I can't fit the family, so sold that and picked up a new project.

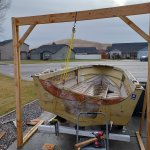
I managed to remove the transom wood without much difficulty and finished cleaning the 50 years of dirt buildup out of the bilge. Eye bolts and a hoist were great help, rechecking for the last tiny screw touching wood also made it much easier!

With cleaning/teardown out of the way, the fun part can begin. Starting with chine reinforcement and patching extraneous transom holes.


20221230_132452.jpg
 

SHSU

Lieutenant Junior+Starmada Splash Of The Year 2019
Joined
Mar 8, 2017
Messages
1,725
Interesting, I have a SS16 that we take out 2-3 miles from shore when we run to the tip of the jetty off Galveston in the Gulf of Mexico. We do have to pick our days, but does the job.

As for your project, I would have to defer to others, but believe the consensus is to add the support bracket on the 18ft chines as they tend to crack over time.

SHSU
 

Sharpie223

Petty Officer 2nd Class
Joined
May 24, 2021
Messages
165
Definitely adding support tabs, working on them today. I was more curious if there is a specific section of rib ends that sees a higher rate of cracking? This is a budget build where practical, so I am trying to reuse some aluminum that I have horded over time. Most tabs will be made from some .045 aluminum with doubled edges for higher stiffness. This was taken from a billboard bottom piece that I got for another project but didn't use. No idea of alloy but it's malleable, probably a 5xxx or 3xxx. I also have some thicker pieces of road sign, about .125" that I could use, but not enough for the whole boat, so I was trying to figure out if there was a specific section that could use it. The floor will be 1/2" nominal ply, but I will be adding some aluminum structure underneath as well, running side to side. This will help stiffen the hull, too.

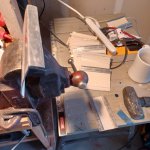
Pictured below is my high tech CNC (crunch n clobber) bending brake, making support tabs. I thought about buying a cheap bending brake, then looked around my garage and decided there's no room. The tab by the hammer is a finished piece, minus bend for chine. The stack above that is starting pieces to go. When finished it has a profile similar to a folded office staple. Hope to finish folding these tomorrow and get one test fit.

20230101_143213.jpg
 

SHSU

Lieutenant Junior+Starmada Splash Of The Year 2019
Joined
Mar 8, 2017
Messages
1,725
Will have to defer to @Watermann for his expertise on adding support tabs.

SHSU
 

Sharpie223

Petty Officer 2nd Class
Joined
May 24, 2021
Messages
165
I got tabs bent and started to drill out chine rivets that will need to be picked up by the tabs. Once this thin metal has it edges folded and the bottom inch bent, they become very stiff. Stainless closed end rivets will replace the solid aluminums that I drilled out. Aluminum closed ends will tie the ends of the tabs to the hull. Then a 10" piece of 1.5" Aluminum angle will tie the rib ends to the tabs, effectively locking the movement of the ribs to the movement of the rest of the chine.

20230102_134318.jpg

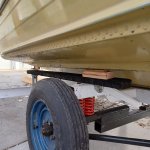
I am starting to think about trailer mods that will happen when my boat is off and upside down for painting. I can easily make the bunks out of hdpe, but if I paint the hull I don't want to wear the paint off.
So if I paint the bottom, I will need roller bunks, planning on then located under the "lifting strakes?" Not impossible but a bit of work to set up right.
That then gave me the thought of just polishing the bottom of the hull, but my original plan was to use coat-it as extra sealant. If it doesn't uv degrade it would look just as bad as worn paint if used on a polished hull. If coat it wasn't used, I'm not sure I fully trust gluvit to penetrate rivets from the top of rib flanges down to the rivet head.
Third option is to paint but only leave the "lifting strakes?" as raw aluminum and have those be centered on the bunks. This would allow outside of rivets to be sealed as well, and it would probably look okay, but alignment would become more critical when trailering.

I suppose the question in that is if anyone has evidence of how well gluvit can seal a rivet from the top of a rib? Will it penetrate all layers? If it's trustworthy enough, I think I may just leave the bottom raw aluminum.

Alternatively to it all, I paint the whole bottom, retain bunks, and just plan touch up paint now and then, or just not care since those spots will hardly be seen.

20230104_111134.jpg
 

matt167

Rear Admiral
Joined
Sep 27, 2012
Messages
4,151
Fwiw. Offshore is built on the larger islander 18’ hull. Do believe it’s a deeper v. the SS and Holidays used a shorter hull so to speak. But this is speculation as I only have been told this. I have a 71 Offshore v 18 that I need to finish. I don’t have an SS hull to compare to
 

redneck joe

Supreme Mariner
Joined
Mar 18, 2009
Messages
10,919
i wouldnt stress on the bottom. On the water or one the trailer they will not be seen. Or two tone it - paint the bottom aluminum color....
 

Sharpie223

Petty Officer 2nd Class
Joined
May 24, 2021
Messages
165
Thinking about it some more, I might just go with a fully painted bottom and bunks, and just plan that some paint will wear off over time. My original plan was to paint with kbs maxx (2k polyurethane paint) in smoke grey. If I am already figuring it will be worn down anyway (durability being the whole reason for higher end paint), I think I may paint the bottom in alkyd and save the good paint for visible topside surfaces. I like the idea of having bunks only under the strakes, but feel like that might make trailering more difficult for perfect alignment.

Paint scheme planned is grey bottom, grey inside, black and red flake job for the sides, silver lettering. I might try my hand at woodgraining the dashboards.
 

Sharpie223

Petty Officer 2nd Class
Joined
May 24, 2021
Messages
165
Fwiw. Offshore is built on the larger islander 18’ hull. Do believe it’s a deeper v. the SS and Holidays used a shorter hull so to speak. But this is speculation as I only have been told this. I have a 71 Offshore v 18 that I need to finish. I don’t have an SS hull to compare to
That's interesting. I was under the impression that all 18'-ers started with the same hull and were built up from there. That's only based on several old ads that I've found and other internet speculation.
 

Moserkr

Chief Officer + Starmada Splash Of The Year 2021
Joined
Nov 23, 2020
Messages
869
Good Morning Sharpie! Glad to have you here sharing your build with us.

My first thought is replacing solid rivets with closed end blind rivets. They may be waterproof for a while, but they arent as strong as a solid rivet. Eventually I would think they will leak, especially in any position where they are part of the structure of the hull. There was another guy on here, forget who, but he put out a random internet call to strangers to help pound in solid rivets and people came to help.

Second though is coat-it and gluvit. I learned in my build that coat-it is extremely strong and is actually made for the outside of the hull. The PO of my boat coated the entire bottom of my boat in it, and it still had leaks from broken rivets before I fixed it properly. I resealed the leaky rivets on the bottom after it was fixed too. Coat-it is ugly as sin when left unpainted. I also used it inside but no sealant will penetrate the ribs and strakes very well because the spots are triple layered aluminum. Each rivet I replaced got a glob of 5200 on the tail as well.

Great to see your progress and reinforcements coming together! Hope those thoughts help as the picture in your head meets the build on the ground!
 

Sharpie223

Petty Officer 2nd Class
Joined
May 24, 2021
Messages
165
When I first looked into rivets, 18-8 closed ends appeared to be stronger than solid aluminums. Since then I have found better data that would indicate if the original rivets are 2xxx (I don't remember the exact alloy, it was a hardened rivet though) series, the 18-8s will still be stronger in shear by over 100 lbs (850 for stainless, ~720 for 2xxx), but weaker in tensile by 150 lbs (900 for stainless vs ~1050 for 2xxx). If the originals are 1100, then stainless will be stronger by far. I suppose I will need to research the original alloy and look at the design to see if it will be primarily shear or tensile loads. It is 4 rivets on the chine between each rib that are being replaced, so the majority remain unchanged.

New rivets to secure the tab ends are planned to be aluminum closed ends, the thought being that they aren't there for the original structural strength, just for added strength. Maybe I am being too cheap on those, though...

I will re-leak check after installing tabs and removing PO's silicone, and probably hand buck any loose rivets with a hammer, I am not expecting many. This boat is actually in pretty good condition, I can't find any missing, broken, or visibly loose rivets. The PO only siliconed the seams, which solved the leaking until the silicone wore off. My gut feeling is that the water ingress he had was either due to the swiss cheese transom (old holes filled with self tappers), or maybe degradation of the original seam sealer, or both.

I think I can find rivet help easy enough, the main issue is me being cheap...
 

Moserkr

Chief Officer + Starmada Splash Of The Year 2021
Joined
Nov 23, 2020
Messages
869
I will say a new rivet, even closed blind, will probably be stronger than a lot of the 50 year old solid rivets. Before I tore my boat down, it spent a summer on the water with around 30 open blind rivets. I lost a rivet completely one day and that hole almost sank the boat in 3 hours, had water to my floorboards. If you’re comfortable with it and it saves a buck, its your boat! Im just wondering if a solid rivet will hold tighter than a blind rivet in how they are attached to the hull. The rivets and original seam sealer are what mainly keeps the boat dry. Just dont depend on coat-it or gluvit holding a broken rivet to the boat or preventing a leak if the rivet pops. Coat-it doesn't matter on broken rivets from my experience - it breaks the coat-it off in a chunk with it.
 

classiccat

"Captain" + Starmada Splash Of The Year 2020
Joined
Dec 20, 2010
Messages
3,412
we recommend using solids on anything structural &/or below the waterline. A solid rivet will completely fill / plug each hole with aluminum as it expands...you're getting complete, intimate contact with materials that you're securing; the head, stem/expansion and bucktail/expansion. If you want to bring some tinny-physics into it, the forces are distributed over a larger area (less pressure on rivet) as opposed to just a head and mandrel-generated bucktail. Another consideration is how long a mandrel-generated bucktail sustains it's hold over time as the joint experiences deflection, thermal expansion/contraction, etc. The latter is 1 of the reasons I would avoid dissimilar materials such as SS.
 

Sharpie223

Petty Officer 2nd Class
Joined
May 24, 2021
Messages
165
Well, thanks to some inconsiderate people injecting some well reasoned points in this thread, reinforcement tabs are on pause until 2117 rivets arrive. My neighbor has an air hammer I can borrow and I will just need to buy a brazier nose for it. These will replace what I have drilled out, the rivets tying the tab ends to the hull bottom and sides I will still plan to use the stainless 18-8 closed ends. I see conflicting reports from people on these loosening over time, it makes be wonder if it's the aluminum rivets that loosen. My thinking is that the 18-8 are rated higher in shear and 85% of tensile of the solid 2117, and the ends of the tabs should be primarily shear, so these should perform at least as well. If they don't, my floors will be screwed down using rivnuts and should allow easy enough rework if I end up wrong. All rivets will be coated in epoxy prior to install. As for the differences in expansion/contraction leading to loose holes, I am not too worried about it causing enough stress to yield, but I will find the right formulas to check from -15 to 130 degrees F.

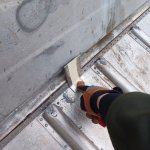
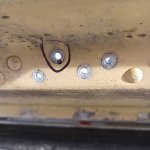
I managed to drill out the remaining rivets necessary for reinforcement tabs, and found some night shift (from my manufacturing days I like to blame them) double holes along the way, or maybe some kind of debris that became an inclusion?

20230106_143908.jpg

While chine tabs are paused I am going to work on filling the 50 years of mount and remove holes, and cutting/varnishing deck panels.

Holes will be beveled and scratched for tooth, backed with an aluminum plate, maybe aluminum screen that has been acid treated, and then filled with jb weld. I hardly prepped the holes on my sea scamp build and the epoxy never cracked or chipped, so I think this will work.

Deck will be 15/32 cdx (just to be controversial), edges sealed with thinned epoxy, and then liberally soaked in varnish, spar for the underside, and "polyurethane" for the top. The top will also have canvas glued and painted on. This has held up well for me in the past, even with osb. I will cover each floor section on its own to facilitate potential removal/maintenance later on. Because this is thinner material, I will be adding some 3/4 angle structure underneath.

Also on the list is fixing the spray rail. I have no idea what happened but it appears to have been beaten from above and below, and scraped...many times. Not sure the intention. I understand the saying "if at first you don't succeed, try, try again," but that should also be balanced with "the definition of insanity is trying the same thing over again, expecting a different result."

20230106_143936.jpg

Anyway, I will fashion some kind of tool that matches the correct profile, to try and beat this back into shape from the inside. Then I think I may glue in a doubler for this section to mitigate fatigue issues later on.
 
Top