1997 Sea Ray 175

fat fanny

Lieutenant Commander
Joined
Feb 9, 2006
Messages
1,935
Re: 1997 Sea Ray 175

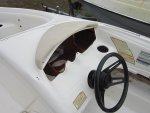
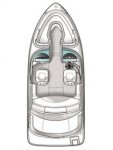
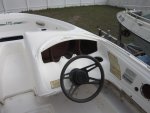
Marc I believe you will be hard pressed to find the dash panel made and molded of vinyl. Also the 19x14.5 gave great economy we could play all weekend on under a tank of fuel and no strain on the drive train. Maybe Searayb can get the windshield company name off his the companies emblem is in the right wrap around corner I wanna say it's surefit or something along those lines?
 

Marc Peternell

Petty Officer 3rd Class
Joined
Dec 21, 2013
Messages
97
Re: 1997 Sea Ray 175

I have 2 separate pieces in the dash area. A plastic piece that houses the instruments (I was able to find one of those) and another plastic piece that I would call the dashboard. I didn't replace that yet. I have a material that I could use to try to mold a new one, which I might do, or I may see if I can find a used one.
 

Marc Peternell

Petty Officer 3rd Class
Joined
Dec 21, 2013
Messages
97
Re: 1997 Sea Ray 175

Baby steps.... I installed a drain/garboard plug. When I bought the boat, it had been taken off. I wanted to install one before putting the transom assembly on. I still need to clean it up, it has 5200 that got on it and some sharpie from when I marked the holes to drill. Not that I'm ultimately concerned about how the drain plug looks.
 

Attachments

  • IMG_0001 (2).JPG
    IMG_0001 (2).JPG
    70.6 KB · Views: 2
Last edited:

Marc Peternell

Petty Officer 3rd Class
Joined
Dec 21, 2013
Messages
97
Re: 1997 Sea Ray 175

One of the reasons why I started this thread is because I wanted to show how easy it is to transfer an entire engine package from an older boat into a newer hull. For example, in my case, I am trying to transfer my good running engine package from a 1987 boat into a 1997 boat, if all goes well, I will have upgraded from a 1987 to a 1997 boat for less than $1000. This thought had come to mind when looking at boats that were newer than mine and thinking "would I trade my boat + $1000 for that boat", and the answer was typically yes. Sure, it isn't about taking a 1987 boat and turning into something brand new, but just an upgrade. (typically, people put a newer engine onto an older boat!)

I'd done this before and I wanted to have a thread on here this time around to chart my progress.

I thought that the entire engine package, as long as I took everything -- engine, outdrive, transom assembly -- would all bolt up perfectly. I was wrong. I've moved the transom assembly and I guess the newer model has 2 bolt holes that the old style didn't have (above the steering lever).

Here are photos. The 8 bolts from my alpha 1 lined up perfectly with the 1997 boat's bolt holes. But, there are the two that don't. My first thought was to just fill them up with 3M 5200, but I will probably fill them with fiberglass resin.

Should I just fill them with 5200? That way if I were to ever put on a newer outdrive, I would have the holes there?
 

Attachments

  • IMG_0001.JPG
    IMG_0001.JPG
    87.7 KB · Views: 3
  • IMG_0003.JPG
    IMG_0003.JPG
    87.5 KB · Views: 3
Last edited:

jbcurt00

Moderator
Staff member
Joined
Oct 25, 2011
Messages
24,996
Re: 1997 Sea Ray 175

Fiberglass resin mixed w/ cabosil & 1/4" chopped strand ~ polyester resin PB, then paint over the resin to blend it w/ the rest of the transom.
 

Marc Peternell

Petty Officer 3rd Class
Joined
Dec 21, 2013
Messages
97
Re: 1997 Sea Ray 175

I was thinking of just getting a stainless steel bolts, coating them in 5200, and screwing them into into the hole from the inside. They'd fill the hole and prevent water from getting into the transom and if I were to go with a newer bell housing and outdrive, then I could remove the bolts and I'd still have the needed holes. Plus, it would be an easy fix. It is easy to get to though, so the resin idea above would be fine too.
 

Marc Peternell

Petty Officer 3rd Class
Joined
Dec 21, 2013
Messages
97
Re: 1997 Sea Ray 175

Hey all,
I just wanted to update with some progress that I made over the weekend.

The steering in the project boat was some sort of a rack steering and was frozen up, so I just moved the entire steering system from the donor boat to the project boat, cable, helm, and steering wheel. With the project boat being gutted, it was pretty easy. The project boat used to be garage kept, so the steering wheel came off easily and I know the cable isn't too old (I had to replace it a while back).

The hole in the dash of the project boat was too small for it, so I had to cut the hole bigger and drill some new holes. No big deal, and I could be sloppy about it because the hole gets covered up anyway.

Here are some photos. First 2 are the project boat, 3rd shows the mounting hardware.

steering (1).JPGsteering (3).JPGsteering (5).JPG
 

Marc Peternell

Petty Officer 3rd Class
Joined
Dec 21, 2013
Messages
97
Re: 1997 Sea Ray 175

And the final installation of the steering.
 

Attachments

  • steering (6).JPG
    steering (6).JPG
    74.2 KB · Views: 2
  • steering (7).JPG
    steering (7).JPG
    71.7 KB · Views: 2
  • steering (8).JPG
    steering (8).JPG
    74.5 KB · Views: 2
  • steering (9).JPG
    steering (9).JPG
    96.7 KB · Views: 2

Marc Peternell

Petty Officer 3rd Class
Joined
Dec 21, 2013
Messages
97
Re: 1997 Sea Ray 175

steering (2).JPGThe steering part was easy and it is nice with things actually go right.

Next, I did get the engine put into the engine compartment.
 

Marc Peternell

Petty Officer 3rd Class
Joined
Dec 21, 2013
Messages
97
Re: 1997 Sea Ray 175

I was really hoping that the alignment would be right, but it isn't. The stringer that the front engine mount sits on is at a different height, so I spent a long time adjusting the front so that the alignment would be right. I think I have it now, but I've decided to go ahead and change the gimbal bearing. (Yes, now that the bell housing is on the boat I decide to do this... why couldn't I have thought about this while it was off of the boat!). The gimbal bearing actually seemed a little stiff when I took the outdrive off, but I thought it would be fine. In going through my alignment process, I'd noticed that it had hardened up and wouldn't turn anymore (maybe something in there dried out and rusted once it was off the boat, who knows). Plus, since I had issues with the alignmnet, I feel it best to just reinstall and new gimbal bearing and put to rest any alignment fears I have.

The gimbal bearing doesn't want to come out. I've had the boat for a long time and I don't think I've ever changed it, plus it got salt water in there. So, this isn't going to be fun. The local auto parts store has a loaner tool program, and I already tried with a slide hammer, but the jaw set on the slide hammer is pretty worn out and isn't gripping well.
 

Marc Peternell

Petty Officer 3rd Class
Joined
Dec 21, 2013
Messages
97
Re: 1997 Sea Ray 175

I stopped by a different auto parts store and this one also loans out tools for free and had a much newer slide hammer and the jaws were in like-new condition. Now that I had something that could actually get a good grip on the gimbal bearing, it came out without too much of a fight.

Next: Get the new gimbal bearing, install it, double check my alignment and install the outdrive.

After that, I'll probably go ahead and move the shifter/throttle over and the tilt trim pump.
 

Marc Peternell

Petty Officer 3rd Class
Joined
Dec 21, 2013
Messages
97
Re: 1997 Sea Ray 175

Update:
I have the new gimbal bearing installed, alignment done, engine bolted in with proper alignment, and outdrive installed.

Wasn't as easy as I thought it would be. The height of the front mounting bracket had to be about 1/2". I'd previously used an old driveshaft to check alignment when outdrives had been removed. That wasn't good enough in this case, so I bought an alignment tool. After using the alignment tool, I wish I'd bought one years ago.

Mechanically, I only need to trasfer over the shifter/throttle with the tilt trim pump and install the dash with instruments along with the wires that go back to the big plug.

Long way to go for the interior portion of the boat.
 

Marc Peternell

Petty Officer 3rd Class
Joined
Dec 21, 2013
Messages
97
Re: 1997 Sea Ray 175

I'd found a marine salvage yard in Georgia that had a Sea Ray 175 there, unfortunately no windshield, but I was able to get a dashboard (not the part that holds the instrument panel, but an actual dash). I was actually looking forward to making one, but now that I have the pre-molded one, I'm glad that I just bought one. I don't think I could've made mine fit and curve the way the right one does.

I also bought this little vent cover from them. That goes on the side of the boat. Oddly, this was one of the items that the thieves stole off of my boat (who really steals this kind of thing!).
 

Attachments

  • IMG_0002 (2).jpg
    IMG_0002 (2).jpg
    123.4 KB · Views: 1

Marc Peternell

Petty Officer 3rd Class
Joined
Dec 21, 2013
Messages
97
Re: 1997 Sea Ray 175

Here is a photo of the dashboard that I bought. It isn't installed in the photo, I just placed it where it is going to be, there are screws in the bottom of it that didn't allow it to fully seat.

I want to paint it and the passenger side dash/glovebox a different color. From what I've seen, all of the Sea Ray 175s came with the beige dash and glovebox, even if the boats themselves didn't have any beige in them.

It is plastic and I think will be pretty easy to spray paint. Probably only 1 can too, so it wouldn't cost much more to use a high quality paint.

What paint would you use to paint this?
 

Attachments

  • IMG_0001 (3).jpg
    IMG_0001 (3).jpg
    138.2 KB · Views: 1
  • IMG_0002 (2).jpg
    IMG_0002 (2).jpg
    138.3 KB · Views: 1
  • IMG_0003 (2).jpg
    IMG_0003 (2).jpg
    131.1 KB · Views: 1
  • IMG_0004 (2).jpg
    IMG_0004 (2).jpg
    125.5 KB · Views: 1

fat fanny

Lieutenant Commander
Joined
Feb 9, 2006
Messages
1,935
Re: 1997 Sea Ray 175

Good score on the dash and the horn vent cover. Coat that dash with some sort of UV protectant spray or it will dull out and crack quickly!!
 

Marc Peternell

Petty Officer 3rd Class
Joined
Dec 21, 2013
Messages
97
Re: 1997 Sea Ray 175

Good call on the UV protectant. I am lucky to have found the dash. The material that I was going to make one with is pretty easy to work with when using a heat gun, and I think I could've gotten pretty close, but without having a dashboard to mould it after, it would've have looked like factory.

I didn't know it was called a horn vent cover. Knowing the name, I wonder if I could've found one somewhere else. Oh well, I'm happy to get the original one and not have to try to fit something different there.


Fat Fanny - Do you like the interior layout? I think I may change it on mine. I like the thought of 2 single captains chairs and a sundeck on the back as opposed to a seat on each side of the engine cover.

Since mine is gutted, I can kind of make it however I want. Attached is a sketch from the Sea Ray website that shows the sundeck version. What I don't like about the idea of a sundeck is that the entire pad for the sundeck would have to sit above the hull. That is where the back pad on the non-sundeck boats sits, but that it is pretty thin and it doesn't seem noticible that it sits on top of the boat. I've really looked at it and wondered if I can get one to sit more inside, but I don't think it could work that way.
 

Attachments

  • sundeck.jpg
    sundeck.jpg
    8 KB · Views: 2

Searayb

Seaman Apprentice
Joined
Jul 6, 2011
Messages
46
Re: 1997 Sea Ray 175

Regarding the interior layout I like it, I tend to have folks in the back seats and the passagers side. Wish I had a captiains chair on the drivers side. A few posts ago I mentioned I replaced the dash panel, the piece that the gauges mount to. There are pictures of it on this site. If I did int again I would copy wha "1969 Sea Ray SRX Pachanga Build Thread" did. His dash is sweet.
 

fat fanny

Lieutenant Commander
Joined
Feb 9, 2006
Messages
1,935
Re: 1997 Sea Ray 175

That layout is allot nicer than what mine came with from the factory the captains chairs are a must! the sun pad from the attachment is much better I would design it to fit around the inside rim of the cap and be hinged from the underside at the furthest point back with seperate heavy duty hinges with backer plates.Then make a bulkhead to enclose the whole bilge/engine compartment contoured to the shelves along the sides of the gunwhales port to starboard with a wrap over padded sun deck. Hope that makes sense!
 

Marc Peternell

Petty Officer 3rd Class
Joined
Dec 21, 2013
Messages
97
Re: 1997 Sea Ray 175

That makes complete sense fatfanny. I really want a design to make it fit around the inside rim of the cap. Hinges could keep it in place as you said. A downside of this is that, if it fits inside the rim, what would you do with the rear section where it goes over the vent hole area? The vent holes are recessed. Would you make a separte section to go over that part? I'm thinking that some sort of a non-skid plate could go acrross this part.

Here are a couple of photos showing what I'm talking about (let me know if I'm not making sense).

Look at the first photo. This is of my donor boat. The sunpad is inside of the cap. The second photo is the bilge vent/blower area of the Sea Ray. I'm not opposed to the sun deck being below the cap (I would like that better), but I would need to put something over the vent/bilge blower area. It would be really nice if the sunpad could extend over this section, yet sit inside of the cap on the rest. I'm not crafty enough to make a dual layer sunpad.
 

Attachments

  • IMG_0001.jpg
    IMG_0001.jpg
    136.4 KB · Views: 2
  • IMG_0002.jpg
    IMG_0002.jpg
    129.4 KB · Views: 2

Marc Peternell

Petty Officer 3rd Class
Joined
Dec 21, 2013
Messages
97
Re: 1997 Sea Ray 175

Searayb - I was drooling at the thought of making my own dash panel and was pretty excited about it. When I first ordered my used dashboard from the salvage yard, they sent me the dash panel instead. Instead of returning it, I decided to just keep it and not make my own. I'm honestly just trying to keep this boat simple. I have another boat that I use more, but I enjoy this kind of stuff, so I decided to take on this project as an inexpensive upgrade to my older 19'. I may end up just keeping this as my primary boat and selling my other boat though. This one fits in the yard (other is a 24' Four Winns bowrider). That was my project boat a few years ago, but I didn't start a thread on that one.

Oh, and yes, I will make a bulkhead that goes to the gunwhales, with a bench seat in front of that.
 
Last edited:
Top