198x SS-150 rebuild

Rasdiir

Petty Officer 2nd Class
Joined
Jul 18, 2011
Messages
167
Been a hot minute, but I'm still around and my painfully slow progress continues!

I got a bit discouraged last year about no riveting partners and the resulting lack of progress, so that plus the weather in Sep meant I just picked away at a few items and then packed everything up for winter.

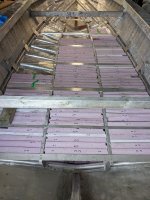
Since I didn't have a riveting buddy, I decided to spend the end of Aug working on the hull skin. After flipping I brass wheeled the entire outside of the hull, then began the painful process of filling in the pits with JBWeld Marine. I got the first coat on and sanded down with 120 grit on the orbital, and I also formed the 3 patches required to put over the spots I noticed from the PO. I also started cutting foam for under the floor, and got the entire starboard side outside of the stringer cut and also half of the port side outside the stringer. For the foam I tried saws and a hot knife from Princess Auto, but got the best results with a good old construction knife. That pretty much finished off the season and everything was packed up for snow.

Spring came a while ago here, but tons of rain meant it took me a while to get going. My work buddy offered to help out with riveting, so last week we put on the 3 patches, replaced a few worn rivets on the transom seam, and also attached the braces for my future side panels. I had to remove the port stringer and a couple of the floor braces to buck the patch rivets, but those are easily replaced now that another leak test is complete (Nothing found, just the bow seam with drips). My to do list is pretty much exactly what it was a year ago:
  • Remake the new port side knee brace wing, since I messed up when drilling the holes and can't get one nut where it needs to be;
  • Paint inside of transom skin and bilge area. Prior to painting I need to thoroughly clean and degrease the entire bilge area;
  • Install the transom wood and all bolts;
  • Install the 1/4" motor mount plate;
  • Flip the hull and do a second round of JBWeld in the pits;
  • Run a bead of 5200 along all outside seams; and
  • Sand entire hull.
I decided to go with Rustoleum Pro for the paint, and I have the Majic brand hardener for it, but now I face the realities of being in Canada: No one carries Rustoleum Pro in cans up here! Amazon has a few colors, but they want between $150-230 a can, which is obviously not happening. Anyone know a source for this paint in white and navy blue in Ontario?
 

SHSU

Lieutenant Junior+Starmada Splash Of The Year 2019
Joined
Mar 8, 2017
Messages
1,741
Use Gluvit or coat it for your seams. That is what it is made for. 5200 probably wont do as well if used in that way.

SHSU
 

Rasdiir

Petty Officer 2nd Class
Joined
Jul 18, 2011
Messages
167
Replaced the floor bracing and managed to get the inside of the transom skin painted, I used Rustoleum SE primer, then Tremclad primer, then 2 coats of Tremclad in white. I didn't bother with hardener or rolling and tipping, this is just to help protect the once-full-of-holes-but-now-patched transom. I also got the replacement knee brace wing fabbed up and installed them using SS bolts with lots of 5200 and nylock nuts.

The next step was to try and Gluvit the bow seam and do another leak test before flipping to finish skimming the hull and painting, but when I went searching for the Gluvit I ordered last year from the rainforest store I realized that it had never actually been delivered. Placed a claim and ordered some Coat It instead, but it won't be here until later this week. Unfortunately I want to coat the stern rivets before I paint the bilge, and I want to paint the knee brace and bilge prior to installing the transom.

Since I couldn't move on with painting I kept going with cutting foam, managed to get most of it cut and glued into blocks with PL300.

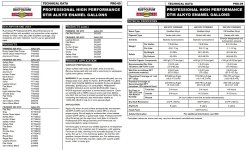
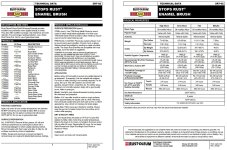
I have pretty much decided to forgo Rustoleum for the hull due to lack of availability and just use regular Tremclad Rust Paint with the hardener, although I would prefer the Tremclad Implement paint. My local store has Rust Paint in both the white and dark blue I want, and the price is only $35/quart or $97/gal, but no one seems to carry the Implement one in dark blue. I found some spec sheets for both the Rustoleum Pro and the Tremclad Rust Paint and they look close enough to me, can someone who knows paint let me know if they see any reason not to use this? I did find during a search that Renns used Tremclad so I sent a pm, but I don't think he's been back here for a while.

Transom skin painted and knee brace wings installed:
PXL_20240713_191423884.jpg

Foam cut and glued:
PXL_20240713_191416115.jpg

Rustoleum Pro specs:
Rustoleum Pro specs.jpg

Tremclad Rust Paint specs:

Tremclad specs.jpg
 

SHSU

Lieutenant Junior+Starmada Splash Of The Year 2019
Joined
Mar 8, 2017
Messages
1,741
Use whatever you can get locally/easily. When it gets scratched, will be easy to repaint with the same color/paint. Just my 2 cents

SHSU
 

Rasdiir

Petty Officer 2nd Class
Joined
Jul 18, 2011
Messages
167
So I'm on vacation for this past week and next week, then back to work for a week, then another week off, but despite all the free time I'm continuing with the slow and steady approach to this project (mostly because I'm a bit lazy lol). While waiting for my Coat-It, which is now being delivered in the middle of next week, I finished cutting the foam and decided to go ahead and install the new transom, I'll just tape it off when I paint the knee brace and bilge. I still have to sand and glue the foam that was just cut, and once I get the floor cut I will have to make space in the new foam blocks to account for seat stiffening blocks under the floor. I don't need stiffeners under the floor edges since I planned my braces to be where the floor edges will meet.

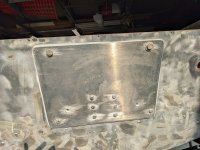
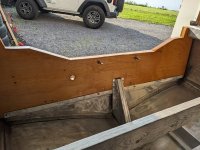
The transom was installed with the new 1/4" aluminum motor pad, but I used way too much 5200 to back butter the pad and install the bolts, which turned into an absolute mess of squeeze-out. Managed to get it all cleaned up, and then took a look at my splashwell before I installed the 3 bolts down each outside edge of the transom. My splashwell has a back plate that covers the wood where the splashwell is, but it doesn't go right to the sides and top corners of the transom. I really like the idea of having an inner skin over the wood instead of just painting it, so my options appear to be procure and cut a 68"x15" piece of 1/16 aluminum sheet or just add on a small piece of aluminum sheet to each edge. I would rather use a solid sheet, but that's going to be at least $100, plus I would have to drive 2hrs to pick it up.

Motor pad installed. The two motor bolts are just there to get enough pressure at the top, they will be removed tomorrow once the 5200 has cured a bit.
PXL_20240720_221424558.jpg

Inside of transom
PXL_20240720_221443127.jpg

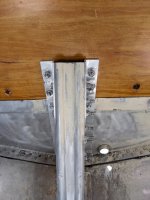
Transom and knee brace 1/4" SS bolts
PXL_20240720_221458649.jpg

Splashwell with back piece that I want to replace
PXL_20240720_233754855.jpg
 

Rasdiir

Petty Officer 2nd Class
Joined
Jul 18, 2011
Messages
167
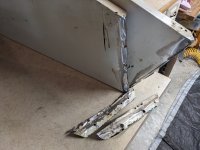
Got after it again today and managed to get both consoles and the splashwell sanded down and cleaned up for paint. The PO used 3/4" for his shoddy floor replacement, so to accommodate the extra height he bent the hell out of the bottom of the consoles. There was no way to recover it, so I cut off the bent parts and I will use a chunk of 1/8" 1x2 angle riveted to the console to attach it to the floor.

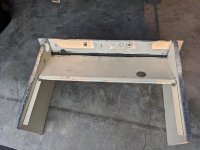
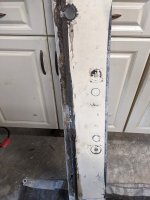
I also removed that back piece on the splashwell so I could clean up the PO's caulking mess at the seam. There was a decent amount of corrosion of that lip in the seam, but it shouldn't be a problem. I may throw some JBWeld in there, but undecided right now. I also used 1/16" angle to make two little brackets to brace the sides onto the actual spashwell tray, they were a bit floppy before and that's what caused the caulking cracking mentioned in the beginning of this thread.

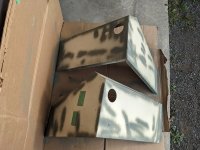
After I sanded, rinsed, and wiped with acetone I shot SE primer onto the bare metal portions of the consoles. Immediately after doing that I remembered that I still need to fill some screw holes on the tops, so tomorrow I will get out the JBWeld and take care of those.

Driver consoles before cleanup:

PXL_20240720_223401292.jpg

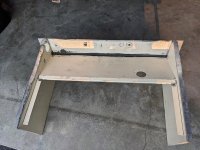
Bottom of consoles after cutting off the bent pieces:
PXL_20240721_151211005.jpg

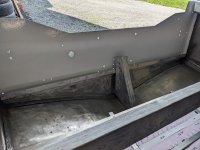
Spashwell before cleanup. Note the mass amount of poorly applied caulking in the seam, and also the cut piece in the top left by the steering hole, which I also braced with a piece of scrap and some rivets.
PXL_20240720_233754855.jpg

Splashwell back piece after removing. Tons of dirt and caulking in that seam, hence the corrosion:
PXL_20240721_200919279.jpg

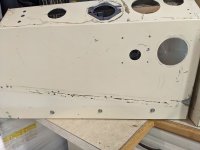
Consoles after SE primer on bare metal. The rest of the paint is in great shape, so I won't be removing it all. I also wanted to save the original capacity plate and import inspection tags that were on there, so I removed 3 that were riveted on and taped over 2 stickers.
PXL_20240721_222152779.jpg
 

Rasdiir

Petty Officer 2nd Class
Joined
Jul 18, 2011
Messages
167
Kept on going during my week off, managed to finish cleaning up and gluing the foam, I picked up my paint, and today I applied the Coat-It.

I did go with the Tremclad Rust Paint, although I made a last minute design decision at the store and will now be doing the top in Tremclad medium blue instead of dark blue. I picked up a gallon of primer and gloss white, and 2quarts of the blue. Forgot the SE primer, so I will have to go back for that at some point. I also figured out what might be an easy way to draw my line to separate the two colors: I want to make the line about 5-6" above my one lap on the side, so I can make a stick that extends the right distance and then just trace the lap. We'll see if it works when the time comes.

The Coat-It came in yesterday, so today I wire wheeled all the seams (and basically the entire inside bottom of the boat), then sprayed liberally with a 50/50 water/vinegar mix, then rinsed and scrubbed with a bristle brush. Let it sit in the sun for 2hrs to dry, and I took the air compressor and blew out the bow seams and under the knee brace to ensure they dried too. Pulled it back in the garage and used about 1/2 the 2lb kit to do the bow seam (outside with a syringe, inside got a thick coat with the brush), the bottom side seams and rear seam, and pretty much every rivet that I have put into the boat when doing patches and other replacements. I didn't bother doing the rib rivets, as any leak would come out under the rib flange anyway. Tomorrow I'll do a final leak test of that bow seam and then turtle it to finish the JBWeld and sanding of the outside bottom.

No pictures of Coat-It drying because the site was having trouble uploading them.
 

Rasdiir

Petty Officer 2nd Class
Joined
Jul 18, 2011
Messages
167
I think all the bending during the cleanup and Coat-It application tweaked my back, so I mostly took yesterday off, although I did get a final leak test of that slowly dripping bow seam done and I'm happy to report that this vessel now appears watertight! Next step is to flip and finish cleaning up the bottom before paint.
 

Rasdiir

Petty Officer 2nd Class
Joined
Jul 18, 2011
Messages
167
Got the bilge painted white, picked up the SE primer ($24.99CAD a can, ugh), and started filling in the extra holes on the consoles, and got the boat flipped. This week after work I will finish the second coat of JBWeld in the pits, then sand, clean, and tape for paint the week after.
5200 works great for that as well.

SHSU
I did use 5200 when installing the rivets, but since I'm new to the riveting game I figured an extra layer of Coat-It couldn't hurt. I still have 1/2 the Coat-It and I'm debating running some along all the outside seams before paint. I'm not that worried about the side and rear seam, but it may be worth painting an extra coat on the bow seam.
 

SHSU

Lieutenant Junior+Starmada Splash Of The Year 2019
Joined
Mar 8, 2017
Messages
1,741
I only used Gluvit on the interior, but guessing it wouldn't hurt on the exterior.

SHSU
 

Rasdiir

Petty Officer 2nd Class
Joined
Jul 18, 2011
Messages
167
Got the 2nd coat of JBWeld in all the pitting, and got it all sanded smooth. It's time for paint, so my plan for tomorrow is:
  • Hand sand the whole exterior with 180grit to knock off oxidization. I also have to do a bit of JBWeld sanding around the rivets where I couldn't get in with the random orbital;
  • Rinse, then spray with 50/50 water/vinegar mix, let sit for 30min;
  • Rinse again and dry;
  • Wipe the whole exterior with acetone;
  • Spray the SE primer. I have 4 cans, hoping I don't have to make an emergency run for more.
Is there any other prep I'm forgetting?
 

Rasdiir

Petty Officer 2nd Class
Joined
Jul 18, 2011
Messages
167
The weather wasn't perfect, about 29C and 78% humidity, but that was within the parameters of the Rustoleum SE primer so I managed to go through my whole list and got the whole exterior hull done with the first coat. I used every drop of 4 spray cans, and there's a few light areas, but I have seen in other builds that the SE primer doesn't really need a thick coat so I will be starting the first coat of regular Tremclad primer tomorrow.

The hardest items today were sanding the whole hull with 180, my sanding block broke halfway and it was also a real pain going around all the rivets. With the high humidity I was drenched in sweat by the end of sanding. After I rinsed the vinegar mix off I dried everything with a microfibre towel to speed up drying, but when I went out to spray the primer after 2hrs I realized that there was water stuck under the keel and strakes. Pulled out the air compressor and spent a while blowing water out from under them (took 3 separate blows with 30min drying time between), which seemed to do the trick. The worst part of spraying the primer was that I was sweating badly again and it kept dripping on either the bare hull or fresh primer, I had to wipe up and respray quite a few times.

Let everything dry for a few hours and now it's back in the garage for the rolled on coats.
 

Rasdiir

Petty Officer 2nd Class
Joined
Jul 18, 2011
Messages
167
Rolled on the first coat of Tremclad primer today. I was going to do a roll and tip, but as it turned out I got better results just rolling a thin coat on and going over it until the lines were gone, only ended up using the single 4" foam roller for the whole coat. It came out quite smooth for primer with very little orange peel, although it exposed my shoddy prep work, I did not fill and sand as well as I thought I did! Doesn't matter since there's 8 patches, a bunch of dents, and some pitting on the keel and strakes so this will never be a show boat anyway.

Tomorrow I will lightly sand off any bumps and lines with 320 and roll on the second coat of primer.
 

SHSU

Lieutenant Junior+Starmada Splash Of The Year 2019
Joined
Mar 8, 2017
Messages
1,741
We are our own biggest critiques. Others wont notice and will be impressed when they find out your did the rebuild yourself.

That being said, I am bad at imagining.... I need pictures ;);););)

SHSU
 

SHSU

Lieutenant Junior+Starmada Splash Of The Year 2019
Joined
Mar 8, 2017
Messages
1,741
Now I can visualize it!!!!. Like the 90 on the side.

SHSU
 

Rasdiir

Petty Officer 2nd Class
Joined
Jul 18, 2011
Messages
167
The weather was pretty good for paint at 21C and 65% humidity, so I got after it today and got the primer lightly sanded with 400, then wiped everything down and taped off my stripe with Frogtape. I had been thinking for a while about how to tape my lines straight, and I made a little jig to draw lines to follow with the tape. I just stuck the pencil through the holes and slid it along the rub rail at the bottom, made for a perfectly even line that matches the profile of the boat. I was doing two levels of stripe, so I just made one hole at 12" and the second at 6", then joined the lines on the angle (the pictures may explain it better).

My paint was a bit separated in the can since I had just grabbed it off the shelf, so I stuck a wooden spoon in my drill and stirred it for 5min, then mixed the paint with WOG's Rustoleum instructions of 2 cups of paint, 1/4cup acetone, and 30mL Majic hardener and got the first coat of white rolled on (I did find another thread from 2018 where WOG said the Majic reps now recommended a 1-8 mix of hardener/paint, but the my can said 1/16 so that's what I went with). The first half of the bottom and sides went well, it went on almost too thin and barely any tipping/second roll was required.

I could definitely tell the acetone was evaporating out of the mix for the 2nd half, it was getting pretty thick again by the time I finished the bottom. I also had to mix up another 1/2cup to finish off the 2nd side and the transom. Overall it went well, it's already highly glossy and fairly smooth.

 
Top