198x SS-150 rebuild

Rasdiir

Petty Officer 2nd Class
Joined
Jul 18, 2011
Messages
167
PO make restorations such an adventure. lol

SHSU
That they do, although the more I dig into this boat the more I appreciate that the PO at least had some idea. I have found quite a few reasonably well filled pits and scratches throughout the boat, and he took the time to make a fairly good floor and transom, attempt a transom brace, and use SS hardware. I think things could be a lot worse.


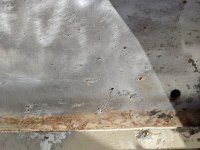
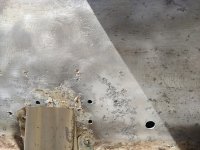
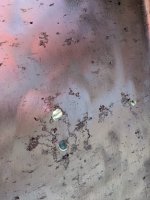
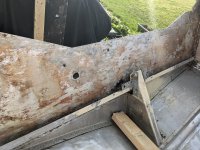
So I spent a bit more time with the nylon cup and wire wheel and am pretty much finished stripping the transom, just a tiny bit on some rivet heads and around the seams left. I found a ton of minor corrosion on the outside that will be easy to fill, and 4 small spots that are right through. The rivets heads that hold on the transom tray have a bit of damage, should I replace these? (you can kind of see them on pic 2 below).


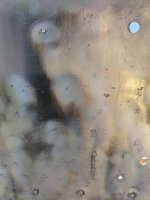
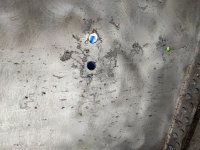
I also got the wood transom out, and did a quick run with the wire wheel on the inside of the skin. The pitting is more significant here, with many spots that are almost through, especially around the rear u-bolt holes and behind the upper part of the knee brace. Since the pitting is fairly spread out and the deep holes are not large I don't believe there will be a structural problem. Should I be looking into a more substantial repair than filling with jbweld? My current plan is to finish cleaning the pits with the wire wheel and the dremel, get some vinegar in the holes, then wash, fill with jbweld marine, sand, then I will paint the inside of the skin with Rustoleum Pro. The outside will get the same treatment but will be painted with Pettit EasyPoxy when I do the rest of the hull.


Transom pulled
PXL_20220513_222436740.jpg
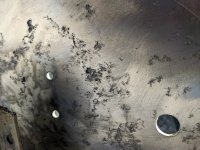
Pitting and two of the holes on the outside that were under the motor mount
PXL_20220514_155349507.MP.jpg
Pitting on the inside of the skin
PXL_20220514_155409550.jpg
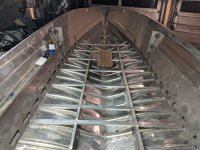
Pitting behind the knee brace
PXL_20220514_155421893.MP.jpg
Pitting by the port u-bolt mounting holes
PXL_20220514_155435439.MP.jpg
 

SHSU

Lieutenant Junior+Starmada Splash Of The Year 2019
Joined
Mar 8, 2017
Messages
1,742
I think every transom has to look like that for it to be a restore on here.... lol

Right or wrong, I just skimmed with JB weld when I patched mine.

SHSU
 

jdvasher

Petty Officer 1st Class
Joined
Jul 10, 2019
Messages
371
That they do, although the more I dig into this boat the more I appreciate that the PO at least had some idea. I have found quite a few reasonably well filled pits and scratches throughout the boat, and he took the time to make a fairly good floor and transom, attempt a transom brace, and use SS hardware. I think things could be a lot worse.


So I spent a bit more time with the nylon cup and wire wheel and am pretty much finished stripping the transom, just a tiny bit on some rivet heads and around the seams left. I found a ton of minor corrosion on the outside that will be easy to fill, and 4 small spots that are right through. The rivets heads that hold on the transom tray have a bit of damage, should I replace these? (you can kind of see them on pic 2 below).


I also got the wood transom out, and did a quick run with the wire wheel on the inside of the skin. The pitting is more significant here, with many spots that are almost through, especially around the rear u-bolt holes and behind the upper part of the knee brace. Since the pitting is fairly spread out and the deep holes are not large I don't believe there will be a structural problem. Should I be looking into a more substantial repair than filling with jbweld? My current plan is to finish cleaning the pits with the wire wheel and the dremel, get some vinegar in the holes, then wash, fill with jbweld marine, sand, then I will paint the inside of the skin with Rustoleum Pro. The outside will get the same treatment but will be painted with Pettit EasyPoxy when I do the rest of the hull.


Transom pulled
View attachment 360470
Pitting and two of the holes on the outside that were under the motor mount
View attachment 360471
Pitting on the inside of the skin
View attachment 360472
Pitting behind the knee brace
View attachment 360473
Pitting by the port u-bolt mounting holes
View attachment 360474

I didn't have that much corrosion on mine but I did have a bunch of unnecessary holes. I just got a sheet of aluminum and skinned over the transom. It wasn't that much and gave me some peace of mind. Not trying to convince you one way or another. just another option.
 

Rasdiir

Petty Officer 2nd Class
Joined
Jul 18, 2011
Messages
167
I didn't have that much corrosion on mine but I did have a bunch of unnecessary holes. I just got a sheet of aluminum and skinned over the transom. It wasn't that much and gave me some peace of mind. Not trying to convince you one way or another. just another option.
I'm hoping to avoid this due to the price of sheet aluminum here in Canada, not to mention the amount of riveting! Once I dig into the pits I'll have a better idea of how bad it is, but I think I can get away with plugging/skinning it.


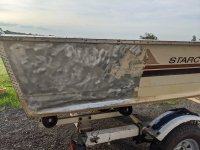
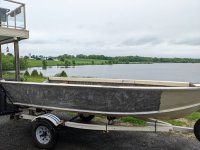
I've been slowly plugging away stripping paint as Mother Nature allows, after about 8hrs of work I'm almost done the starboard side. I keep feeling that there must be a better way to do this, the amount of scraping I'm doing is insane! This factory paint is tough and I'm dreading doing the bottom with all the rivets. My process so far is:


  • Apply thick layer of stripper on a 3ft section, then immediately cover with plastic wrap to keep moist, wait 45min
  • Use a 2" putty knife to scrape off the paint and ZC primer. This is absolutely brutal and requires so much pressure and just the right angle
  • Because only 1/2 the paint comes off on the first run, reapply stripper/plastic and wait again
  • Scrape again with the putty knife, pretty much everything comes off on this one.
  • Hit the whole area with the nylon cup brush to get any remaining paint and ZC off
  • Scrub the whole thing with a brush and a hose to get most of the paint stripper off


There's a little bit of dock rash near where the console will be, and one dent with a minor crease, but neither are too bad. I will sand out the rash and not worry about the crease.
PXL_20220520_232052248.MP.jpg
PXL_20220522_163049337.jpg
 

BWR1953

Admiral
Joined
Jan 23, 2009
Messages
6,195
I feel your pain! BTDT. 😏

It was absolute murder for me to get the paint off my Kingfisher. It took many attempts and easily $400 in tools and expendable supplies, if not more. Just for the stripping. And it took weeks and weeks and multiple attempts.

I ran into even more troubles while painting. Drove me nuts. And it simply wasn't cost effective in the end.

So for my Chieftain, I skipped doing the stripping and painting myself. I paid to have the hull dustless blasted and it was the best decision I could have made. The hull was completely stripped and ready in less than a day. Painting will be the same. And the cost for having both of those things done professionally will only be about 50% more than me "trying" to do it myself. :rolleyes:

And it won't take years off my life due to stress! :ROFLMAO:

I hope you get through this phase okay. (y) :cool:
 

MNhunter1

Lieutenant Junior Grade
Joined
May 12, 2014
Messages
1,058
What stripper are you using? I was pretty happy with Citristrip and never had to cover it with plastic.
 

Rasdiir

Petty Officer 2nd Class
Joined
Jul 18, 2011
Messages
167
What stripper are you using? I was pretty happy with Citristrip and never had to cover it with plastic.
Unfortunately Citristrip doesn't seem to be available in Ontario :(

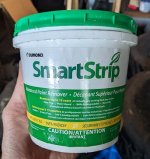
I was using the Solvable Resolve HD stripper, but I just tried this Dumond SmartStrip that my friend lent me and the paint came off like nothing with just a little scraping after only a 45min sit time, so I'm taking the new gallon of Solvable back. This will cut my time in half at least, very happy to discover this!
PXL_20220523_193107754.jpg
 

jdvasher

Petty Officer 1st Class
Joined
Jul 10, 2019
Messages
371
I'm hoping to avoid this due to the price of sheet aluminum here in Canada, not to mention the amount of riveting! Once I dig into the pits I'll have a better idea of how bad it is, but I think I can get away with plugging/skinning it.


I've been slowly plugging away stripping paint as Mother Nature allows, after about 8hrs of work I'm almost done the starboard side. I keep feeling that there must be a better way to do this, the amount of scraping I'm doing is insane! This factory paint is tough and I'm dreading doing the bottom with all the rivets. My process so far is:


  • Apply thick layer of stripper on a 3ft section, then immediately cover with plastic wrap to keep moist, wait 45min
  • Use a 2" putty knife to scrape off the paint and ZC primer. This is absolutely brutal and requires so much pressure and just the right angle
  • Because only 1/2 the paint comes off on the first run, reapply stripper/plastic and wait again
  • Scrape again with the putty knife, pretty much everything comes off on this one.
  • Hit the whole area with the nylon cup brush to get any remaining paint and ZC off
  • Scrub the whole thing with a brush and a hose to get most of the paint stripper off


There's a little bit of dock rash near where the console will be, and one dent with a minor crease, but neither are too bad. I will sand out the rash and not worry about the crease.
View attachment 361099
View attachment 361100
it may be too late. but check around for a mobile glass blasting company. I found a guy, came to the house and did the boat in the driveway. only charged a couple hundred. well worth it in my opinion. I just wish I would have done that from the beginning lol.
 

Attachments

  • PXL_20220122_171943140.jpg
    PXL_20220122_171943140.jpg
    5.6 MB · Views: 8

SHSU

Lieutenant Junior+Starmada Splash Of The Year 2019
Joined
Mar 8, 2017
Messages
1,742
That is the way to do it.

SHSU
 

Rasdiir

Petty Officer 2nd Class
Joined
Jul 18, 2011
Messages
167
it may be too late. but check around for a mobile glass blasting company. I found a guy, came to the house and did the boat in the driveway. only charged a couple hundred. well worth it in my opinion. I just wish I would have done that from the beginning lol.
Not too late as I haven't finished yet, but the new stripper is working incredibly well and I am now over half done the other side, very little hard scraping now!

I received my 3/16 rivet set and rivets today, so I'm ready to start plugging those screw holes as soon as the paint is off. There's about 50 rivets throughout the boat that have some form of damage to the head, mostly at the rear, so I'll thoroughly check those as well so I can get everything together once I start riveting. I'm hoping to spend some time this week sourcing 5/8 plywood for the floor (no pt, hopefully I can get ACX) and 3/4 for the transom.
 

Rasdiir

Petty Officer 2nd Class
Joined
Jul 18, 2011
Messages
167
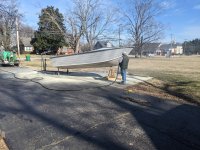
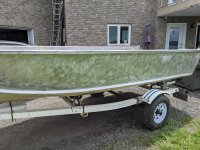
So despite my enthusiasm about the effectiveness of the new paint stripper, my working speed has actually decreased lol. The last three weeks have been spent off and on getting all the paint stripped from the top half, including the entire port side and both gunnels. The whole top half except the bow keel strip is now stripped and cup brushed clean. No significant corrosion, scratches, or dents, just one spot of dock rash on each side. I also picked up a sheet of ACX Fir plywood for the transom ($104CAD !!!!) along with the spar varnish, BLO, and mineral spirits to make the Old Timers Formula.


Yesterday I spent a few minutes practicing setting solid rivets, but it was not as easy as advertised on YouTube and only 1 of 4 was a good set. I had a hard time getting the test pieces to pull tight, it seemed like the rivet would only buck the tail from whatever position it was in when I started, the tail did not push the 2 pieces tight. Might make things challenging when I start putting pieces back together. I also need to find a proper bucking bar, as I was using the back of an axe head and it wasn't great. I seems like I had to really go on the air hammer to get it set, like 10 or so 10 second bursts. My 2gal pancake air compressor was turned all the way up too, although the pressure gauge to the tool is not accurate and I can't confirm the actual pressure. I'll spend more time practicing.


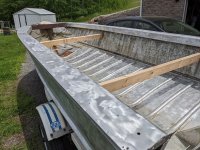
I also had another go at the transom skin with the dremel and small brass brush (it disintegrated after 2 min) and drill with the cup brush. Haven't cleaned out the inside of the pitting yet, but now I can see it is very widespread and there are at least 20-40 spots with either pin holes or deep, almost all the way through divots. The pitting is spread across the whole transom, although it is worse at the knee brace, motor and ubolt holes, and about 1" above the transom tray. I know @jdvasher did a re-skin, based on the pictures does that look necessary? A 3x6 sheet of 0.081 aluminum is around $260CAD plus tax and have to drive 2 hrs to get it (plus a ton more riveting), so really hoping to avoid all that.


I poked around the outside bottom of the hull and found another spot the PO covered with some flexy black goop, which was still in good shape. After goop removal and further investigation on the rest of the bottom it looks like I have 2 or 3 small (about 2mm) spots under ribs that have corroded through the hull. Should I be removing the ribs and attempting to drill this out and fill with a rivet, then replace the rib? After seeing the state of my riveting skills that might be a tall order. Would a patch on the outside that I can just rivet on either side of the rib work better? One problem with doing a patch is that I will not be able to remove any active corrosion because I would not remove the rib.
PXL_20220611_175803075.jpg
PXL_20220611_175810594.MP.jpg
PXL_20220614_231617286.jpg
PXL_20220614_231626321.jpg
 

BWR1953

Admiral
Joined
Jan 23, 2009
Messages
6,195
So despite my enthusiasm about the effectiveness of the new paint stripper, my working speed has actually decreased lol. The last three weeks have been spent off and on getting all the paint stripped from the top half, including the entire port side and both gunnels. The whole top half except the bow keel strip is now stripped and cup brushed clean. No significant corrosion, scratches, or dents, just one spot of dock rash on each side. I also picked up a sheet of ACX Fir plywood for the transom ($104CAD !!!!) along with the spar varnish, BLO, and mineral spirits to make the Old Timers Formula.


Yesterday I spent a few minutes practicing setting solid rivets, but it was not as easy as advertised on YouTube and only 1 of 4 was a good set. I had a hard time getting the test pieces to pull tight, it seemed like the rivet would only buck the tail from whatever position it was in when I started, the tail did not push the 2 pieces tight. Might make things challenging when I start putting pieces back together. I also need to find a proper bucking bar, as I was using the back of an axe head and it wasn't great. I seems like I had to really go on the air hammer to get it set, like 10 or so 10 second bursts. My 2gal pancake air compressor was turned all the way up too, although the pressure gauge to the tool is not accurate and I can't confirm the actual pressure. I'll spend more time practicing.


I also had another go at the transom skin with the dremel and small brass brush (it disintegrated after 2 min) and drill with the cup brush. Haven't cleaned out the inside of the pitting yet, but now I can see it is very widespread and there are at least 20-40 spots with either pin holes or deep, almost all the way through divots. The pitting is spread across the whole transom, although it is worse at the knee brace, motor and ubolt holes, and about 1" above the transom tray. I know @jdvasher did a re-skin, based on the pictures does that look necessary? A 3x6 sheet of 0.081 aluminum is around $260CAD plus tax and have to drive 2 hrs to get it (plus a ton more riveting), so really hoping to avoid all that.


I poked around the outside bottom of the hull and found another spot the PO covered with some flexy black goop, which was still in good shape. After goop removal and further investigation on the rest of the bottom it looks like I have 2 or 3 small (about 2mm) spots under ribs that have corroded through the hull. Should I be removing the ribs and attempting to drill this out and fill with a rivet, then replace the rib? After seeing the state of my riveting skills that might be a tall order. Would a patch on the outside that I can just rivet on either side of the rib work better? One problem with doing a patch is that I will not be able to remove any active corrosion because I would not remove the rib.
I too found a small hole near a rib which perforated the hull of my Chieftain and decided to pull the rib. Under the center of the pulled rib I found another hole. At that point I started pulling ribs until I was well clear of the corrosion area. In my case, it meant "only" pulling 3 ribs. But it had to be done. :cool:
 

jdvasher

Petty Officer 1st Class
Joined
Jul 10, 2019
Messages
371
others may have stated this already but it would be a good idea to add some chine braces since you are in there doing rivet work. Here is a pic of when I did mine.
 

Attachments

  • IMG_20191218_231638.jpg
    IMG_20191218_231638.jpg
    464 KB · Views: 24

Rasdiir

Petty Officer 2nd Class
Joined
Jul 18, 2011
Messages
167
others may have stated this already but it would be a good idea to add some chine braces since you are in there doing rivet work. Here is a pic of when I did mine.
Definitely planning on it, I actually have that picture saved as an example :)

I'm actually planning on beefing up the boat quite a bit to accommodate the motor, so I want to add chine braces, angle braces at floor seams that run from rib end to rib end and are also attached to the stringers, and will be attaching the rear storage frames and bow seating frames (both angle aluminum with wood/vinyl faces) directly to the hull sides/front/rear as well. If I can figure out a good system I also want to add a few gunnel braces to avoid flex when stepped on.

I am also pretty sure I will be fabricating a tray and wooden side panels, which the SS-150 didn't come with. I don't want this to look too much like a fishing boat, but I have also decided that stripping the old carpet glue from the sides is way too much work, so I will cover the top of the sides with floor vinyl and will use pleated white vinyl on the side panels, which will classy the interior up nicely. Bonus is a bit of extra foam for flotation behind the side panels.
 

SHSU

Lieutenant Junior+Starmada Splash Of The Year 2019
Joined
Mar 8, 2017
Messages
1,742
Yesterday I spent a few minutes practicing setting solid rivets, but it was not as easy as advertised on YouTube and only 1 of 4 was a good set. I had a hard time getting the test pieces to pull tight, it seemed like the rivet would only buck the tail from whatever position it was in when I started, the tail did not push the 2 pieces tight. Might make things challenging when I start putting pieces back together. I also need to find a proper bucking bar, as I was using the back of an axe head and it wasn't great. I seems like I had to really go on the air hammer to get it set, like 10 or so 10 second bursts. My 2gal pancake air compressor was turned all the way up too, although the pressure gauge to the tool is not accurate and I can't confirm the actual pressure. I'll spend more time practicing.

Couple things,
1. What kind of rivet gun do you have? A true rivet gun or an impact from Harbor Freight/Equivalent? I tried the Harbor Freight, then an Amazon Special, and finally a used Aircraft Rivet gun. It would have been cheaper if I had just gone to the used Aircraft Rivet Gun. Properly sized, it should buck a 3/16 rivet it 2-3 seconds at ~40 psi

2. If you are having issues getting it to set, you might need to cut some of the tail off before bucking. If its to long you will have a hard time getting it to properly set without folding first. Other option is to drill a 13/64 or 7/32 hole in your bucking bar and use it to help buck the tail to start. It prevents the tail from folding on you. Just be careful to not buck to much or it is a pain to get off. Don't ask me how I know....

SHSU
 

jdvasher

Petty Officer 1st Class
Joined
Jul 10, 2019
Messages
371
Couple things,
1. What kind of rivet gun do you have? A true rivet gun or an impact from Harbor Freight/Equivalent? I tried the Harbor Freight, then an Amazon Special, and finally a used Aircraft Rivet gun. It would have been cheaper if I had just gone to the used Aircraft Rivet Gun. Properly sized, it should buck a 3/16 rivet it 2-3 seconds at ~40 psi

2. If you are having issues getting it to set, you might need to cut some of the tail off before bucking. If its to long you will have a hard time getting it to properly set without folding first. Other option is to drill a 13/64 or 7/32 hole in your bucking bar and use it to help buck the tail to start. It prevents the tail from folding on you. Just be careful to not buck to much or it is a pain to get off. Don't ask me how I know....

SHSU
I second this, there is a big difference between the air chisel guns and real rivet guns
 

Rasdiir

Petty Officer 2nd Class
Joined
Jul 18, 2011
Messages
167
Couple things,
1. What kind of rivet gun do you have? A true rivet gun or an impact from Harbor Freight/Equivalent? I tried the Harbor Freight, then an Amazon Special, and finally a used Aircraft Rivet gun. It would have been cheaper if I had just gone to the used Aircraft Rivet Gun. Properly sized, it should buck a 3/16 rivet it 2-3 seconds at ~40 psi

2. If you are having issues getting it to set, you might need to cut some of the tail off before bucking. If its to long you will have a hard time getting it to properly set without folding first. Other option is to drill a 13/64 or 7/32 hole in your bucking bar and use it to help buck the tail to start. It prevents the tail from folding on you. Just be careful to not buck to much or it is a pain to get off. Don't ask me how I know....

SHSU
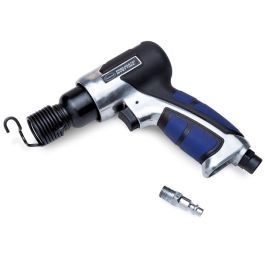
Just a cheap Mastercraft air hammer, that is definitely part of my problem. I looked around for aircraft rivet guns but the cheapest I could find even used was well over $200, so I'm going to try and practice a bit more with the air hammer before going that route. I don't think the length was too bad, I was using 3/8 for two pieces as recommended in the rivet thread, and it seemed like the tail was about the 1.5x rivet tail diameter recommended in the videos I watched. I may have been applying too much pressure to the bucking steel as well.
 

BWR1953

Admiral
Joined
Jan 23, 2009
Messages
6,195
Just a cheap Mastercraft air hammer, that is definitely part of my problem. I looked around for aircraft rivet guns but the cheapest I could find even used was well over $200, so I'm going to try and practice a bit more with the air hammer before going that route. I don't think the length was too bad, I was using 3/8 for two pieces as recommended in the rivet thread, and it seemed like the tail was about the 1.5x rivet tail diameter recommended in the videos I watched. I may have been applying too much pressure to the bucking steel as well.
I was reading this thread yesterday morning and afterwards I spent hours and hours researching air hammers vs rivet guns because I'm in the same boat, so to speak. :sneaky:

And I learned a great deal.

The difference between an air hammer and a rivet gun is like the difference between a jackhammer and a jewelers hammer. Huge difference! And different purposes for each. The air hammer is a brute force beast and a rivet gun is a finesse tool. An air hammer can tear a car apart with a chisel tip. Not so, the rivet gun.

An air hammer has 1.5 inches or 2.5 inches of stroke and slams down hard on the rivet, smashing it into place. The air hammer trigger is on/off and doesn't provide much control. A rivet gun has much shorter stroke, (the Eastman gun has a quarter inch stroke), a variable trigger and lighter force. This allows for correctly setting, filling and bucking the rivet.

I too, bought a $15 Harbor Freight air hammer. Mostly because I figured I'd only need to buck a dozen or two rivets and it would work "good enough." However, it turns out that I'll be installing hundreds of new solid rivets and I realized that I need the correct tool. The air hammer smashed the rivets down hard, leaving them ugly on the head. And it's difficult to use.

After much searching yesterday, I decided on and ordered an Eastwood rivet gun. It was $92.97 but will be the correct tool for the job. It'll be delivered sometime next week.


And here's a video of it in use. They're promoting it as part of a kit, which I didn't need. So I ordered just the gun.

Good luck and have fun! :)


Rasdiir

Petty Officer 2nd Class
Joined
Jul 18, 2011
Messages
167
Admiral and I redid the entire boat, so we needed a good rivet gun. Plus I went with a 4X so I could do 3/4. Pretty sure below is where I got mine.

https://www.yardstore.com/riveting/pneumatic-tools/rivet-guns/surplus-pneumatic-rivet-guns

SHSU
I took a look on that site, the prices are good but I would get killed on UPS brokerage fees, I ended up paying a total of $90CAD shipping and brokerage for my $45 worth of rivets!

I took a few more tries at riveting on a practice piece and wasn't satisfied, so I ended up getting this 3x rivet gun and a proper bucking bar from Aircraft Spruce: https://www.aircraftspruce.ca/catalog/topages/econorivguns.php. I also picked up a tube of 5200. I have a hard time telling if I've driven a rivet enough. I'm not getting the nice flat shop head that I see in videos, but when I look in the boat it seems the Starcraft builders didn't either on at least half the rivets, so I'm still confused as to what is good enough.

Not a whole lot of other progress the last couple of weeks, I've been exhausted from work and busy with my daughter on the weekends. I did get out once with the wire wheel and took another crack at the transom. I ended up getting a bit stuck in my dremel so that was out of service and I thought I was done, but then I realized I have an air powered dremel in the same kit I got the air hammer! Just need to dig out the last bits of corrosion and then I will apply the jbweld to fill in the pits.
 
Top