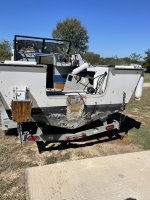
1987 Starcraft islander 190v?

MNhunter1

Lieutenant Junior Grade
Joined
May 12, 2014
Messages
1,053
Thanks for the reply. I was afraid of that lol just trying to minimize down time and take care of the necessities. But corrosion is a necessity so that’s what I will probably be doing
Not very difficult or time consuming to drill out the rivets and reinstall after addressing the corrosion. Well worth it in my opinion.
 

SHSU

Lieutenant Junior+Starmada Splash Of The Year 2019
Joined
Mar 8, 2017
Messages
1,725
A Hydraulic riveter from HF make replacing the rivets quick and easy.

SHSU
 

87Starcraft

Petty Officer 2nd Class
Joined
Sep 15, 2021
Messages
135
Not very difficult or time consuming to drill out the rivets and reinstall after addressing the corrosion. Well worth it in my opinion.
For sure I haven’t looked at them I thought they were solids... thanks for the tips I’m definitely gonna do that
 

87Starcraft

Petty Officer 2nd Class
Joined
Sep 15, 2021
Messages
135
I looked at the stringers today. My stringers are secured with solid rivets and run under each rib in the middle. This may be an outboard thing?
 

87Starcraft

Petty Officer 2nd Class
Joined
Sep 15, 2021
Messages
135
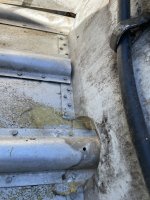
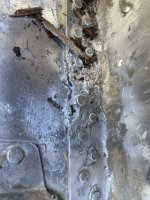
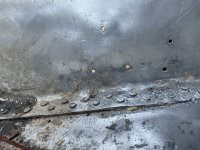
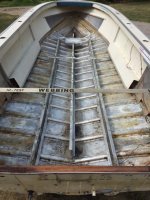
Found more corrosion. Got the outboard off .
 

Attachments

  • 2C2D751F-0EAA-456A-82D5-314C6CB06635.jpeg
    2C2D751F-0EAA-456A-82D5-314C6CB06635.jpeg
    2 MB · Views: 40
  • 2F2D3C4B-3F1A-430E-B8E6-69445CF8EF4C.jpeg
    2F2D3C4B-3F1A-430E-B8E6-69445CF8EF4C.jpeg
    1.9 MB · Views: 39
  • DB65476C-4F1B-43CB-92A2-8642AA429776.jpeg
    DB65476C-4F1B-43CB-92A2-8642AA429776.jpeg
    2.4 MB · Views: 40

MNhunter1

Lieutenant Junior Grade
Joined
May 12, 2014
Messages
1,053
I looked at the stringers today. My stringers are secured with solid rivets and run under each rib in the middle. This may be an outboard thing?
Those are the ribs, and yes, secured with solids. The stringers are what support the deck and typically secured with blinds. Whole different ball game removing the ribs, but if the corrosion is needing to be addressed, there are several here that have tackled it before.
 

SHSU

Lieutenant Junior+Starmada Splash Of The Year 2019
Joined
Mar 8, 2017
Messages
1,725
@classiccat is the resident expert when it comes to corrosion.

For me I just used an angle grinder with a wire wheel and vinegar.

SHSU
 

87Starcraft

Petty Officer 2nd Class
Joined
Sep 15, 2021
Messages
135
How should I patch holes that are going to be directly behind the transom core? I found twenty holes 10 from trim tabs I do not want to put back on and the other ten from sheet metal screws 🤔
 

Attachments

  • E165D115-5712-4116-9F69-7F983D35D630.jpeg
    E165D115-5712-4116-9F69-7F983D35D630.jpeg
    2.5 MB · Views: 16

87Starcraft

Petty Officer 2nd Class
Joined
Sep 15, 2021
Messages
135
Those are the ribs, and yes, secured with solids. The stringers are what support the deck and typically secured with blinds. Whole different ball game removing the ribs, but if the corrosion is needing to be addressed, there are several here that have tackled it before.
My bad for not responding. The picture there are the stringers and they are secured to the hull skin under the middle rib sections. But not secured under the rib sections that run the width of the boat.secured with solids
 

Douglasdzaster

Petty Officer 1st Class
Joined
Sep 11, 2020
Messages
315
Shane, it looks like you’re getting plenty of help. Isn’t this a great forum.
Hang in there and these guys will get you through. Keep us posted on your progress.
Ill let you know how I do on Bastrop. Going to try a different approach. River’s way to low right now.
 

87Starcraft

Petty Officer 2nd Class
Joined
Sep 15, 2021
Messages
135
Shane, it looks like you’re getting plenty of help. Isn’t this a great forum.
Hang in there and these guys will get you through. Keep us posted on your progress.
Ill let you know how I do on Bastrop. Going to try a different approach. River’s way to low right now.
This is the best forum for these aluminum boats.
 

87Starcraft

Petty Officer 2nd Class
Joined
Sep 15, 2021
Messages
135
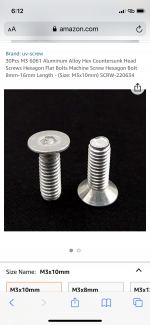
So. I don’t care about how the repair looks. But I do care about it never leaking again. And considering the transom is going to be against the transom skin I’m not sure if I can stick solids and that wood be up against the bucktails. Would placing these be a good alternative.

maybe not countersunk heads but a flat head if I can find it
 

Attachments

  • 1D70A4D8-A4C5-4C9D-BE56-A088FFFE81C4.png
    1D70A4D8-A4C5-4C9D-BE56-A088FFFE81C4.png
    3.4 MB · Views: 2

MNhunter1

Lieutenant Junior Grade
Joined
May 12, 2014
Messages
1,053
The stringers run fore/aft on top of the ribs to support the deck. The ribs run port/starboard and are secured directly to the hull skin. The system as a whole when secured together along with the side panels, splashwell, gunnels, etc., are engineered to provide structural stability to the overall hull.

IMG_0390.JPG

I'm assuming your corrosion concerns are related to the saturated pour in foam sitting against the hull skin and ribs and you are inquiring about removing the ribs to assess and/or address what might be hiding under the ribs. Is this correct?
 

87Starcraft

Petty Officer 2nd Class
Joined
Sep 15, 2021
Messages
135
So that’s not a good picture but the right side of the photo is the stringers and I was just stating my stringers are secured with solids. I was wondering if that was because it was an outboard and where the hull skin goes down at an angle and meets the stringers is very difficult to get a brush or drill into. I don’t think they need to be removed I don’t believe the corrosion is underneath just where the water say against the stringers they are are up in a couple isolated places.
 

87Starcraft

Petty Officer 2nd Class
Joined
Sep 15, 2021
Messages
135
Also mine don’t sit on the ribs like yours do. My stringers have half circles in them going over each rib. I’m just gonna get an oversized stainless steel brush on a grinder and a dremel and try to tackle it that way. I just figured someone had a unique way of getting into that tight angle
 

MNhunter1

Lieutenant Junior Grade
Joined
May 12, 2014
Messages
1,053
Yep, stainless brush and/or nylox brush on a drill or grinder, dremel for more detailed work. Hit the areas with 50/50 vinegar/water spray, let sit for a bit and rinse thoroughly. Once they're all clean out and the corrosion is removed, you can assess how best to address them. Will they need a patch, or fill/skim with MarineTex, etc.?
 

87Starcraft

Petty Officer 2nd Class
Joined
Sep 15, 2021
Messages
135
Yep, stainless brush and/or nylox brush on a drill or grinder, dremel for more detailed work. Hit the areas with 50/50 vinegar/water spray, let sit for a bit and rinse thoroughly. Once they're all clean out and the corrosion is removed, you can assess how best to address them. Will they need a patch, or fill/skim with MarineTex, etc.?
I’ve got a couple of patches and a bunch of jb backfill. I have all my aluminum stock, rivets, jb weld, and 5200. I also have the marine plywood and epoxy and 6 oz cloth from us composites. Trying to tackle corrosion then I will be doing glove it on All seems and reassembly. I really appreciate your help and everyone else’s. I wouldn’t have a clue what to do with this tub if it hadn’t been for the veteran members here.
 

SHSU

Lieutenant Junior+Starmada Splash Of The Year 2019
Joined
Mar 8, 2017
Messages
1,725
So. I don’t care about how the repair looks. But I do care about it never leaking again. And considering the transom is going to be against the transom skin I’m not sure if I can stick solids and that wood be up against the bucktails. Would placing these be a good alternative.

maybe not countersunk heads but a flat head if I can find it

I know some have drilled holes in the wood transom where the buck tails came through to give the space needed for a flush fit. Don't need much of a hole, just time to figure out where each holes needs to be drilled.

SHSU
 

classiccat

"Captain" + Starmada Splash Of The Year 2020
Joined
Dec 20, 2010
Messages
3,412
a trick for plugging the hole behind the transom core:
  1. put a big chamfer on the interior side of the hole.
  2. give a solid rivet a healthy dose of 5200
  3. buck the rivet
  4. grind the bucktail flush with the transom skin; the chamfer will fill-in with aluminum that gets smashed down and hold the rivet in place even though you're grinding the protruding bucktail away.
 
Top