1987 Ski Centurion Tru Trac II - First Time Rebuild - Floor, Engine, Dash, etc.

Status
Not open for further replies.

garbageguy

Lieutenant Commander
Joined
May 8, 2012
Messages
1,537
AH!! I consider "old' to be a synonym for experienced...

I wish there were more people out there that would consider that, especially as I become more - "experienced".

I continue to enjoy watching your work and such. Good stuff, keep it up. Can't wait to see your splash, and you skiing with your boat, enjoying time on the water with good friends
 

ACon977

Senior Chief Petty Officer
Joined
Nov 21, 2017
Messages
759
I wish there were more people out there that would consider that, especially as I become more - "experienced".

One of my biggest pet peeves are people who think they know better than someone else without any sort of reasoning and explanation. I am a very fact and proof based person, and love to have my thoughts challenged, so long as you dont say "because I'm right". This forum has so many people who know what they are doing, and have great reasoning as to why, due to something they have done or someone they know have done; which comes with experience. ThereforeI feel like the more you see/hear/experience over the years the more you learn.

I continue to enjoy watching your work and such. Good stuff, keep it up. Can't wait to see your splash, and you skiing with your boat, enjoying time on the water with good friends

Glad to have you following along!! Its entertainment for me to take pictures and update as I go, a nice break at work while I'm updating based on milestones, and a great reference for things I know little, or nothing, about.
I cant wait to be out on the boat, but am trying to think things through rather than just rush into it.
 

ACon977

Senior Chief Petty Officer
Joined
Nov 21, 2017
Messages
759
I got about 3 hours of grinding done yesterday to smooth out the fillets and any globs of PB that wasnt where it was supposed to be. It was probably overkill, but I think its going to make laying the mat to be much easier and less frustrating.

If I was to go back. I would recommend doing one side of the stringer at a time, and making smaller batches of PB so that I have more working time to make the fillets cleaner and have less bumps and whatnot. Its really just whenever you want to put in the effort. If I had spent more time with the PB, I would have spent less time grinding.

Classic pay me now, or pay me later. Oh well. Excited to be prepped to lay glass over the stringers this week!
 

TRH299

Petty Officer 2nd Class
Joined
Aug 4, 2017
Messages
123
Hey Tim,

I would recommend ski-it-again.com they have a really good selection of skis from super high end 2018 models to older skis that people just want to find a good home for. You can get caught on Ebay buying something that is not worth the price. Pretty much everything on there is quality equipment.

After skiing on an old crap combo ski Sunday, I decided life is too short so I just pulled the trigger on this Radar Theory (same as TimR71's) I found on the ski it again site you recommended. It has a Radar Vector front boot and an RTP. I hope it is big enough as it is a 65" and I am 5'8" 150 lbs. I was looking for a 66" but this deal was too good to pass up. Ski should show up early next week.

2012RadarTheory.jpg


RadarVector.jpg
 

Timr71

Petty Officer 1st Class
Joined
Jul 19, 2012
Messages
326
Wow! That's awesome. I haven't had a chance to ski on mine yet. I did order a RTP from Wiley's and it should be here in a few days. We'll have to compare notes. Mine is a 67, and I was advised to try to ski the biggest ski that you can turn. I've been on 65" skis for years. And, I'm not a big guy either. 5'9" about 152 pounds. We'll see how it goes.
 

ACon977

Senior Chief Petty Officer
Joined
Nov 21, 2017
Messages
759
After skiing on an old crap combo ski Sunday, I decided life is too short so I just pulled the trigger on this Radar Theory (same as TimR71's) I found on the ski it again site you recommended. It has a Radar Vector front boot and an RTP. I hope it is big enough as it is a 65" and I am 5'8" 150 lbs. I was looking for a 66" but this deal was too good to pass up. Ski should show up early next week.

I'm glad you took the dive! Skiing on a combo ski gets the job done... but there is something to be said about a ski that turns for you And that is a NICE looking ski!!! Great condition!!!:roll: and getting a nice set of Vector boots on it is a plus! those things are super comfortable and pretty expensive when new. Wileys have better control of the ski but I cant ski for very long in them. i Wileys on my jump skis, slalom and trick are soft shell.

I feel like a 65 will be fine, it just all depends on how aggressive of a skier you are, with a shorter ski you can throw your weight too far forward and "crush" on your turn, so it'll take some time getting used to a slightly more gradual turn with a more balanced stance on your ski.

Wow! That's awesome. I haven't had a chance to ski on mine yet. I did order a RTP from Wiley's and it should be here in a few days. We'll have to compare notes. Mine is a 67, and I was advised to try to ski the biggest ski that you can turn. I've been on 65" skis for years. And, I'm not a big guy either. 5'9" about 152 pounds. We'll see how it goes.

Ive always skied a 66 but consider myself a pretty balanced skier, A buddy of mine is your size Tim and he had a 67.5. He is a phenomenal skier and could get into 35off but you could tell he would have to throw his weight at the ski to turn the buoy. Again, all depends on your skiing style! Ive skied 67s and they feel slow in the turn in comparison to my 66. but they are more stable if you get aggressive.

Yay for Radar friends! :tea:

although I must admit. I did just buy a 2015 Goode Nano on Ski-It-Again to try out, Ive read a bunch of great reviews on it, and with a good deal, I thought it would be a fun ski to try out.
 

mickyryan

Rear Admiral
Joined
Apr 18, 2016
Messages
4,210
i used to waterski even barefoot ski but i shattered ankle at 25 and that ended that , never tried again out of fear since i only had 60 % of the bones lft , better to not chance it
 

Mad Props

Lieutenant Commander
Joined
Jul 8, 2016
Messages
1,766
i used to waterski even barefoot ski but i shattered ankle at 25 and that ended that , never tried again out of fear since i only had 60 % of the bones lft , better to not chance it

I feel you lol... I dislocated my shoulder snowboarding 3 winters ago and now I'm afraid to do anything that could cause it to pop out again, because they said once it happens once, its much easier for it to happen again and its got me paranoid... I remember tubing last summer on the lake and flipping off and my arm made a weird sound and for a 2nd it was time to get back to the ER... luckily it was ok..

I don't understand how you guys can even get out of the water on a single ski... I've tried many times and it feels like that shoulder is gonna come right back out lol
 

mickyryan

Rear Admiral
Joined
Apr 18, 2016
Messages
4,210
well to be fair i was young and very light :) heck we would ski behind a glastron tri hull with i think a 50 rude lol barfoot was painful and took a faster boat but i only did it a couple times and wasn't enjoyable to me.
 

mr300z87

Senior Chief Petty Officer
Joined
Sep 15, 2010
Messages
694
Hi, I have been quickly following along. I have always loved these style of boats my former friend (as I call him now) used to have and may still an early 80s Ski Nautique we would ski that thing all day long when Barnegat bay would lay down flat for us. It is not really a boat made for our area cool to run none the less. Reading about you skiing brings back fond memories as I to did my share of slalom skiing. It has been probably 8 years since got up on my 30 year old Connelly Shortline 2 and about 4 since skiing at all. I guess you can say I am experienced, so as much as I want to ski I also don't want to hurt myself either. Just living though reading this thread and fond memories of tearing it up back in the day.

I look for war to watching your progress she will be really cool when done.

BTW was that and Australian Shepard back in a post a couple week ago? Have a great day
 

ACon977

Senior Chief Petty Officer
Joined
Nov 21, 2017
Messages
759
i used to waterski even barefoot ski but i shattered ankle at 25 and that ended that , never tried again out of fear since i only had 60 % of the bones lft , better to not chance it

Nice Mikey! Sad to hear an injury got you out of it. My brother and I hit a piece of firewood someone had hucked into the lake when we were barefooting and he split his foot really bad. It was just tissue, no bone breaks, so he healed up quickly and is back on the water now. But after that footing scares me a bit, Ill still do it from time to time though, its quite the rush going so fast!


I feel you lol... I dislocated my shoulder snowboarding 3 winters ago and now I'm afraid to do anything that could cause it to pop out again, because they said once it happens once, its much easier for it to happen again and its got me paranoid... I remember tubing last summer on the lake and flipping off and my arm made a weird sound and for a 2nd it was time to get back to the ER... luckily it was ok..

I don't understand how you guys can even get out of the water on a single ski... I've tried many times and it feels like that shoulder is gonna come right back out lol

Shoulder dislocations are something to take seriously for sure, once you get scar tissue built up from having it pop in/out a few times it just doesn't heal right. Glad to hear you've only had the one issue so far. From water skiing, pole vaulting, swimming, and working odd jobs growing up my shoulders hurt quite a bit, but no injuries as of now (thankfully).

Getting up on one is much different than 2 for sure! you still need the same seat positioning but you have to be leaning forward to have less drag on the ski to help you pop up quicker, if not you can drag and drag and never come out of the water which makes you feel like you're getting torn in half by the boat lol. Takes quite a bit of time and balance to ride that fine line between too far forward and too far back. Plus the side to side stability is tough. Exciting when you get it though!
 

ACon977

Senior Chief Petty Officer
Joined
Nov 21, 2017
Messages
759
Hi, I have been quickly following along. I have always loved these style of boats my former friend (as I call him now) used to have and may still an early 80s Ski Nautique we would ski that thing all day long when Barnegat bay would lay down flat for us. It is not really a boat made for our area cool to run none the less. Reading about you skiing brings back fond memories as I to did my share of slalom skiing. It has been probably 8 years since got up on my 30 year old Connelly Shortline 2 and about 4 since skiing at all. I guess you can say I am experienced, so as much as I want to ski I also don't want to hurt myself either. Just living though reading this thread and fond memories of tearing it up back in the day.

I look for war to watching your progress she will be really cool when done.

BTW was that and Australian Shepard back in a post a couple week ago? Have a great day

Hey mr300z87 ! Glad to have you following along! Its a really fun looking boat, and a 351W is a great reliable engine with plenty of power to do everything we need! I cant wait until we get it out on the water. But there is still a lot of work to do to get us to that point.

I was luckily to grow up on a lake in MI since I was 6 and joined a local show skiing team there. Learned pyramids, rope doubles, strap doubles, barefoot, jump, trick ski, and everything in between. It was such a riot! Loved the small town feel of skiing with your neighbors every week.

When I went to college I found that there was a competitive ski team at Michigan State University and so I joined up and competed in 3-event there for 4 years. Slalom, Trick, and Jump were the 3 events, we ended up competing in collegiate nationals in 2014 and 2015 and placed pretty well. Now I'll do a tournament every now and then, but without access to a boat everything is rusty as all get-out so I typically get out on the water when i can and have fun rather than practice for competition.

And Yes! Maya (pup) is an Australian Shepherd / German Shepherd 50/50 mix. I've had her since she was a puppy and we do all our adventures together! She truly has a tough life haha

20180311_102742.jpg
 

Attachments

  • 20180311_102742.jpg
    20180311_102742.jpg
    595.3 KB · Views: 0

ACon977

Senior Chief Petty Officer
Joined
Nov 21, 2017
Messages
759
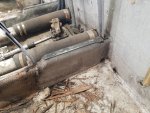
With all the fun skiing talk out of the way... Time to share my most recent update! Super excited to have finally started glassing the stringers! I spent ~1hr of prep (cleaning the boat, cutting glass, measuring where I wanted to do my joints, etc.), and then put the mask on and spent about 5 hours glassing. By the time I was done it was past 11pm lol whoops. But overall I am SUPER happy and proud of how everything turned out, I vowed to have a zero bubble, zero dry fiber glassing in the boat so I definitely spent an extra bit of time than maybe was necessary. But I think it was well worth the extra effort.

note: there is some dry glass in the bottom right of the 2nd photo, this is where I stopped glassing near the rear of the boat since I hadnt made up my mind on how I wanted to do the drainage.

Click image for larger version  Name:	20180620_230533-1512x2016.jpg Views:	1 Size:	821.7 KB ID:	10595898 . Click image for larger version  Name:	20180620_230528-2016x1512.jpg Views:	1 Size:	657.5 KB ID:	10595899

I decided to do the CSM with the Tab, Tab, Cap method. doing 5" legs on the side, and a 7" cap overt top. This took a majority of the time since my stringers are ~14ft and with 4ft lengths of tabbing, it took 12 different pieces to do the whole thing. And with the Poly setting up after 15-20min I was only able to do 1-2 pieces at a time.

The Mat went faster, I cut one big piece and set it over the top of the stringer, then used the poly and CSM layer which was still tacky to get it to mostly form into place. I then rolled out a MINIMAL amount of Poly over the top just enough to let it go clear (like Woodonglass recommended multiple times). It worked out great, but a bit of Poly still pooled around the corners where my fillets were. I'm not too worried about that though.

Click image for larger version  Name:	20180620_190409-2016x1512.jpg Views:	1 Size:	729.0 KB ID:	10595900

So now, I am 1/4 of the way done to being ready for the floor lol, not to mention all of my wiring and hoses I want to make conduit/raceways for. Seems like it took a really long time, but I was being really meticulous so I'm not totally surprised.


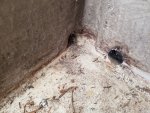
One thing that I have a question on. In the back, there are drain plugs going out the back of the boat. In addition to the one that is in the center under the motor. It seems like these are for any sort of gas leak/overflow to be able to drain, because they are on the outside of the stringers. I was planning on not putting in the holes, and having the stringers mate to the hull, then sealing off that section from the foam with bulkheads, but wanted to see what you all thought.

Before, there were holes through the rear part of the stringer to connect the center area with the outside areas. This is also where all the rot began because it doesnt seem like they did much thought with this. It also allowed water to get to the foam which was a bad idea.

In the image below I have the back of my boat. My profile cut of my stringers was not great :blue: as you can see by the gap (there was a bump up that I measured off the old stringer, but apparently was not as exaggerated as I thought. I plan to fill that in with PB and then glass over top. In the back corner I cut the stringer to match the "hole" that was in the old ones, but the more I think, I want to just fill those in with PB and glass over as well. Then I would isolate the little hole right next to the stringer (the drain plug) within a bulk head that I would put just in front of my little profile mistake.

Click image for larger version  Name:	20180620_173207-2016x1512.jpg Views:	1 Size:	724.3 KB ID:	10595901
 
Last edited:

ACon977

Senior Chief Petty Officer
Joined
Nov 21, 2017
Messages
759
Here are old pictures of what the drainage looked like originally. Im just not a huge fan of having water flowing through the stringers. Or it having access to the foam on the outer sections.

20180416_165223-1612x1209.jpg


20180416_165227-1612x1209.jpg
 

Attachments

  • 20180416_165223-1612x1209.jpg
    20180416_165223-1612x1209.jpg
    574.7 KB · Views: 1
  • 20180416_165227-1612x1209.jpg
    20180416_165227-1612x1209.jpg
    652 KB · Views: 1

ACon977

Senior Chief Petty Officer
Joined
Nov 21, 2017
Messages
759
:bump2:

To get some some thoughts on how best to do the rear drainage. Or what they are even for??
 

Woodonglass

Supreme Mariner
Joined
Dec 29, 2009
Messages
25,924
I'd lose all the holes except the bilge drain unless the other holes are clearly ABOVE the water line of the hull. Creating some limber holes in the stringers is fine but I drill em over size and then use pvc pipe PB's into the holes to allow water to get to the bilge from any of the stringer channels. When the bow is up any water should be able to move to the stern and exit via the bilge. IMHO your first time glassing efforts came out GREAT!!! It's slow going at first but once you've done several pieces and start to understand good technique, time limitations and mat and fabric handling, you'll get faster and faster. If you need more time use a 1% mix. That's totally acceptable. On Really hot days where you need to glass you can even drop to a .75% ratio.

Keep up the good work.
:eagerness::thumb::hail:
 

ACon977

Senior Chief Petty Officer
Joined
Nov 21, 2017
Messages
759
I'd lose all the holes except the bilge drain unless the other holes are clearly ABOVE the water line of the hull. Creating some limber holes in the stringers is fine but I drill em over size and then use pvc pipe PB's into the holes to allow water to get to the bilge from any of the stringer channels. When the bow is up any water should be able to move to the stern and exit via the bilge.

I agree with you there. I just wasnt sure if anyone knew why these plugs were there for. Timr71 any thoughts on your boats? what did you do at this point?
I have a bilge that was located below the engine and one drain in the center of the boat. I think that that is enough. The only reason I can think to have these are for a major gas leak. I think I'm going to go with my first thought of PB and glassing over these to create a full seal all the way around.

MHO your first time glassing efforts came out GREAT!!! It's slow going at first but once you've done several pieces and start to understand good technique, time limitations and mat and fabric handling, you'll get faster and faster.

Thanks! I thought it went great as well! And LOL jokes on me for thinking I had zero bubbles, when I checked on it all last night there were a few places that had pulled apart and made a pocket. But overall not too many, and I was impressed.

If you need more time use a 1% mix. That's totally acceptable. On Really hot days where you need to glass you can even drop to a .75% ratio.

Keep up the good work.
:eagerness::thumb::hail:

Ok Ill be sure to keep my mixing ratio in mind. The time was ok, I just had to make 18oz batches because I was taking so long to work it into the fabric.
 

TRH299

Petty Officer 2nd Class
Joined
Aug 4, 2017
Messages
123
I have no idea about the reason for the plugs outside the stringers, but on my boat, my outer foam filled bays did have moisture down at the bottom of the foam. I attribute that to poor original joint construction and leaking screw holes through the deck. During my rebuild, I made great efforts to epoxy seal and glass all joints. All screws that later got re-installed to mount interior got epoxied in place. If you do a similar type job of sealing your outer bays and gluing on your decking, I don't know that the drains or limber holes through the stringers would serve any purpose.... Just my opinion.... I have no knowledge of your particular boat design.
 

ACon977

Senior Chief Petty Officer
Joined
Nov 21, 2017
Messages
759
I have no idea about the reason for the plugs outside the stringers, but on my boat, my outer foam filled bays did have moisture down at the bottom of the foam. I attribute that to poor original joint construction and leaking screw holes through the deck.

I had the same thing, and I do think that the stringer rot originated from these through holes. They look like they were not properly sealed, glassed, or PVC through like WOG recommended.

During my rebuild, I made great efforts to epoxy seal and glass all joints. All screws that later got re-installed to mount interior got epoxied in place. If you do a similar type job of sealing your outer bays and gluing on your decking, I don't know that the drains or limber holes through the stringers would serve any purpose.... Just my opinion.... I have no knowledge of your particular boat design.

I agree with you on this as well. I think Ill just seal it off and then do a small bulk head in the back so that if these drain plugs ever leak I dont have water getting to my foam.


My thought on why these are there is to drain the boat if you have a lot of water in it. Have it jacked up on the trailer and pull these back plugs out to make sure its 100% empty. But honestly, I feel like I can do that with just the main drain plug. I think having 3 ports (all of which are under water level) is a bit overkill.
 

ACon977

Senior Chief Petty Officer
Joined
Nov 21, 2017
Messages
759
Hey all! I got the port side stringer glassed with CSM and 10oz mat last night. Ended up going much faster than the first time.

tips for a newbie, from a newbie:
I spent a bit more time getting the glass mat and cloth situated on the stringer and having it stick to to the pre layer of resin before mixing and applying the resin to the top. This helped to do less pulling and pushing of the glass and more just soak and roll.

when I was applying the new resin I dunked my roller in resin and then rolled from the top. Just one top to bottom to top. The dunked again and went to the next strip to the right or left. I did this the whole way down the 4' section. Then went back and cleaned up the parts that are still dry or had bubbles. This let the resin soak Into the fibers while I was applying it elsewhere rather than adding more and more and trying to push it through. By the time I made it to the end, the beginning of the strip was saturated and ready to be worked.

I also kept a cup of acetone on my bench that I would dunk and rinse my roller while I was mixing up the next batch. I didn't spend time disassembling the roller every time. Nor was I rinsing out my cup. I just had it drain into an old coffee carton while I was swirling the roller and take a breather from under the mask. After the cup got pretty hairy or sticky I would toss it and use a new one. I think I threw out 2 cups during this session.

Due to cure time (I reduced my mix ratio but still pretty short) I did 16-18oz mixes and that was a good amount per the time I was spending working it.

similarly to last time I cut 12 CSM pieces (4 sections of tab tab cap), and 4 sections of 10oz Mat that wrapped all the way hull to hull. And it took me about 4.5 hours with prep (cutting glass, acetone surfaces, lay out supplies), and clean up. MUCH faster than last time which was 6-6.5hrs.
 
Last edited:
Status
Not open for further replies.
Top