1987 Larson DC-215 restoration

sms986

Petty Officer 1st Class
Joined
Sep 18, 2017
Messages
334
I know, I know!

It's a mess in there right now so I'm going to grind as much as I can tolerate today, clean everything off, and get some pictures.
 

sms986

Petty Officer 1st Class
Joined
Sep 18, 2017
Messages
334
Have about 1/2 of the stringers ground out. About 1" of fresh snow!

​​​​​​I've been reading through other forums and such, and I read on another forum that one of the older guys who had helped a lot out finally quit posting on the forum because of all of the people who argue with his advice.

I just want to take a short intervention and say that I appreciate all of the help you all have offered. I've learned a great deal and I'm pretty sure I'm being pointed in the right direction. If I say something to rebut your advice, I'm not looking to "outsmart" anyone, I just want to explain my thoughts on the matter, in hopes that someone says "that's a good idea," or more importantly "that won't work because of this."
 

sms986

Petty Officer 1st Class
Joined
Sep 18, 2017
Messages
334
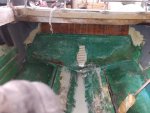
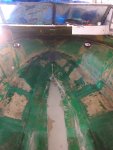
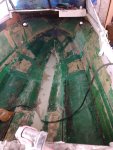
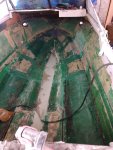
The moment you've all been waiting for! Picture time. I'm going to do this in sections. First section, just some general pics of what I've done. I have all of the initial grinding complete my next move is to l let this dry, get the carpet glue off with some WD-40, and sand everything down with a belt sander and 40 grit. I would like to leave the lips for the motor mounts where they are so that I can be exact when putting them back in. I'm not so concerned with the height though because the mounts themselves are adjustable. I'll be within 1/2" on the height.
 

Attachments

  • photo307657.jpg
    photo307657.jpg
    762 KB · Views: 11
  • photo307658.jpg
    photo307658.jpg
    730.8 KB · Views: 11
  • photo307659.jpg
    photo307659.jpg
    762.8 KB · Views: 11

sms986

Petty Officer 1st Class
Joined
Sep 18, 2017
Messages
334
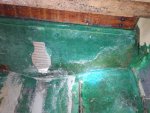
Next, the transom. Here you can see the little bubbles I was talking about. Are these ok to leave? Also, I tried to get a good picture of the waviness.

You can also see in the lower right corner an entire layer of CSM that came out with the wood. That's a pretty large void. Will PB take care of that or should I put a layer of CSM on that?
 

Attachments

  • photo307660.jpg
    photo307660.jpg
    600.8 KB · Views: 10
  • photo307662.jpg
    photo307662.jpg
    735.2 KB · Views: 10
  • photo307663.jpg
    photo307663.jpg
    792.8 KB · Views: 10
  • photo307663.jpg
    photo307663.jpg
    792.8 KB · Views: 9

sms986

Petty Officer 1st Class
Joined
Sep 18, 2017
Messages
334
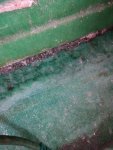
Last, am I taking off enough glass?

Also you can see dark brown spots on the hull. Isn't this rotted fiberglass? Should I be worried about this?

I heard a small cracking noise when walking along the right side chine earlier. I saw no crack on the top or bottom of the boat. Is this a concern? I'm going to basically have at least one full layer of fresh 1708 covering the entire bottom of the hull when I'm done.
 

Attachments

  • photo307659.jpg
    photo307659.jpg
    762.8 KB · Views: 5
  • photo307664.jpg
    photo307664.jpg
    704.7 KB · Views: 5
  • photo307665.jpg
    photo307665.jpg
    790.4 KB · Views: 5

Mechanicalmike08

Petty Officer 1st Class
Joined
Aug 29, 2018
Messages
308
The brown isn't fiberglass its usually rotted wood or dirt. Mine seem to have a lot of dirt trapped by foam.

the layer of missing csm can be taken up by pb but ull have to be careful where you clamp when you install the transom to not put to much pressure there.

you can leave lips if you really want but everything needs to be cleaned out of them and well stuck to the hull. If there weak you now have a weak point even if you glass over it. Maybe a better way would be to grind them away in front the transom, once the new transome is in you can mark the transom and grind them the rest of the way out will still having your reference point.
 

Chris51280

Ensign
Joined
Jan 24, 2018
Messages
932
looks like you have dirt under there. more sanding required. I had some kind of filler under the stringers.
 

Woodonglass

Supreme Mariner
Joined
Dec 29, 2009
Messages
25,927
IMHO, you have a lot more grinding to do. The old glass should be pretty much all a uniform color/shade when it's ready for new glass.
 

sms986

Petty Officer 1st Class
Joined
Sep 18, 2017
Messages
334
Good info! I'll be back to work the first week of March and I'll keep you all posted.
 

Chris51280

Ensign
Joined
Jan 24, 2018
Messages
932
fiberglass does not rot. at least we wont be alive until it does. keep sanding until you see nice green. you can tell where the hull is vs the csm on top. don't have to sand all of it down, just feather it in until you see good solid glass and not air pockets.
 

sms986

Petty Officer 1st Class
Joined
Sep 18, 2017
Messages
334
Good to know... I was most concerned with that. I guess I don't mean "rot," but waterlogging. I've seen a lot of posts about brown waterlogged fiberglass and I was hoping that wasn't a real thing..

I can definitely see where the CSM ends and the roving begins, but on parts of thick tabbing I can't find the roving underneath, or at least I don't want to grind until I start cutting into the hull.

I can definitely tell where the tabbing isn't connected anymore because it's a light green. I've been sanding all of these spots off and levelling them out. I'll go another round in March end I get home and see what you think.
 

sms986

Petty Officer 1st Class
Joined
Sep 18, 2017
Messages
334
Back at it again!
following the advice from woodonglass, I am further grinding the old tabbing. I'm only using a belt sander for this. I have some deep gouges (none penetrating through the hull, or even coming close) that will need filled in with PB. I'm not going to make more. Essentially, what I'm looking for is high spots that need more attention and light spots that indicate air pockets. I'm halfway done, so tonight I'll be measuring and cutting new wood!

Unfortunately my phone doesn't like water as much as I do, and long story short my camera no longer works. I'll have to get my tablet out tonight to get some pictures, but they will be coming.

I know we've been over this before, but I still don't have a definite answer. Do I need to grind all the way down to the hull, or just until I get good, solid, smooth glass?
 

tpenfield

Moderator
Staff member
Joined
Jul 18, 2011
Messages
18,040
You will get some varying opinions . . . I favor less grinding. So, as long as you have gotten into good glass that you can tab into, no need to go further.
 

Chris51280

Ensign
Joined
Jan 24, 2018
Messages
932
I did not grind everywhere to the woven. there were areas from the old stringers that had alot of resin that are solid to the hull without loose chop strand underneath that I left. Just feathered out. There are obviously some spots that have little dots of air pockets underneath that I left as well. I figured that if it hasn't come apart yet, it never will. I looked at friscoboaters videos and other pictures and nobody cleaned it up 100% to the woven
 

sms986

Petty Officer 1st Class
Joined
Sep 18, 2017
Messages
334
So it took longer than expected, but I got the hull finished. Now all I am doing is cleaning and prepping. I'll get some pictures when I'm done.

Also, I used old, old gasoline to clean off my old carpet glue and a 4 1/2" wire wheel on a grinder. Worked like a charm.

As for the fiberglass grinding, I really really hope this is the longest single part of boat rebuilding. I have ~45 hours into just grinding fiberglass, from start to finish.

I will get pictures put up here once I get the boat cleaned up.

I have one question: can CSM be used with epoxy? I've seen a lot of yes and a lot of no, but I have 30 yards of 1708..
 

tpenfield

Moderator
Staff member
Joined
Jul 18, 2011
Messages
18,040

sms986

Petty Officer 1st Class
Joined
Sep 18, 2017
Messages
334
Ok, no big deal. I got it free from one of our accounts! What is recommended?
 
Top