1987 Fourwinns Sundowner Transom repairs

solar7647

Lieutenant Junior Grade
Joined
Apr 23, 2009
Messages
1,218
Looks good! I just started pinstripe removal on my boat today. Undecided if I'll put them back on. Love the hot-pink...I'd say it's a period-correct color!
That was my thought. Since she is 1987 I wanted to do sharp angles and that hot pink is very 80s.
 

solar7647

Lieutenant Junior Grade
Joined
Apr 23, 2009
Messages
1,218
Just put on the first coat of clear coat over the pin stripes. Did an experiment with a strip yesterday and sprayed some of the stripe on my bench to ensure the clear coat wouldn't damage it. All came out good. Using lacquer clear coat since that is what the boat is coated with since lacquer when applied on top of lacquer will actually dissolve the old lacquer a little and create a strong chemical bond. I know lacquer clear coat is old school and can crack over time if not taken care of, but in my opinion you can't beat the look.

PXL_20210611_233114263.jpg
 

solar7647

Lieutenant Junior Grade
Joined
Apr 23, 2009
Messages
1,218
I like it, wouldn't have to twist my arm to get me to ride in it.
Thanks I'm hoping once she is all done she is a head turner.

I should add a note to my prior post, clear coat won't damage the vinyl strip if it is stuck to something, even if it the paper backing. If it is just free not stuck to anything it will make it cure up.
 

solar7647

Lieutenant Junior Grade
Joined
Apr 23, 2009
Messages
1,218
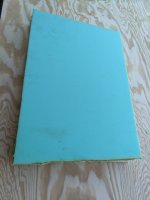
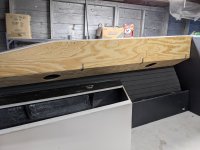
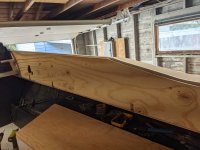
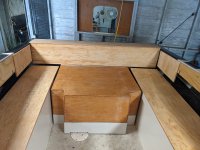
Got the wood cut for the cuddy cushions, and got them foamed. I tell ya what at the end of this project the one product that will end up coasting the most is foam. I'm going to end up spending more on foam then the long block for the engine and the part I replaced just be aide they are old and I had it apart so might as well replace it now. The cuddy was $300 in 3 inch foam. I got lucky and the woman at the fabric store knew about a 50% of coupon on line so I only paid $150 but even at that price wow.

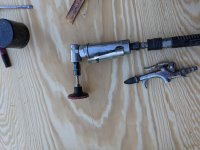
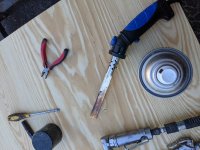
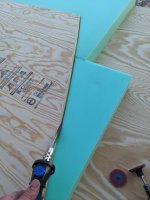
Well any way I cut my wood and laid it on the foam and used a $20 hot knife from harbor freight to cut the foam. I then used my die grinder with a fiber disk on it to shape it and round edges.

I have the go to Topeka Kansas this week for work so my progress will end till next weekend. I'm dropping what I have done off to get upholster. My brother started his own side gig doing vinyl, canvas and such so he all the tools and skills to do it. So he is going to get these covered while I'm gone. Then I'll come home and cut some more to drop off too him next week.
 

Attachments

  • PXL_20210613_213354174.jpg
    PXL_20210613_213354174.jpg
    3.7 MB · Views: 9
  • PXL_20210613_213347548.jpg
    PXL_20210613_213347548.jpg
    2.1 MB · Views: 8
  • PXL_20210613_213356881.jpg
    PXL_20210613_213356881.jpg
    3.5 MB · Views: 8
  • PXL_20210613_215800252.jpg
    PXL_20210613_215800252.jpg
    1.9 MB · Views: 9
  • PXL_20210613_230905857.jpg
    PXL_20210613_230905857.jpg
    3.3 MB · Views: 9

solar7647

Lieutenant Junior Grade
Joined
Apr 23, 2009
Messages
1,218
Well my brother sent me a photo of some test stickers. Finish product is going to be french stocked but the hot pink thread looks great on the carbon fiber black. The phot really doesn't do it justice. To the eye in natural light it's freaking awesome.
 

Attachments

  • IMG_20210618_171059.jpg
    IMG_20210618_171059.jpg
    919.7 KB · Views: 6
  • IMG_20210618_171059~2.jpg
    IMG_20210618_171059~2.jpg
    350.7 KB · Views: 6

solar7647

Lieutenant Junior Grade
Joined
Apr 23, 2009
Messages
1,218
Got some detail work done, things no one but me will ever notice lol. Trimmed out the helm and cuddy door with polystyrene molding glued in place. Used Bondo to fill in the seems because I want it to look like it's part of the fiber glass mold. Then I gave it a coat of paint. It's got a goofy cut out for the hatch over the cuddy door but I'm happy with it. Also got the inside plastic trim for the port holes installed.
 

Attachments

  • PXL_20210620_183306346.jpg
    PXL_20210620_183306346.jpg
    3.5 MB · Views: 14
  • PXL_20210620_184533327.jpg
    PXL_20210620_184533327.jpg
    4.3 MB · Views: 14
  • PXL_20210620_184535773.jpg
    PXL_20210620_184535773.jpg
    4 MB · Views: 14

chevymaher

Commander
Joined
Mar 29, 2017
Messages
2,914
Please show a shot of the dash. I got the tach is out I was thinking of doing that.
 

gr8knurlin

Seaman Apprentice
Joined
Jun 9, 2021
Messages
38
That is an amazing project, the skill and patience some of you folks have totally amazes me....
 

solar7647

Lieutenant Junior Grade
Joined
Apr 23, 2009
Messages
1,218
Please show a shot of the dash. I got the tach is out I was thinking of doing that.
Not 100% done with the helm. Still a few things to install and clean up. But I pulled the original gages about 10 years ago and installed these, then placed the original face place over them with a little modification to fit the new round gages.
 

Attachments

  • PXL_20210623_224232552.jpg
    PXL_20210623_224232552.jpg
    3.1 MB · Views: 11

solar7647

Lieutenant Junior Grade
Joined
Apr 23, 2009
Messages
1,218
That is an amazing project, the skill and patience some of you folks have totally amazes me....
Thanks, it's a combination of using existing skills and learning new ones through trial and error
 

chevymaher

Commander
Joined
Mar 29, 2017
Messages
2,914
Thank you. So you made a board for the gauges installed them. Then used the original bezel over them?

You got me wanting to do some measurements and shop for a set.
 

solar7647

Lieutenant Junior Grade
Joined
Apr 23, 2009
Messages
1,218
Thank you. So you made a board for the gauges installed them. Then used the original bezel over them?

You got me wanting to do some measurements and shop for a set.
I pulled the original gages cluster housing I'll call it. It is held in but a few bolts that the nut could reached from underneath the helm. I removed the bezel that was held on with a few screws. Then I pulled the gages out, they are square faced but the body was round. Mine had a water temp gage I removed, I filled it's hole in with body filler. I then sanded it down and painted it black. I then slid in the new round gages in the existing holes and slightly modified the beveled metal rim of the gages so that they fit tight against each other since they over lapped a little. I then installed the bezel face plate back on. And installed the entire thing back in place. That way I still had the factory dash because that is all one piece of material like some kind of molded foam.
 

solar7647

Lieutenant Junior Grade
Joined
Apr 23, 2009
Messages
1,218
Today I was able to get one side panel done. It was a complete pain for as simple as it looks. It's going to be a real pain to install once covered. I will have to use the holes cut for 6 inch speakers to get my arm in to get the nut on the 4 mounting bolts. The bolts will be covered by foam and vinyl, they have Tee nuts on the backs side of the wood to keep them tight in the wood. Original design these had large cut outs so the space behind them could be used for storage, I never liked it because it just collected trash. I wanted the clean look of solid panels so I pay the price of it being a pain to install.

Also all of the hardware I am using on this project is all stainless and was all off the shelf from Home Depot as well as all the hinges and brackets.
 

Attachments

  • PXL_20210624_010223261.jpg
    PXL_20210624_010223261.jpg
    3.5 MB · Views: 6

solar7647

Lieutenant Junior Grade
Joined
Apr 23, 2009
Messages
1,218
I forgot to say, the ply for these panels is only 3/8 inch since they have no structural purpose nor will they be holding any weight so I went thin to save some $$ and weight.
 

solar7647

Lieutenant Junior Grade
Joined
Apr 23, 2009
Messages
1,218
Got all my wood cut and holes pre drilled for hardware. I left the appropriate gaps to allow space for foam and vinyl. I have 2 mode small pieces to cut for the gap left on each side where the side panels meet the back side panels but I am not going to do that untill everything else is covered and installed because they are going to be funky shaped and I want them to fit right. Now comes time to clean, touch up damage done while building post paint and then final assembly.
 

Attachments

  • PXL_20210701_150703408.jpg
    PXL_20210701_150703408.jpg
    3.3 MB · Views: 9
  • PXL_20210701_150705547.jpg
    PXL_20210701_150705547.jpg
    3.2 MB · Views: 9
  • PXL_20210701_150712249.jpg
    PXL_20210701_150712249.jpg
    3.4 MB · Views: 9

solar7647

Lieutenant Junior Grade
Joined
Apr 23, 2009
Messages
1,218
Well today I went and spent $400 on seat foam. Was going to be over $600 but lucky for me I got some online coupons and some app coupons for Joann fabrics. Can't complain about over $200 savings. I still insist that at the end of this project it will be foam that was the most expensive part. Between floatation foam and seat foam I'm already over the price of the new long block I purchased and pound for pound the foam is definitely more costly.
 
Top