1987 Fourwinns Sundowner Transom repairs

solar7647

Lieutenant Junior Grade
Joined
Apr 23, 2009
Messages
1,218
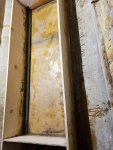
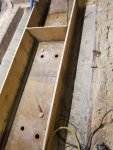
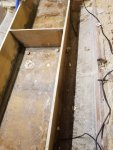
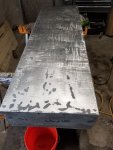
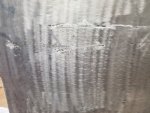
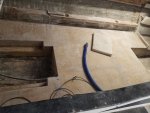
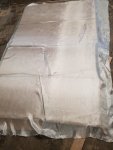
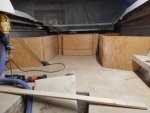
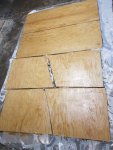
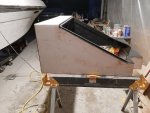
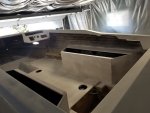
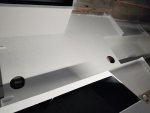
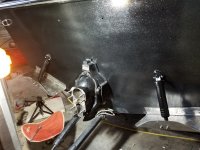
This week i got the stringers all glassed in. I used 1700 BA to glass the seams and then chop strand mat over the rest of the surface.

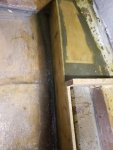
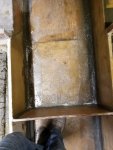
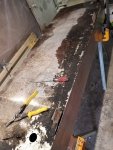
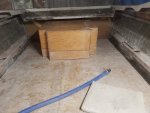
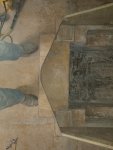
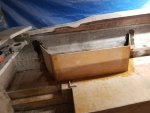
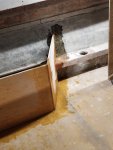
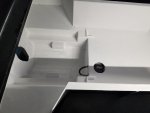
I had to remove my bump outs for the bilge, glass them and the stringer under them and then PB them in place. I used some finishing nails to hold them in place.

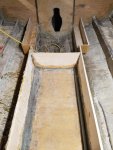
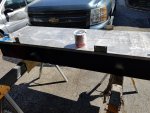
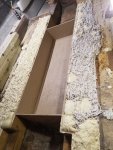
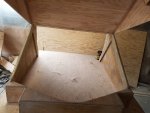
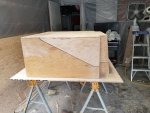
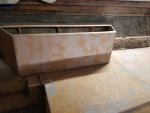
I also rebuilt and glassed in the one cabin seat that had to be rebuilt.

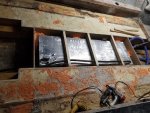
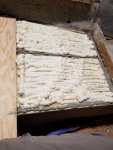
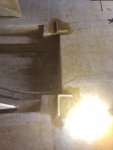
I also drilled 2in holes in the floor of the cabin and under the gas tank and pored foam in.

Tomorrow i am going to PB the plugs in for the holes for the foam, them sand the gas tank area down real good and seal it to protect the fiberglass from any fuel that might end up spilled.
 

Attachments

  • photo329247.jpg
    photo329247.jpg
    294.7 KB · Views: 16
  • photo329248.jpg
    photo329248.jpg
    257.2 KB · Views: 16
  • photo329249.jpg
    photo329249.jpg
    308.7 KB · Views: 17
  • photo329250.jpg
    photo329250.jpg
    324.1 KB · Views: 17
  • photo329251.jpg
    photo329251.jpg
    333.3 KB · Views: 17
  • photo329252.jpg
    photo329252.jpg
    322.5 KB · Views: 16

solar7647

Lieutenant Junior Grade
Joined
Apr 23, 2009
Messages
1,218
So this week i made some good progress.

With the stringers in and glassed the next thing was the gas tank. The gas tank was covered in 30 years of dirt and god know what else. I got out the die grinder and got to it. As i got it cleaned i found that there was some damage and corrosion. I noticed that at a few of the corrosion spots it was damp and when i looked into it i found it was gas seeping through, so i started researching since a new 50 gallon $800 gas tank is not in the budget.

I found that JB Weld Steal stick was gas safe. So i cleaned the areas out and filled them with some steal stick. I then sanded it down and used truck bed liner to coat the outside of the tank to held prevent corrosion in the future. Yes I know truck bed liner in boats is a no no but its chemical resistant and helps protect metal. I then used some Red Kote gas tank sealer and sealed the inside of the tank for double protection.

I then got the gas tank in place in the boat, braced in and the foam in. The Humidity shot up on me during mixing and poring the foam so i didn't get the expansion i needed, it was just shy of being over the stringers. Since i just did a month at the Dupont factory i have cases and cases of the Great stuff foam. So i used that as a space filler in the dips and valleys in the flotation foam. This is why there are odd colors in the photos. Next i will be getting the deck in and glassed.

Photos will be in another post, issue loading photos
 

solar7647

Lieutenant Junior Grade
Joined
Apr 23, 2009
Messages
1,218
Well i got the deck in place and glassed in with CSM. I also sanded it down nice and smooth and ready for a layer of 6oz cloth for a nice smooth finish. I think i am going to hold off on that until i have rebuilt the seating. I am going to chang up my seating layout with a full bench along the back and partial benches up along the side.

I am still having issues uploading photos.
 

mickyryan

Rear Admiral
Joined
Apr 18, 2016
Messages
4,210
whomever told you bedlier was a no no is wrong, its either vinyl, or poly both will help with what you used it for , my boat was painted in several areas where i knew wear would be a issue with bedliner , raptor liner 2 part tinted and i have nothing but compliments and its holding up well .
 

solar7647

Lieutenant Junior Grade
Joined
Apr 23, 2009
Messages
1,218
whomever told you bedlier was a no no is wrong, its either vinyl, or poly both will help with what you used it for , my boat was painted in several areas where i knew wear would be a issue with bedliner , raptor liner 2 part tinted and i have nothing but compliments and its holding up well .

Its always been about how difficult it is to remove so people always say not to use it.
 

solar7647

Lieutenant Junior Grade
Joined
Apr 23, 2009
Messages
1,218
Finally i can up load photos. These are the shot i took while doing the gas tank.
A shot of the damage to the tank that was fixed with the steal stick, a shot of the red kote on the inside, a shot of the bed liner on the tank and a shot of what the tank looked like when i started.

Yes there is a some dirt that fell into the tank when i took the photo, i got it out before buttoning up the tank.
 

Attachments

  • photo330098.jpg
    photo330098.jpg
    44.4 KB · Views: 18
  • photo330100.jpg
    photo330100.jpg
    90.8 KB · Views: 18
  • photo330101.jpg
    photo330101.jpg
    83.9 KB · Views: 18
  • photo330102.jpg
    photo330102.jpg
    83.3 KB · Views: 18
  • photo330103.jpg
    photo330103.jpg
    91.3 KB · Views: 18
Last edited:

solar7647

Lieutenant Junior Grade
Joined
Apr 23, 2009
Messages
1,218
The photos of the deck being installed and all glassed in, like i mentioned the flotation foam stalled because of humidity so i used spray foam as a filler since i have cases and cases of it.

When i put the deck down i used PL glue along the top of the stringers and put a layer of spray foam down over the foam to help bond the deck to the foam also. I then glassed the deck and sanded it smooth.

I bright orange foam in areas around the gas tank is fire block foam and is there to hold the tank in place, it is only in a few sports.
 

Attachments

  • photo330104.jpg
    photo330104.jpg
    98 KB · Views: 17
  • photo330105.jpg
    photo330105.jpg
    99.2 KB · Views: 18
  • photo330106.jpg
    photo330106.jpg
    86.2 KB · Views: 18
  • photo330107.jpg
    photo330107.jpg
    77 KB · Views: 18

solar7647

Lieutenant Junior Grade
Joined
Apr 23, 2009
Messages
1,218
This weekend i got the engine cover built and fiber glassed. I glassed the inside with CSM and the outside with 6oz cloth so that it has a nice finish when painted.
 

Attachments

  • photo330112.jpg
    photo330112.jpg
    70 KB · Views: 18
  • photo330113.jpg
    photo330113.jpg
    64.6 KB · Views: 18
  • photo330114.jpg
    photo330114.jpg
    79.9 KB · Views: 18

solar7647

Lieutenant Junior Grade
Joined
Apr 23, 2009
Messages
1,218
After getting the dog house finished and in the boat i wanted to figure out a way to keep it from moving around and to be able to put it back in the same spot every time its removed in the future. I measured everything up so that it was centered i then cut some small strips of ply and attached them to the deck with PB and then glassed then in. Now when the dog house is removed to get access to the engine it will go back into the same exact spot every time. It worked out great.

I also got the wood for the new bench layout cut, I laid them all down together and glassed the face of them all at once. Once they set i cut them apart and cleaned the edges. I mocked them up in the boat and used some finishing nails to hold them together. I know the layout looks a little odd but its for a purpose, the smaller back compartments are the future locations for the batteries and trim pump and when the dog house is removed i will have complete unobstructed access to all the mechanical stuff. I am avoiding using any other mechanical fasteners, this way i don't damage the integrity of the wood or fiberglass. The manufacture only used large staples to hold wood together before glassing so a finishing nail inst far off. Once set how i wanted i set it in place with PB along all the joints. Once the PB set i started tabbing it in place. Once the tabbing is all done i will be adding some additional bracing to the benches. I am also going to add a 5 inch wide self along the back, much like the original one in front of the benches. This will be behind the seat cushions and I am planing on covering it with a rubber mat and cut holes for the cup holder, This will be a secure place for phones, keys and whatever else is in pockets.
 

Attachments

  • photo330405.jpg
    photo330405.jpg
    76.5 KB · Views: 16
  • photo330406.jpg
    photo330406.jpg
    83.5 KB · Views: 16
  • photo330407.jpg
    photo330407.jpg
    110 KB · Views: 16
  • photo330408.jpg
    photo330408.jpg
    89.1 KB · Views: 15
  • photo330409.jpg
    photo330409.jpg
    82.1 KB · Views: 15
  • photo330410.jpg
    photo330410.jpg
    88.2 KB · Views: 15
  • photo330411.jpg
    photo330411.jpg
    109.6 KB · Views: 15
  • photo330412.jpg
    photo330412.jpg
    95.9 KB · Views: 16

solar7647

Lieutenant Junior Grade
Joined
Apr 23, 2009
Messages
1,218
Its been a while since i updated you guys, I have been busy working away. It is going to take a couple posts to get all the photos uploaded.

I got the engine cover and new benches sanded and applied some body filler to get then silky smooth for paint. It took a few days of sanding and filling to get everything smooth and prepped for paint. I also sanded the entire boat and built the new motor mounts,
 

Attachments

  • photo332158.jpg
    photo332158.jpg
    60.9 KB · Views: 17
  • photo332159.jpg
    photo332159.jpg
    74.1 KB · Views: 17
  • photo332160.jpg
    photo332160.jpg
    61.8 KB · Views: 17

solar7647

Lieutenant Junior Grade
Joined
Apr 23, 2009
Messages
1,218
The next thing i did was apply 2 coats of white Rustoleum Marine primer thinned per the instructions and a light sanding with 80 grit between each. Once that fully dried I sanded with 220 grit and applied tape to mask out my new design. I then put on 2 coats of Rustoleum gloss white top side marine paint.

I am using Rustoleum marine products because i used them when i painted the boat 10 years ago and it held up great and its price is very affordable.
 

Attachments

  • photo332161.jpg
    photo332161.jpg
    60.2 KB · Views: 17
  • photo332162.jpg
    photo332162.jpg
    61.7 KB · Views: 17
  • photo332163.jpg
    photo332163.jpg
    60.8 KB · Views: 17
  • photo332164.jpg
    photo332164.jpg
    53.6 KB · Views: 16
  • photo332165.jpg
    photo332165.jpg
    58.9 KB · Views: 17
  • photo332166.jpg
    photo332166.jpg
    55 KB · Views: 17

solar7647

Lieutenant Junior Grade
Joined
Apr 23, 2009
Messages
1,218
Once the white set up and dried for 3 days i removed the tape and re taped the design. I taped for the white so i could see the areas that will black and didnt waste white paint on those areas. I also covered the white top coat with painter paper to prevent over spray on it. I then applied 2 coats of Rustoleum black top coat thinned per the instructions and sprayed with a air spray gun.
 

Attachments

  • photo332167.jpg
    photo332167.jpg
    58.4 KB · Views: 16
  • photo332168.jpg
    photo332168.jpg
    54.5 KB · Views: 16
  • photo332169.jpg
    photo332169.jpg
    54 KB · Views: 16

solar7647

Lieutenant Junior Grade
Joined
Apr 23, 2009
Messages
1,218
While i worked on paint i also worked on the engine. I unpacked the new long block, took everything off the old block, cleaned parts and installed on the new block. Once it is back in the boat the exhaust manifolds and a few other parts will be installed, just because it will be easier to get the engine in and mounted without them.

I am hoping and can get it back on the trainer this weekend or early next week and start getting mechanical and electrical installed.
 

Attachments

  • photo332170.jpg
    photo332170.jpg
    100.5 KB · Views: 13

solar7647

Lieutenant Junior Grade
Joined
Apr 23, 2009
Messages
1,218
Ok so update, the paint is all done. Once the black dried i applied clear coat with metal flake to give it a little flash. I then pulled off the paper cleaned the white and applied a few coats of clear over the entire boat. I then buffed with rubbing compound and polish to smooth out the clear. once it is all done and cleaned and gets a coat of wax it should have a nice shine to it.

I also painted the inside. I did a ton of research on non skid deck paint and was just chasing my tail, trying to justify the price with the work and the reviews was impossible. So i called my local Sherwin Williams and discussed with them what i was doing and what result i wanted. They ended up having a product and at a decant price. They have a paint line for marine docks and decks. So i went with it, I figure if its made to handle constant water and abuse of a dock it will do for the floor of my boat that will be covered 75% of its life. Plus worse case if i need to re-coat its easy available and cost effective. It was easy to lay down and it very thick, it looks and smells alot like roll on truck bed liner. I am really happy with the look. Time will tell how it holds up, it will have a mat over it and the mat will only be removed after outing and when out fishing and such.

I am going to apply a second coat tonight with the non skid in it to give it some grip.
 

Attachments

  • photo332953.jpg
    photo332953.jpg
    44 KB · Views: 23
  • photo332954.jpg
    photo332954.jpg
    49.8 KB · Views: 21
  • photo332955.jpg
    photo332955.jpg
    48.8 KB · Views: 24
  • photo332956.jpg
    photo332956.jpg
    91.4 KB · Views: 25
  • photo332957.jpg
    photo332957.jpg
    96.5 KB · Views: 25

buxmj

Petty Officer 1st Class
Joined
Jun 9, 2018
Messages
294
I just read your whole thread and that is an impressive build! Thanks for sharing all the pics and details, very inspiring!
 

solar7647

Lieutenant Junior Grade
Joined
Apr 23, 2009
Messages
1,218
Thank you for the kind words.

I started getting hardware installed this weekend. I also started getting everything installed on the dash. I made a new face plate using an aluminum door kick plate i picked up. I am hoping to get it all finished up tonight and get some photos posted.
 

solar7647

Lieutenant Junior Grade
Joined
Apr 23, 2009
Messages
1,218
Hello again all i had to bench my build for a while. I had to get back to work and get somethings done to the house. I am back at it now.

I got my engine installed and aliened, mane what a pain that was. Since everything was bran new the alignment was so far off I couldn't get the tool to engage the coupling, I searched and searched and tried every trick and tip I could find with no success. So i came up with my own contraption with the help of my sons new 3D printer. I found a laser pointer on amazon that is the exact dimensions of a .223 round for sighting in guns, i then designed and printed a holder for it that was the exact dimension of the end of my alignment tool. I then designed and printed a target that would fit inside the gimble bearings. The result was a laser alignment tool that worked wonders on allowing me to see just how for off the engine was and what direction it needed to move.

Once the engine was set in place i started getting on installed my trim tabs, pumps and wiring. Once everything is wired up and tested I will pull it out of the garage and start the process of getting the engine to fire up and tuned.
 

Attachments

  • 20210224_094821.jpg
    20210224_094821.jpg
    27.6 KB · Views: 24
  • 20210224_095106.jpg
    20210224_095106.jpg
    56 KB · Views: 25
  • 20210310_175916.jpg
    20210310_175916.jpg
    130.7 KB · Views: 25
  • 20210310_175924.jpg
    20210310_175924.jpg
    140.3 KB · Views: 25
  • 20210310_175927.jpg
    20210310_175927.jpg
    133.2 KB · Views: 25
  • 20210325_150042.jpg
    20210325_150042.jpg
    145.8 KB · Views: 25
  • 20210325_195852.jpg
    20210325_195852.jpg
    141.6 KB · Views: 24
  • 20210325_195857.jpg
    20210325_195857.jpg
    95.6 KB · Views: 23
  • 20210325_195901.jpg
    20210325_195901.jpg
    106.4 KB · Views: 23
  • 20210325_195904.jpg
    20210325_195904.jpg
    102.3 KB · Views: 24
  • 20210325_195906.jpg
    20210325_195906.jpg
    82.8 KB · Views: 25
Top