1985 Conroy X-19 I/O Transom Restoration

nrasnake

Seaman
Joined
Aug 13, 2012
Messages
62
Re: 1985 Conroy X-19 I/O Transom Restoration

GT, thanks for compliments... I needed that!
 

Rick-101

Seaman Apprentice
Joined
Jan 27, 2012
Messages
48
Re: 1985 Conroy X-19 I/O Transom Restoration

Looks good! Keep at it, your making great progress!
 

Woodonglass

Supreme Mariner
Joined
Dec 29, 2009
Messages
25,929
Re: 1985 Conroy X-19 I/O Transom Restoration

The Arauco plywood is VERY GOOD Stuff. You chose Well!!! Nice job on cutting out and assembling the transom. You coulda used screws to "Clamp" the wood and them removed em. The resin and PB will fill em when you install it. Now for sealing the wood here's what you do... cut your CSM so it's about 3" larger than the transom wood. Cut Both pieces. Get a couple of 3 ft long 1 x 2's and put a nail in each end of them. Lay them across your saw horses and lay the transom on top of the nail points. Coat both sides of the the transom with a coat of resin and make sure any voids in the edges are filled with wood putty first. Flip it back over and the first side should be tacked up enough so you can lay the glass. Put the CSM on and then Pour resin in the middle and roll it out to the edges. Don't over roll it and don't use to much just enuf to wet it out and make it go clear. If you roll to much it will lift the glass and cause air bubbles and or a hairy mess. Did not see a glass roller but that's ok. I would get some 4" short nap Whizz roller covers to roll the resin with like these.http://www.lowes.com/pd_235014-6490...uctId=3693920&Ns=p_product_qty_sales_dollar|1 just before it starts to tack up pull and tear the edges of the CSM and make it Hairy. Use a chip brush and dab the Hairy glass over the edges of the plywood. When it's all tacked up Flip it over on the nail points. (It won't hurt it!") and do the other side the exact same way. You'll be done in about an hour or so.
 

nrasnake

Seaman
Joined
Aug 13, 2012
Messages
62
Re: 1985 Conroy X-19 I/O Transom Restoration

Thanks for the compliments Rick!

Wood, that makes perfect sense, but I wouldn't have thought of it... thanks. I did put 2" screws around the edges and between the clamps in the middle to squeeze things together. I'm confident everything is bonded solid. Funny you mentioned the Whizz rollers because I picked up a pack of them this evening. I will follow your glassing procedure exactly and everything should turn out nicely.

I wanted to bring up the fiberglass and temperature topic again. I've seen everywhere that 60 degrees F is the cutoff temperature for glassing, but I was reading through the Oops! project and noticed he was intentionally trying to keep his garage at 50 degrees. I'm just curious what the risks are because I'm restricted to working outside on my boat and with cooler temperatures approaching I'm getting a bit stressed with wondering how I'm going to get all of this done before it's too cold (end of October I'm guessing). Even now, the temperatures are getting in the mid to upper 50's overnight. Is it going to be okay to fiberglass mid-day when temperatures are in the 60-70 range even though temperatures may fall into the 50's overnight? If it comes down to it, is it okay to fiberglass in 50-60 degrees with possibly 40's overnight? What's the scoop? I little pressure is good to keep me motivated, but I don't want to get into rushing things and making mistakes. If it has to wait until spring then so be it. I do have the engine and stern drive to work on :)

FYI, some advice based on my experience:
The Arauco 7 layer plywood from Home Depot was solid all the way through and I was very pleased with it. Nothing compares for the price (that was readily available for me anyway). I highly recommend it for transoms... assuming it's entirely covered with fiberglass.
The PL adhesive starts to cure fairly quick and gets a thick consistency so you want to get things clamped pretty quick to get it to spread nicely. It's not like standard wood glue. Those blue plastic quick-grip clamps I used just didn't have the power to pull all three sheets together properly, but it was what I had to work with (they certainly helped). You definitely want to used metal screw clamps, the threaded rod and 2x4 clamps, and standard drywall screws all around to pull it down tight.
Also, I've been meaning to share pictures of my homemade gantry I built for $90 (including the 1 ton chain hoist). I used two 2x6s screwed together for the main beam which may have been overkill for my Mercruiser 140 (I read it weighs around 350 lbs), but better safe than sorry (or injured).
439c4387_zps807dadb3.jpg


Hopefully fiberglassing the transom tomorrow evening!:cool:
Regards

Sorry to add more to this post... it's already turned into a short story. I was reading through Rick-101's thread and he mentioned drilling his transom holes (for the through bolts) oversized to allow for extra peanut butter in there (before mating the transom to the hull of course). That seems like a good idea to me since that's a likely area for water penetration over the years. I was also applying that same logic to the keyhole. What about cutting the keyhole out oversize and then putting in a layer of CSM or even 1708 along the edge? Thoughts?
 
Last edited:

nrasnake

Seaman
Joined
Aug 13, 2012
Messages
62
Re: 1985 Conroy X-19 I/O Transom Restoration

Forgot I had some final trimming and sanding to do on the transom, so no fiberglassing yet. Everything is done now except for cutting out the keyhole and sanding those edges. I was hoping to get some feedback regarding cutting the keyhole out oversized to allow for a layer of CSM or 1708 on the edge (as mentioned in my previous post). If you have some input, I'd appreciate it.

Here are some picture of progress from today.

The plywood of my foam boxes with tie into the transom where the vertical marks are. And I cut the height of the "tabs" or "wings" so that the tops of the foam boxes with rest on them (hence the string). Then I can take the foam box tops all the way back to the hull (behind the transom) which would prevent water from getting behind the foam and the transom (it was left open before... no wonder it rotted).
IMG_20120919_215027_zps413cc1f0.jpg


IMG_20120919_215555_zps640981bc.jpg


Look at all those layers of solid wood. That Arauco is some good stuff! I actually dropped the transom on my garage floor accidentally and I was more concerned for the concrete. That transom is SOLID!
IMG_20120919_190602_zps61c48d6d.jpg


Flatness is good. I can just see a sliver of light under the level in the center of the transom.
IMG_20120919_221622_zpsabea2f95.jpg


If there's any question about the adhesion of PL Premium adhesive... here's the answer. Just a couple of tiny drops got on the sawhorse and when I pulled the transom up it tore the wood out!
IMG_20120919_192637_zps4cd97e29.jpg


It's coming together!
 

Trooper82

Commander
Joined
Nov 21, 2011
Messages
2,648
Re: 1985 Conroy X-19 I/O Transom Restoration

Coming together real nice! I thought that the keyhole would be safe from water by the gaskets? Sure it wouldn't hurt to put some glass on it though...I spread just some plain resin on mine to protect while I am working on it...seeing that I am working outside...Looks great!
 

ikayak2

Recruit
Joined
Jul 1, 2011
Messages
2
Re: 1985 Conroy X-19 I/O Transom Restoration

Cody,
The restoration so far is impressive. Good job on maintaining the angle on the transoms. Looks like it fits perfect.

Keep up the good work and keep the pictures coming! :D
 

nrasnake

Seaman
Joined
Aug 13, 2012
Messages
62
Re: 1985 Conroy X-19 I/O Transom Restoration

Hey everybody... I've finished for the day and man am I beat! Again, I've not gotten the transom installed, but I'm getting closer and messier. For not having done fiberglass work before, I think I've done pretty well and I've also found its more work and mess than I anticipated (and I anticipated a lot!!). Regardless, the hardest part is to stay positive and motivated. So, that's what I'm focusing on most. The work will get done when it gets done as long as keep plugging away.

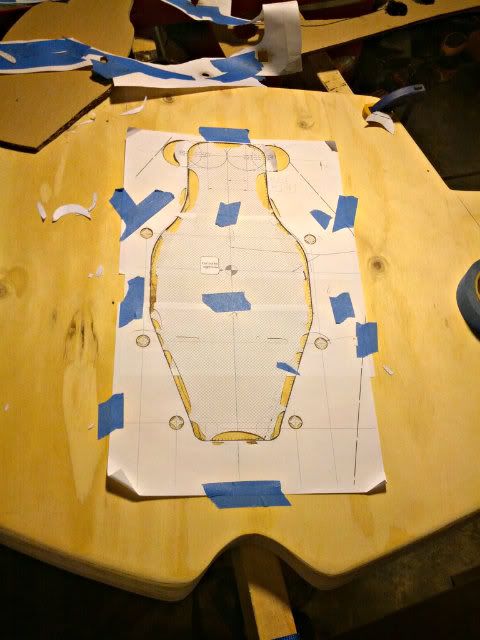
This is the Volvo template I found in a thread by Don S. on iBoats yesterday. It is an exact match to the Mercruiser. I was able to print it on 3 sheets of 8.5x11 using Adobe PDF viewer. See my how-to here (sorry no hyperlink, exceeded my limit): http://forums.iboats.com/showthread.php?t=570022"]http://forums.iboats.com/showthread.php?t=570022
IMG_20120920_230336_zps56808d78.jpg


Here is the drill jig (which I actually already had) I used yesterday to drill the transom bolt through holes perpendicular to the transom surface. I used a 1/2" drill bit though the template calls for 9/16". I found that the bottom bolts (with the anode) are larger than the other four through bolts. So, a 1/2" bit was required for the bottom bolts on mine and I just drilled the others the same (not to mention I didn't have a 9/16" bit). This also leaves room for resin....you could use either size... but if you use 9/16" you will have to keep your holes aligned better to ensure the gimbal housing will fit. Also, notice that I modified my template slightly and kept some extra transom wood around the bolt holes second from the bottom. I did A LOT of measuring, template making, and triple checking to ensure everything was kosher which gave me a very nice final fit. The most important part is to ensure the bolt holes are drilled in the exact location and are perpendicular to the transom surface. The keyhole is no as important as long as you keep inside of the gimbal housing seal.
IMG_20120921_210146_zps595803d6.jpg


Today the transom with CSM on both sides and the outer edges. I will attempt the keyhole edges tomorrow.
IMG_20120922_182631_zps2778a456.jpg


Here is the layer of CSM on the hull
IMG_20120922_182655_zps5b82633a.jpg


Finally, I just wanted to share how I setup to unroll and cut my fiberglass. Friscoboater built a very nice stand and I was going to replicate it, but with my time constraints I improvised... which is common in my neck of the woods :D
IMG_20120922_195348_zps99637918.jpg
 

gatorfan6908

Petty Officer 2nd Class
Joined
May 17, 2010
Messages
149
Re: 1985 Conroy X-19 I/O Transom Restoration

Looking good! Transom came out very nice. I'm hoping to have the rest of the grinding done tomorrow and cut out a template. We will see though... may turn out to be one of those days...
 

nrasnake

Seaman
Joined
Aug 13, 2012
Messages
62
Re: 1985 Conroy X-19 I/O Transom Restoration

Thanks! I've got a few spots to touchup, but I'm very pleased with my first glass job. Grinding sucks so bad it's not funny. I've just grinded enough to get the transom in (which for me is the majority), but I'm dreading the rest already. You on the other hand have done A LOT more than me. All I can say is keep at it and stay positive :).

Go FSU :)
 

GT1000000

Rear Admiral
Joined
Jul 13, 2011
Messages
4,916
Re: 1985 Conroy X-19 I/O Transom Restoration

Wow!, you are doing an impressive job so far, keep up the great progress...

With your attention to detail, everything seems to be coming along nicely...:D
 

nrasnake

Seaman
Joined
Aug 13, 2012
Messages
62
Re: 1985 Conroy X-19 I/O Transom Restoration

Well it was a gorgeous day today and I got some more work done, but still no transom installed. Seems like there's always a little bit more to do before I install it. Not to mention I got a late start today... I decided to get some much needed rest after hitting it ALL DAY yesterday. Good news is it will be gorgeous all week, so I'm shooting for having the transom in by Thursday since I'll be out of town for the weekend.

So today I went back over the transom and grinded out the large air bubbles I had on some of the edges and repaired them with a peanut butter mix. I also cut the glass out covering the keyhole, drill out the through holes, and put peanut butter on the keyhole edge and in the through bolts. Here's what I learned:

1. I realized I made a mistake with my math and drilling my through holes :facepalm: as I mentioned in a previous post. The template called for 9/16" holes and I used a 1/2" bit. Well of course 9/16" is 1/16" LARGER (not smaller) than a 1/2", haha I wasn't thinking! Turns out this was fine for four of the bolts, but the bottom two bolts (with the anodes) where 1/2" in diameter. They fit before I put the resin in, but of course wouldn't afterwards. So now I will have to go pick up a 9/16" bit, drill out the bottom two holes, and put some fresh peanut butter in them.

2. My first peanut butter batch as a disaster and ended up having to toss it along with the pint of resin I put in it!!! Turns out I put way too much chop strand in which made it extremely difficult to smooth out and get to stick. So if you're new to peanut butter like me, start with small amounts and work your way to the consistency you want. The second batch was perfect. I actually used a lot less chop strand (maybe two tablespoons) which kept the consistency more like ketchup and went on beautifully.

IMG_20120923_132038_zps17fb9413.jpg


I grinded out all of the air bubbles on the edges seen here.
IMG_20120922_191631_zpsed38f669.jpg


Air bubbles, keyhole, and through holes all peanut buttered and drying.
IMG_20120923_193957_zpsb53c84d6.jpg


Close up
IMG_20120923_194009_zpsfe8d21bd.jpg


Another day closer! Thanks for all the support!
 

Friscoboater

Captain
Joined
Jul 3, 2009
Messages
3,095
Re: 1985 Conroy X-19 I/O Transom Restoration

WOW!! Very nice work. I did not read every single word, but I noticed you took off the layer off glue all the way to the hull. That is fine, but make sure that you have the right thickness for the transom. I think the min on merc is 2".
 

Woodonglass

Supreme Mariner
Joined
Dec 29, 2009
Messages
25,929
Re: 1985 Conroy X-19 I/O Transom Restoration

FB has made and excellent point ^^^ How thick IS your transom and the outer skin of the boat? Your final layers of glass will ad, At the most MAYBE 1/8" to the total thickness and you need to be a minimum of 2".
 

Friscoboater

Captain
Joined
Jul 3, 2009
Messages
3,095
Re: 1985 Conroy X-19 I/O Transom Restoration

My glastron had the same layer, and I left it there after filling any cracks and such. Like I said, I don;t think it is a big deal, but you might have to build up the transom core to make up for what you took off.
 

cedarlattice

Petty Officer 2nd Class
Joined
Dec 3, 2011
Messages
104
Re: 1985 Conroy X-19 I/O Transom Restoration

I am impressed with the glass job. No matter what I do I end up with bubbles and air pockets. I get it so it looks perfect and when i come back i have little bubbles and pockets. More with the 1708 than with the CSM.
 

ikayak2

Recruit
Joined
Jul 1, 2011
Messages
2
Re: 1985 Conroy X-19 I/O Transom Restoration

Cody,
Really great progress. Looks like you are putting in some serious hours. Be careful you wouldn't want to be so tired that you oversleep and are late for work :facepalm:
 

nrasnake

Seaman
Joined
Aug 13, 2012
Messages
62
Re: 1985 Conroy X-19 I/O Transom Restoration

Hey guys, thanks for all of the compliments and the heads up on the thickness. I am pleased with my first attempt with this CSM, it can be tricky around corners and it certainly could have turned out worse (like my first batch of peanut butter :facepalm:). I'm hoping the 1708 is even easier to work with. I've heard lots of great things about it.

Believe it or not I actually planned for that layer of mystery material I removed :D and I just double checked with my calipers... according to my original formula (which I had to modified slightly to include the second 1/32" layer of PL adhesive) I should be at 1.935" right now. Would you believe that I took 4 measurements around the keyhole and got 1.92-1.945"... that never happens!!! So, if anybody is wondering about material thickness, these numbers are really close. It looks like if anything I'll need to be careful not to go over the 2-1/4"... depending on how well I control my Peanut Butter layer.

For what it's worth:
TransomThicknessPrediction_Modified_zpsd729d836.jpg


Frisco, I just noticed your Glastron did have the exact same layer of mystery material (funny I didn't notice it the first 5 times I watched your videos). I'm thinking maybe my transom hasn't been replaced before, hmmmm. Doesn't matter now though. I still can't get over how thrown together my transom and foam boxes were. They really cut their costs and don't plan on those boats lasting more than several years do they? With all the exposed wood, nooks, and crannies its just a matter of time before they turn to mush!

Had to work late tonight, so no progress. I will get the final touchups and bottom two through holes done tomorrow evening and then it's peanut butter and transom sandwich Wednesday!
 

Trooper82

Commander
Joined
Nov 21, 2011
Messages
2,648
Re: 1985 Conroy X-19 I/O Transom Restoration

I am impressed with the glass job. No matter what I do I end up with bubbles and air pockets. I get it so it looks perfect and when i come back i have little bubbles and pockets. More with the 1708 than with the CSM.

I read a trick here somewhere....roll some resin on the back side if you can on the 1708..works, but be prepared for the cloth to get real loose..I just wet mine now and flipit over...on larger areas I do not do this...too much distortion in the clothe...also make sure you are using a bubble buster roller..one direction...inner to outer..works best for me...
 

Trooper82

Commander
Joined
Nov 21, 2011
Messages
2,648
Re: 1985 Conroy X-19 I/O Transom Restoration

Awesome looking transom! and the glassing looks great too!
 
Top