1984 Starcraft 16ft Glutton for Punishment [Splashed July 2019]

Status
Not open for further replies.

SHSU

Lieutenant Junior+Starmada Splash Of The Year 2019
Joined
Mar 8, 2017
Messages
1,713
Ok, think I got it. Looks like I had to many pictures and it was knocking them out. Let me know if you still can't see them
 

SHSU

Lieutenant Junior+Starmada Splash Of The Year 2019
Joined
Mar 8, 2017
Messages
1,713
Starting to look at rub rails and think I found one that will fit... But not sure. Anyone have experience with replacing the rub rails on a SS16?

From my measurements Taco V12-4144 might work, but didn't know if anyone else had experience with it or had other suggestions.

Click image for larger version  Name:	10725182.jpg Views:	1 Size:	13.1 KB ID:	10696493

The opening on the aluminum rail I have is right at or slightly under 7/8 of an inch.

I didn't save the old rub rail insert for reference.... :frusty:

Any advise/suggestions are appreciated
 

SHSU

Lieutenant Junior+Starmada Splash Of The Year 2019
Joined
Mar 8, 2017
Messages
1,713
Finally able to get back working on the boat. Had a medical issue that took me out for awhile and helps explains me being so tired over the last 6 months to a year. Still recovering but, have enough energy to work on the boat as long as I take it slow. Updates below

I had to modify one of the panels that I cut for the captain side panel supports. Since I will be installing a horn I have to shift it over, and didn't account for the size difference. Cut down the panel and routed it
DSC04093.JPG

Installed the panel (above) with 10 stainless steel snap head screws with 5200. I also decided to do some fairing with JB weld... Didn't think it through, but will be painting it all again anyways. Still haven't sanded it back in this picture.
DSC04096.JPG

The white 5200 had been bugging me on the front seat section and was able to use a little JB weld to dirty it up to match better with the Shark Vinyl

Before
DSC04082 v2.jpg

After
DSC04094.JPG

Pulled out my scrap vinyl from when I used it on other parts of the boat. As you can see it was very wrinkled. I used an iron on the back side and they came out nice and flat.

Before
DSC04098.JPG

After
DSC04100.JPG

Outline and glued with contact cement. Decided not to use the 3M spray adhesive as it was falling off from earlier installs and was re-gluing with the contact cement. Seems to be working thus far
DSC04101.JPG

End Part 1
 

SHSU

Lieutenant Junior+Starmada Splash Of The Year 2019
Joined
Mar 8, 2017
Messages
1,713
Part 2 cont...

Installed the gunwales with temporary screws to shape the boat. The brought out the trim and matched up the holes where the original 3/16th rivets went through and used those holes. That way I wouldn't be having to drill out rivets I accidentally put in them when installing the trim.
DSC04103.JPG

Hard to see the rivets in this picture, but end piece by the transom. Did spacing every inch for the first 6 or so inches. Then went to every 2 inches. Followed what watterman did on his to make sure it wasn't going to come apart

DSC04109.JPG

Seems I coated with 5200 before riveting together
DSC04105.JPG

Cleaned Up. You can also see all the rivets that I had placed already waiting to pop them. Glad I had a Pneumatic Rivet gun.
DSC04106.JPG

Additional Pic. After poping the rivets you see, I backed out the screws and filled those with rivets as well. As Watermann provided in his guide, I used the 5/32 sized rivets for this. I had a couple 3/16 that I used in certain areas where I went through more than 2 pieces.
DSC04108.JPG

Here is the final trim up of the vinyl after the install of all the rivets.
DSC04111.JPG

Next steps:

Hopefully next weekend I will have the strength work on the boat again, will look at trying to get some trim installed and sanding of the fairing I did.

Until next time

​​​​​​​SHSU
 

Attachments

  • DSC04109.JPG
    DSC04109.JPG
    115.6 KB · Views: 6
  • DSC04108.JPG
    DSC04108.JPG
    116.8 KB · Views: 8

Watermann

Starmada Splash of the Year 2014
Joined
Jan 12, 2013
Messages
13,775
Looking good, from what I see she'll be one to stand the test of time :thumb:
 

No-AH

Petty Officer 1st Class
Joined
Oct 20, 2016
Messages
234
Stay healthy. Really sweet work done SH.....looks great. Nice progress, steady pace works best!
Some members here replaced there rub rails and had good results using webco brand I believe?
 

SHSU

Lieutenant Junior+Starmada Splash Of The Year 2019
Joined
Mar 8, 2017
Messages
1,713
Thanks All,
Feels good to get back out and work on the boat again.

No-AH ,
I will have to look at that. I found some simple 1 inch camper rub rail that I might try. Not sure how robust it is, but might be worth a shot for as cheap as it is.

SHSU
 

astor

2018's Starmada Splash Of The Year.
Joined
Jul 31, 2011
Messages
425
on my 87 SS180 I used wefcorubber.com part number 0101G for the rubber insert. worked great and installed very easily. Boat Rubrail.png
 

Attachments

  • Screen Shot 2019-02-13 at 11.55.13 PM.png
    Screen Shot 2019-02-13 at 11.55.13 PM.png
    9.2 KB · Views: 4
Last edited:

SHSU

Lieutenant Junior+Starmada Splash Of The Year 2019
Joined
Mar 8, 2017
Messages
1,713
on my 87 SS180 I used wefcorubber.com part number 0101G for the rubber insert. worked great and installed very easily.


astor

That is exactly what I was looking for!!I just sent an e-mail off to them for pricing and dimensions. Would like to confirm dimensions before I pull the trigger.

SHSU
 

astor

2018's Starmada Splash Of The Year.
Joined
Jul 31, 2011
Messages
425
I have a couple of feet left over
I can measure and send to you tonight
 

astor

2018's Starmada Splash Of The Year.
Joined
Jul 31, 2011
Messages
425
Click image for larger version  Name:	979F7E0F-640D-43E4-9DFA-1E1BB539C58F.jpeg Views:	1 Size:	1.10 MB ID:	10705655 1" across the bottom
3/8" tall
The "hump" is 3/4" at the widest and 5/8" at the top
hopefully that description makes sense. I know wefco won't send a sample piece, I think they build to order. But if you want a piece PM me your address and I can send the one in the picture in the mail to you
 

SHSU

Lieutenant Junior+Starmada Splash Of The Year 2019
Joined
Mar 8, 2017
Messages
1,713
1" across the bottom
3/8" tall
The "hump" is 3/4" at the widest and 5/8" at the top
hopefully that description makes sense. I know wefco won't send a sample piece, I think they build to order. But if you want a piece PM me your address and I can send the one in the picture in the mail to you

Much appreciate the offer. I e-mailed them and they responded within 2 hours with below info. It matches what you showed and my measurements for the channel make me feel comfortable to move forward.

"The part is 1 1/16" wide X 3/8" tall
$ 3.00 per foot plus shipping.
2 week delivery"

How difficult was it to insert into the channel? Any tricks you used or just pressed it in?

Thanks,

JN
 

astor

2018's Starmada Splash Of The Year.
Joined
Jul 31, 2011
Messages
425
Was easy to install it is much more flexible than the original material
I used a tooth brush to clean the channel out
Had someone push while I pulled with vise grips
I used some dish soap to lube the channel
 

oldrem

Commander
Joined
Nov 7, 2013
Messages
2,002
I slipped one lip into the upper channel then pushed from below with a dull putty knife to pop it in. Took less than 30 minutes for 30ft
 

Watermann

Starmada Splash of the Year 2014
Joined
Jan 12, 2013
Messages
13,775
Their RR insert is rubber rather than vinyl like the original and it does fit a bit looser.
 

SHSU

Lieutenant Junior+Starmada Splash Of The Year 2019
Joined
Mar 8, 2017
Messages
1,713
Thanks all,

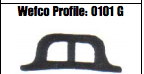
I just put in my order with them for 36 ft of Wefco rub rail 0101G. I measured 34, but always good to have some wiggle room.


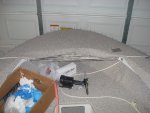
On another note, had a three day weekend so got to work quite a bit on the boat. As always, it takes a lot longer then what was planned to do somethings and didn't get as much done as I wanted, but still progress

Sanding of my fairing. I didn't take a direct picture of after yet, but you will see it in some of the other photos.
DSC04120.JPG

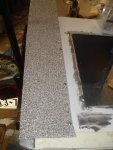
Prepping the rub rail rail for install. Used painters tape to try and make the clean up of 5200 easier.
DSC04122.JPG

Rub rail rail removed to show what will be covered with 5200
DSC04123.JPG

Finished after clean up. Used a complete 10 oz tube to do both sides, but worth it in my opinion. Wont have any water getting behind anything from the gunwales

DSC04124.JPG


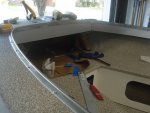
Drilling holes for the Gem Lux cleats I bought, back durring a sale. You can see the jig I created to make drilling precise.
DSC04125.JPG

Epoxied the holes to prevent water intrusion
DSC04127.JPG

Area prepped with painters tape. I covered with tape first then inserted the cleat and cut around it. Clean up was a lot easier.
DSC04128.JPG

5200 squeeze out
DSC04130.JPG

Finished look. You can also see the bracket up from for the Nav light. I installed that with 4200 as I figured that might be replaced in the future if the light fails.
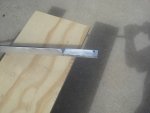
DSC04131.JPG
 

SHSU

Lieutenant Junior+Starmada Splash Of The Year 2019
Joined
Mar 8, 2017
Messages
1,713
Part 2 so I can continue to post pictures

I didn't realize until after i installed the consoles that the inner gunwale trim was also riveted between the edge and the consoles.... So i had to cut out the section would go between the two so it would fit
DSC04132.JPG

Only took one picture, but used my wire brush wheel to clean up all of the trim/rub rail rail prior to install
DSC04134.JPG

Had to cut out a small area on the U front Trim too to make it fit along the console as well
YFOY9150[1].jpg

Screwing down of the front gunwale. I noticed that the front area when I bought the boat was bowed up and again when I did the install. I got some Stainless steel screws and screwed a bunch in to help distrubute the force across the whole board. I used such a long screw and so many because I was going into the plywood edge. You can also see the squeeze out from the 5200 I put in before screwing together.
DSC04136.JPG

Front Trim installed. 5200 and 3/16 rivets used as before

DSC04140.JPG
DSC04141.JPG
DSC04142.JPG

Been looking for T bolts for the windows, and realized I could make my own out of some extra 1/4 SS bolts I had. Made different lengths as I will have to shim some to get the windows level.

DSC04146.JPG

Bolts test fitted into the window
DSC04149.JPG

So that is what I got done this weekend. Have my welder swinging by tonight to look at the boat as well as figure out how to fabricate the front nose, two rear gunwales, and the transom cap.

Next steps is to continue to install windows and trim pieces. Will start doing electrical here shortly....

Until next time

SHSU
 

Attachments

  • DSC04138.JPG
    DSC04138.JPG
    84.8 KB · Views: 8
  • DSC04144.JPG
    DSC04144.JPG
    103.2 KB · Views: 8

Watermann

Starmada Splash of the Year 2014
Joined
Jan 12, 2013
Messages
13,775
Lots going on right there! I do like those snazzy pop up cleats :thumb:
 
Status
Not open for further replies.
Top