1984 Starcraft 16ft Glutton for Punishment [Splashed July 2019]

Status
Not open for further replies.

SHSU

Lieutenant Junior+Starmada Splash Of The Year 2019
Joined
Mar 8, 2017
Messages
1,665
Howdy All,

Got some time over the last couple weekends. Getting really close!!!!

Added a temp sender to the powerhead. Now it won't just be a horn letting me know if there are issues...

DSC04309.JPG

Finished the install of the water/fuel seperator. Also completed the install for the trim tilt control. The extra white wires are for the extra switch I installed in the splashwell
DSC04315.JPG

Switch I installed in the splashwell to control the trim tilt. That way I don't have to walk back and forth between the Control and motor when on the trailer and I need to do something

DSC04312.JPG

Interior of the switch covered in dialetic grease

DSC04313.JPG

Completed wiring the front control panel and installed the steering wheel.

DSC04317.JPG

Installed the antenna for the radio. Used a rubber grommet to run the wire through the gunnel

DSC04318.JPG

Did the final install of the rest of the electronics and motor control.

DSC04326.JPG

Picture of the ugly wiring job I did underneath.... Not nearly as neat as I had hoped... Took me about 5 hours to wire it the first time. Then another hour to redo it into what you see now. I also got to spend an additional 2 1/2 hours troubleshooting a short I had that kept blowing the engine fuse. It would short every time I turned the key switch on for the accessories. Eventually I took the entire console apart to realize I had screwed the fuel gauge bracket to tight (Which is on the ground screw) and had it touching the ignition screw on the gauge... :frusty::frusty::frusty:. Got it all fixed up and now it works just fine

DSC04334.JPG

Now that I had the wiring done. I got to move to the final part of the splashwell... the livewells. I decided I wanted a dedicated overflow in the baitwells.

I found an aerator filter that I had to modify so that the overflow would fit in it.

DSC04320.JPG

Got the admiral to help me with securing the baittanks. Used SS bolts with nyloc and 5200. Used the Tempress system that Watermann used as well. Really a fan of the stuff. Also used the Flowrite aerator head (Not installed as the 5200 still drying). Also installed hose for just an air aerator. That way when I get bait I dont have to wonder if there is enough air in the water until I put in. Finally a light as well for night fishing.

DSC04331.JPG
 

SHSU

Lieutenant Junior+Starmada Splash Of The Year 2019
Joined
Mar 8, 2017
Messages
1,665
Part 2

Picture of aerator installed. It has outputs for two tanks. So I can run both tanks at the same time. I only had one air hose plugged in at the time of picture

DSC04322.JPG

Picture of the splashwell 98% complete. I will probably add some extra foam under the splashwell. Also, undecided on how to cover the access hole. Originally planned on having a cooler sit in front of it, but my measurements were off... So I don't have the room I would want for a cooler and chair at the same time. Still mulling this one over. Exposed wiring is for the livewell lights. Getting a coating of liquid electrical tape.

DSC04332.JPG

Added a fire extinguisher. Never a bad thing to have. Used SS screws and 5200 per the normal MO

DSC04329.JPG

Finshed off the windows by rieting the support bars to the console. Debated for awhile on placement, but in the end this will work. I also installed the Starcraft SS 160 decal that I saved from the tear down

DSC04338.JPG

Have a question for ya'll, but will create another post for it as I want to make sure it is seen.

Hopefully we are only a couple weeks away from splashing!!!!!!

Until next time

SHSU
 

SHSU

Lieutenant Junior+Starmada Splash Of The Year 2019
Joined
Mar 8, 2017
Messages
1,665
Now that the boat is mostly assembled, I noticed that the springs seem to be a little light... What are ya'lls thoughts? I would think they should have more "bow" in them....

DSC04341.JPG
 

sopwithcamel74

Petty Officer 1st Class
Joined
Aug 15, 2018
Messages
203
Phenomenal stuff, man - the fishing-centric mods in particular are really intriguing.
 

Watermann

Starmada Splash of the Year 2014
Joined
Jan 12, 2013
Messages
13,753
How much travel does the tire have before it bottoms out in the fender well?

Hey that's some super nice work on the livewell! :thumb:
 

SHSU

Lieutenant Junior+Starmada Splash Of The Year 2019
Joined
Mar 8, 2017
Messages
1,665
Phenomenal stuff, man - the fishing-centric mods in particular are really intriguing.

Thanks, I didn't like the original splash well as I felt it was weak (couldn't support me if i was climibing in and out of the boat). Plus I felt that it was not a very effective use of space. There was a lot of dead space taht wasn't really being used (minus the flotation foam). In the end, the wife loves to fish and agreed that a run about that we can "play" with the little admiral and still fish out of was the key. Hence why I took on this project vs a center console

How much travel does the tire have before it bottoms out in the fender well?

I have 3 inches to the front, 4 inches at the top and an 1 1/2 to the rear. Will have to remeasure when I put ~10 gallons (~ 63 lbs) in the tank, but don't think that will change anything.
 

classiccat

"Captain" + Starmada Splash Of The Year 2020
Joined
Dec 20, 2010
Messages
3,405
Build is coming out great SHSU! That's some serious attention to detail!
 

66Holiday924

Chief Petty Officer
Joined
Aug 21, 2017
Messages
525
It looks great! Everything! You're doing a hell of a job!

I'd say take a few measurements on the axle, take a closer look at the leaf springs and you should be able to determine the max weight they are rated for. It does look a little light, especially when you figure all your gear and fuel onboard. There's a popular trailer website (yes that one), and if you call them with the measurements, they can probably tell you what it is.

I have an 18' Holiday, I just rebuilt my trailer and went with the 3500# set-up. My boat should weigh somewhere around 2000#, probably a little less, the trailer frame itself weighs around 500#, then you have fuel and gear.
 

Watermann

Starmada Splash of the Year 2014
Joined
Jan 12, 2013
Messages
13,753
Here's a pic of my trailer 3500# axle spring with the boat fully loaded with fuel and 450# Merc.

y4mC2oSOmYvaB0TJBId09hFduQffIYvlzwn-t2tsmJmw-a1CgWHtMvbwm7H2Y4ThHDMwJRUZPaEbWVHRB6o3uJY_4ixTIHoJ1PwCqPo5vphNjz1guoJMRGyKbWSy4aNHngv0gRQW0frAfDgWLQfrpKV0mIyivG5Cn18fZax1ihrVPrJhb9I2Vn6noklC51aclig4vx9Ditiu4GnwwMOXteW6Q
 

SHSU

Lieutenant Junior+Starmada Splash Of The Year 2019
Joined
Mar 8, 2017
Messages
1,665
66Holiday924 / Watermann

Thanks guys. I agree I think they look a little light too. The picture really helps. That looks like a normal leaf spring to me. The ones I have are either just under or right at their limit... I probably could get away with it for now, but will look at upgrading. I am pretty sure I got 1750 lb leaf springs when I did the rebuild (Can't find my order to confirm...). Think I will be upgrading to 3000 lb. I will still have enough weight for them to do their job, but also not way overkill.... That will also mean I need to upgrade my tires.... LOL Just another thing to add to the list
 

SHSU

Lieutenant Junior+Starmada Splash Of The Year 2019
Joined
Mar 8, 2017
Messages
1,665
Yeah but then you could get some really nice aluminum rims! Basically everybody who has seen my trailer has complimented mine, even random people at the ramp.

That is because its a hell of a trailer!!!!

As for mine, I looked at my tire rating and I am good as they are rated for 1300 lb a piece or 2600 lb total. So I just need to upgrade the springs as I progress
 

SHSU

Lieutenant Junior+Starmada Splash Of The Year 2019
Joined
Mar 8, 2017
Messages
1,665
More work and pics

Drilled and installed a Magnesium anode on the skeg of the motor. Verified I showed grounding from the motor to the Hull
DSC04342.JPG

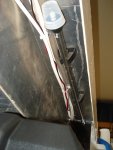
Installed the cap on to the EZ Fill pickup I added for the livewells. Reading up on it, I also drilled a hole in the top to allow air out. Read that an air bubble can form preventing the pickup from actually getting any water. You can also see how much the white has yellowed on the Fasco Epoxy. Still happy with the stuff and the blue still looks good. Just the white doesn't hold the color.

DSC04343.JPG

Did final install of the fire extinguisher. You can see it just barley fits under the front deck when the fishing platform is installed

DSC04344.JPGDSC04347.JPG

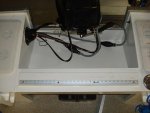
Livewell complete with everything installed
DSC04348.JPG

Before ya'll tell me I have the steering guard on the wrong rod, I know. I tried it on the correct rod, but it wouldn't stay and kept coming loose. No good way to secure it to the motor end. Also, it reduced turning by about an inch and a half. So I just moved it to cover the top arm... Figured since I had it might as well use it.
DSC04350.JPG

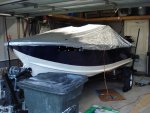
Pulled out of the garage and getting ready to go for a road trip to the wash and get gas. Actually looks like a boat and neighbors came over to comment and congratulate me on finally completing it. Think they are just tired of hearing me banging away on stuff. I know they were happy when the Admiral and I finished riveting the boat.!!!!.

DSC04355.JPG

Transom saver installed. Side note, debating on how I will do it for the kicker, if I will do a transom saver or just use a strap and pull it up tight. I have read quite a bit and see arguments for both sides. I just can't fathom taking the kicker on and off each time I go out....

DSC04356.JPG

Pic at the Car wash. Got a couple strange looks, but that is OK. This is the most water she has seen since when I did the hull leak test a year and a half ago...
DSC04358.JPG

Drove up the road to Bucky's (for those in the south) and picked up some ethanol free gas. She only held 9 gallons of gas/oil/seafoam... I was hoping for a little over 10 but can't complain. On later examination, I think the way the gas tank is positioned and how the tongue sits, the front of the boat is low, so when I fill all the gas shifts to the front and I may have extra space. I will have to test that when I take her out and filler her up again

DSC04359.JPG

So after filling her up and bring her back home. I took a look at the springs and am really not happy with what I see. So I went ahead and picked up some 3500lb rated springs and started to work on those. Sanded the new ones down and added some primer and new paint to keep them in better shape then the factory paint.

DSC04360.JPGDSC04362.JPG

So finally, I tried to start her up last weekend. The gas tank and lines worked great!!!!.

But when I started her up with the warm up throttle fully pushed forward she immediately started up and ran away from me..... I immediately killed it with the key switch and couldn't get her to start back up again..... So now I am chasing electrical issues on the engine. Confirmed that one of the coils was bad so decided might as well replace the three coils, the power pack and the rectifier.

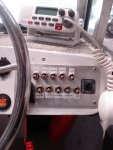
Also, I was trying to figure out why I was having so many issues with the gauges and their extreme readings. I decided to measure the voltage at the controller and found I am getting 28 volts from a 12 volt system!!!!! Confirmed the battery is delivering only 12 volts, so I am not sure where on the motor the voltage is getting stepped up. But going to have to figure that out before I do anything else....

For those that want to help or have any suggestions on what to looks for, it is a Evinrude 70 hp (70473m)

Pic of the console torn apart while trying to figure this out...

DSC04361.JPG

Until next time

SHSU
 

Watermann

Starmada Splash of the Year 2014
Joined
Jan 12, 2013
Messages
13,753
Oh yeah boat looks great out in the sun :thumb:

Couple things,

The trim tab anode should not be painted or it won't work as it's supposed to and give itself up like it should.

The rectifier on the motor is not really a voltage regulator and will put out voltage way above wheat's healthy for your battery and electronics on board. I replaced the rectifier on my 140 Merc that hit 16v with a voltage regulator so at max it kicks out 13.8v from the 9 amp stator.
 

SHSU

Lieutenant Junior+Starmada Splash Of The Year 2019
Joined
Mar 8, 2017
Messages
1,665
Thanks Watermann. Good point on the annode, was going to paint it until i read on multiple threads not too.

Also, figured out my voltage issue. Talked with my dad (Electrical Engineer) and he pointed out that I might ahve used the AC setting instead of the DC when I was checking the voltage.... Well I went back and tested again and got a perfect 12.4!!!! So I am a happy camper. It was just me and I had my wires backwards. From that I figured out I had my ground and live wires backwards on the gauges... That is what was causing all the extreme readings. Once I fixed that they responded like they should.
 

SHSU

Lieutenant Junior+Starmada Splash Of The Year 2019
Joined
Mar 8, 2017
Messages
1,665
I am hoping this is my last update before putting her in the water!!!!!!

I was not happy with the way the springs looked and upgraded to 3500lb rated springs. Much better looking
DSC04363.JPG

Plenty of clearance now. When I get in and out it doesn't feel like a water bed anymore....
DSC04364.JPG


As posted before, had engine trouble and had to replace some parts. As I hadn't replaced them during the original rebuild I went ahead and replaced the coils, rectifier, and power pack. You can see the damage on the rectifier.
DSC04373.JPG

Once I replaced everything, she fired right up!!!!! Now I just have to try her out on the water.
DSC04376.JPG

All the gauges are working as well!!!! After all the issues I had with the electrical, glad these are working now
DSC04378.JPG

Installed a bait cutting board and aluminum ruler by the splashwell so we will always be able to measure quickly and cut bait when we go out.

DSC04381.JPG

Installed a Panther bolt gaurd
DSC04393.JPG

I replaced the bolt clamps as the original ones were bent really bad and you couldn't tighten them down. I had to get creative and made my own "feet" for them with nylon lock washers.
DSC04394.JPG

As I don't think I will be trying to take this motor on and off, I am debating on using the strap method to keep the kicker in place while traveling. Got it ratcheted pretty tight between an eye and a main motor bolt, but still debating. Thoughts anyone?????

DSC04392.JPG


As mentioned at the beginning, hoping this is the last post before we splash her!!!! Its been a fun 2 and 1/2 years. Never thought it would take this long.

Until next time

SHSU
 

Attachments

  • DSC04386.JPG
    DSC04386.JPG
    81.2 KB · Views: 10
  • DSC04387.JPG
    DSC04387.JPG
    91.9 KB · Views: 11
  • DSC04389.JPG
    DSC04389.JPG
    102.3 KB · Views: 11
  • DSC04390.JPG
    DSC04390.JPG
    108.7 KB · Views: 14

bchaney

Petty Officer 1st Class
Joined
Jul 3, 2018
Messages
246
The ratchet strap seems like a good way to prevent the motor from bouncing around while trailering, which is effectively what a transom saver does except your motor is in a more vertical position which is what most manufacturers recommend anyway.
 

Watermann

Starmada Splash of the Year 2014
Joined
Jan 12, 2013
Messages
13,753
Oh yeah she looks great! I'll be looking forward to some on the water pics/vid. :joyous:
 
Status
Not open for further replies.
Top