1982 Starcraft Center Console 18' Rebuild

SHSU

Lieutenant Junior+Starmada Splash Of The Year 2019
Joined
Mar 8, 2017
Messages
1,725
I have a few patches that need to be made on spots that are curved, what is the best way to form the patch to the contour of the hull. I assume with a hammer but would I want to use a metal hammer, a rubber hammer, any other kind of hammer? They're going to be small patches probably 3"x3"and maybe a few that are a little bit bigger. I just don't want to do any damage to the metal underneath

I used a rubber mallet. Most of the forming I did off the hull. I would test it, see where I needed to bang it some more and go back and forth. Plus if the patch is exterior and you are underneath trying to hammer up, doesn't sound effective or fun...

SHSU
 

Watermann

Starmada Splash of the Year 2014
Joined
Jan 12, 2013
Messages
13,787
Guys with deep corrosion pitting have used the acid but I don't know about using it for surface prep before painting, never have heard of anyone using it for that. I used a palm sander over the entire surface area with 220g to break the smooth surface tension on the AL prior to painting. I hate sanding so anything would be better if it works out the same.
 

Hodgey4489

Cadet
Joined
Dec 14, 2020
Messages
28
Got quite a few rivets done today, it's slow going but at least it's still going. I don't know if you guys remember probably a few pages back I mentioned that on the seams if I used all brazier head rivets that the heads would overlap each other and wouldn't sit flush. My solution to this was to alternate every other rivet between brazier head and modified brazier head rivets because the modifieds have a smaller head diameter. You can see in the picture below that the rivet circled in red and all the rivets in line with it are normal brazier head and the rivet circled in green and all the ones in line with it are modified brazier heads. This worked really well and doesn't look like it doesn't belong which is what I was worried about.
View attachment 332456

I also got the 4 ribs in the bow and the first rib in the floor taken off so I can clean them up and get all the crud out from underneath them. No pics of this though as I forgot and I'm to lazy to go downstairs to take one. Going to order some metal for patches online as well as the angle aluminum for the knee brace tabs because you can buy almost the same metal that starcraft uses from the big online shopping giant for a very reasonable price....Starcraft uses 5052 H34 aluminum according to their website and you can buy 5052 H32 online, I don't think the angle is the same but I'm not worried about it.
Mikesta,

I am working on rivets now on my late 80’s super sport. I am trying to figure out what rivets were used originally and I’ve come to the conclusion that they’re 3/16 modified brazier head. Does this seem right? After reading the rivets sticky I was under the impression they were going to be 3/16 brazier, not modified brazier.
 

Mikesta

Petty Officer 3rd Class
Joined
Mar 15, 2018
Messages
86
Mikesta,

I am working on rivets now on my late 80’s super sport. I am trying to figure out what rivets were used originally and I’ve come to the conclusion that they’re 3/16 modified brazier head. Does this seem right? After reading the rivets sticky I was under the impression they were going to be 3/16 brazier, not modified brazier.
I've been using both, I'm pretty sure from starcraft they're all brazier head. Along the panel seems where the rivets are staggered I have had to alternate between brazier and modified brazier because the heads on the modifieds overlap in some spots so they don't sit flush. Where there is enough room without over lapping I use just the modified. For what ever reason the holes along the seems aren't all spaced evenly. They're all 3/16 except where there is an oblonged hole I'll drill it out to 1/4" and use a 1/4" rivet
 

Watermann

Starmada Splash of the Year 2014
Joined
Jan 12, 2013
Messages
13,787
I've been using both, I'm pretty sure from starcraft they're all brazier head. Along the panel seems where the rivets are staggered I have had to alternate between brazier and modified brazier because the heads on the modifieds overlap in some spots so they don't sit flush. Where there is enough room without over lapping I use just the modified. For what ever reason the holes along the seems aren't all spaced evenly. They're all 3/16 except where there is an oblonged hole I'll drill it out to 1/4" and use a 1/4" rivet
The modified brazier heads are the more narrow of the brazier heads.
Modified brazier in 3/16 dia has a head dia of .390 while the brazier is .469.

@Hodgey4489 It's only going to possibly matter which you use brazier or mod brazier when working on replacing close together rivets in the seams and then depending on the boat size. You just need to have the right rivet set for each type but when replacing rivets out in the field that .079 matters not. Personally I give the brazier head the nod for being more robust with added head material in diameter and thickness.

Hope that makes sense.
 

Mikesta

Petty Officer 3rd Class
Joined
Mar 15, 2018
Messages
86
The modified brazier heads are the more narrow of the brazier heads.
Modified brazier in 3/16 dia has a head dia of .390 while the brazier is .469.

@Hodgey4489 It's only going to possibly matter which you use brazier or mod brazier when working on replacing close together rivets in the seams and then depending on the boat size. You just need to have the right rivet set for each type but when replacing rivets out in the field that .079 matters not. Personally I give the brazier head the nod for being more robust with added head material in diameter and thickness.

Hope that makes sense.
Sorry I had it backwards!! You are right...good catch. And I agree the modifieds (bigger head) are better to use everywhere where space isnt a limiting factor
 

Hodgey4489

Cadet
Joined
Dec 14, 2020
Messages
28
The modified brazier heads are the more narrow of the brazier heads.
Modified brazier in 3/16 dia has a head dia of .390 while the brazier is .469.

@Hodgey4489 It's only going to possibly matter which you use brazier or mod brazier when working on replacing close together rivets in the seams and then depending on the boat size. You just need to have the right rivet set for each type but when replacing rivets out in the field that .079 matters not. Personally I give the brazier head the nod for being more robust with added head material in diameter and thickness.

Hope that makes sense.
It makes perfect sense. I’ve drilled out a few rivets (testing the waters) I used a 5/32 drill bit. My 3/16 bit won’t fit into the holes. Is it crazy that most of my rivets are 5/32? At least along the seams they’re all 5/32. I found a few 3/16 where there are 3 pieces of metal being fastened.
I really appreciate your expertise and willingness to help!
 

Mikesta

Petty Officer 3rd Class
Joined
Mar 15, 2018
Messages
86
I'm finally back after one of the most chaotic years of my life, not much has gotten done to the boat in the past year due to time restraints and my riveting partner (dad) being laid up all summer with a broken ankle but I'm slowly starting to get back into it.

I think the last update I gave you guys I mentioned that I took the 4 ribs in the bow and the first rib that runs side to side out of the boat.... I got them all cleaned up, dremeled out any bits of corrosion I saw and ready to go back in the boat. I skimmed all pitting on the hull with jb weld and sanded smooth. very happy with how it came out

The main bow seam is mostly riveted except for the few that are blocked by the trailer. I have to figure out what I'm going to do with bow eye. It was riveted in from the factory but the heads of the rivets are gone, the tails are still in and it's still in place very securely but I can't leave it like that. I'm thinking about using bolts instead of rivets for that, any input on that idea would be appreciated

The main seams that run from bow to stern are riveted on both sides of the boat from that first rib to the front of the boat. My neighbors were probably ready to kill me after listening to a few hours of rivets being hammered

I also got the rubrail brackets that attach directly to hull put back on, its the "C" shaped bracket that the gunnel tops attach to and the actual channel bracket that holds the rubber rub rail attach to. I'm not really sure what you guys call them. Boy was it a lot of dremeling on the inside of the bracket to get all the corrosion out. Luckily I kind of like dremeling the corrosion out, I have a nice comfortable work station set up and I found a dremel bit that doesn't really harm the good aluminum as long as you keep if moving but it rips through the white powdery corrosion very quickly.

I'm trying to break it up into small sections so that the boat doesn't get to flimsy. I figure after I put the bow section back together I'll take out 2 or 3 more ribs and start the process all over..... No pics of anything right now because there isn't really anything thats been done that is picture worthy
 

classiccat

"Captain" + Starmada Splash Of The Year 2020
Joined
Dec 20, 2010
Messages
3,412
welcome back @Mikesta ! Yeah that dremel bit is a corrosion killa. Tough call on that bow eye. Are they 1/4" rivets?
 

roscoe

Supreme Mariner
Joined
Oct 30, 2002
Messages
21,739
Something to think about.
I added a second bow eye to my 1981 MR180.

It makes for an easier way to connect the safety chain on the trailer.

It also works well for the bow line when launching and loading, since there are no cleats available. I just drilled, inserted, sealed, added backing plate, and bolted it down.


bb - 1.jpeg
 

Mikesta

Petty Officer 3rd Class
Joined
Mar 15, 2018
Messages
86
The rivets have been flying the past few days, the entire bow section is cleaned up and riveted back together with the exception of a few rivets. I'm waiting on a package of longer rivets (1/2" for the sections where there's 3 sheets of aluminum plus the layer of foam in between) to finish up like 8 rivets in the bow. Also have to go back to rehammer a few because my breaker tripper and I didn't realize I was low on air pressure so some of the rivets look like they could use a few more bangs. I find my gun works best at 60psi, anything below 50psi makes a very noticeable difference in how they come out.

-A couple things I'm still trying to figure out...What size rivets to use to replace the bow eye, I could use bolts but I think I'd rather just rivet it
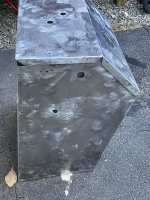
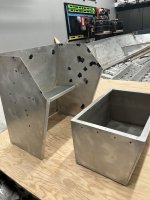
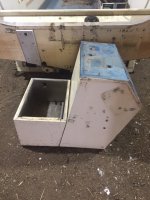
- what to do with all the holes in the console, Patch over them? try to JB weld them?

No pics yet but I have the entire weekend off of work so I'll get a few to show my progress
 

Mikesta

Petty Officer 3rd Class
Joined
Mar 15, 2018
Messages
86
One other question is when I go to attach the 3 floor supports to the ribs should I be using open end or closed end rivets? I'm thinking open so that any water that gets in them will just drain out but figured I'd ask the experts before I order anything
 

BWR1953

Admiral
Joined
Jan 23, 2009
Messages
6,178
The rivets have been flying the past few days, the entire bow section is cleaned up and riveted back together with the exception of a few rivets. I'm waiting on a package of longer rivets (1/2" for the sections where there's 3 sheets of aluminum plus the layer of foam in between) to finish up like 8 rivets in the bow. Also have to go back to rehammer a few because my breaker tripper and I didn't realize I was low on air pressure so some of the rivets look like they could use a few more bangs. I find my gun works best at 60psi, anything below 50psi makes a very noticeable difference in how they come out.

-A couple things I'm still trying to figure out...What size rivets to use to replace the bow eye, I could use bolts but I think I'd rather just rivet it
- what to do with all the holes in the console, Patch over them? try to JB weld them?

No pics yet but I have the entire weekend off of work so I'll get a few to show my progress
I'd use stainless bolts with a solid backing plate for the bow eye.

I patched holes in my KF with JB WaterWeld.
 

BWR1953

Admiral
Joined
Jan 23, 2009
Messages
6,178
One other question is when I go to attach the 3 floor supports to the ribs should I be using open end or closed end rivets? I'm thinking open so that any water that gets in them will just drain out but figured I'd ask the experts before I order anything
Most here use large flange aluminum blind rivets, then seal them up along with everything else concerning the deck. I sure did.
 

MNhunter1

Lieutenant Junior Grade
Joined
May 12, 2014
Messages
1,053
One other question is when I go to attach the 3 floor supports to the ribs should I be using open end or closed end rivets? I'm thinking open so that any water that gets in them will just drain out but figured I'd ask the experts before I order anything
Blinds are fine for the stringer to rib attachment. No need to worry about sealing anything up as there is nothing penetrating the hull.

As BWR1953 noted, many use the large flange blinds for the deck attachment, but standard blinds are fine for the stringer to rib attachment and probably even better due to fitment/space.
 

Mikesta

Petty Officer 3rd Class
Joined
Mar 15, 2018
Messages
86
Here are some less than ideal pictures for you guys, tried to snap a few before the rain came in.

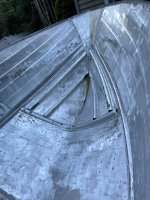
The bow section all cleaned up except for a few rivets near where the original yellow sealant is. The black stuff is the jb weld sanded smooth except for on the ribs (I forgot). It starting to streak down the boat from left exposed to the elements but I don't think it will cause a problem when it comes time to paint or anything. Also the next two ribs are taken off the hull, just have to clean up some pitting on the hull then they can go back in
37.jpg


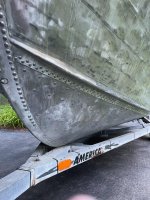
Just a pic of the outside of the bow section. Not sure what the streaking is on this side of the hull. If you look close you can see where I did some experimenting with some different rivets. The 1/4" brazier heads I didn't like because the heads are significantly larger than the 3/16" rivets, ended up getting some 1/4" modified brazier rivets and the head is the same size as the 3/16" brazier head rivets
38.jpg

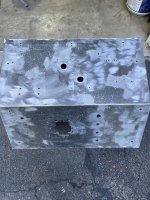
I didn't even know they made enough boat accessories to be bolted to this many holes in the console. I guess I'll tape over the back of the holes and then fill them with some jb weld unless anyone else has any better options. I picked up one of the cheapo harbor freight paint sprayers that I plan on testing on the console once she's riveted back together
39.jpg

40.jpg
 

BWR1953

Admiral
Joined
Jan 23, 2009
Messages
6,178
Dang, I wish I'd known about the modified brazier head rivets being the same size as a regular 3/16" head. I paid $20 for the rivet setter to match the larger head size. 😏

That sure is a lot of console holes! 😲
 

MNhunter1

Lieutenant Junior Grade
Joined
May 12, 2014
Messages
1,053
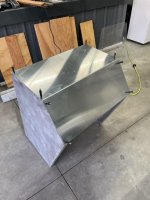
Yeah, so many holes... I did the Marine Tex patch work on the console sides and re-skinned the top with some new aluminum. The original top was wrapped in vinyl, so depending on your plan, that could cover a lot as well. Little trick I use with the MT or JB when patching holes is to slap some wax paper on both sides. I just use the blue painters tape to afix the wax paper on the finished side, add the fill, then just stick another piece of the wax paper on the back side where the MT or JB just holds it in place. Sand down the finished side after it cures and leave the back side in the rough if it's not going to be visible, otherwise that gets sanded too. I've used the JB Marine Weld putty as well, just tend to personally prefer the MT if I have enough there to mix up a batch.

Console_MT.jpegConsole2.jpgIMG_9776.JPG
 

Watermann

Starmada Splash of the Year 2014
Joined
Jan 12, 2013
Messages
13,787
Oh man, there's more proof positive that anyone can own a drill but that some shouldn't. :rolleyes:
 
Top